Back to Event Manager Main Menu

Login and navigation

*Note: If your organization is using SSO (single sign on) for user authentication, your login experience may be different. If you are having difficulty logging in using SSO or you are unsure whether your organization utilizes SSO for their Dude Solutions products, please contact your technology help desk for assistance.

Watch the video tutorial:

How to log in

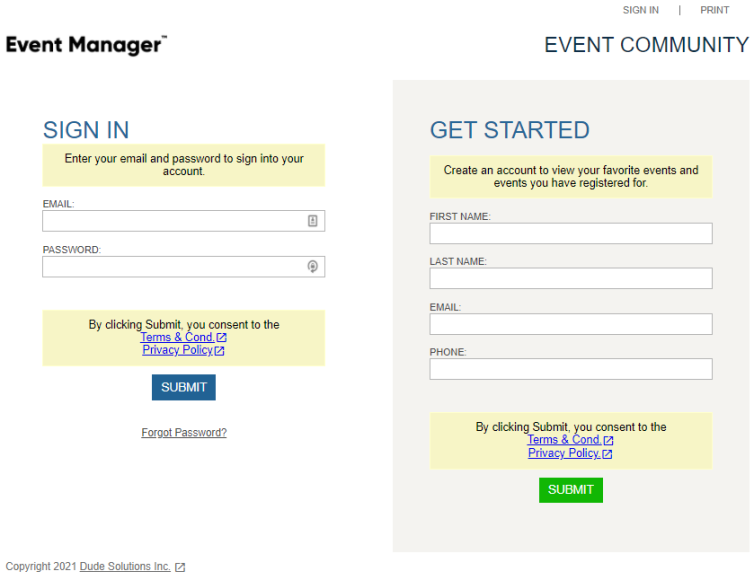
  1. From a site's public calendar, click the Sign In link. Bookmark this page or create a shortcut on your desktop to make it easy to come back to this page later. *Note: If you do not have the link to the public calendar, contact your Administrator or check your organization's website for the link.
  2. Enter your Email address.
  3. Enter your Password.
  4. Click the Submit button.


Resetting your password

  1. From the login page, click the Forgot Password? link.
  2. Enter your Email address.
  3. Click the Send Reset Password Email button. An email with a link to reset your password will be sent to you.
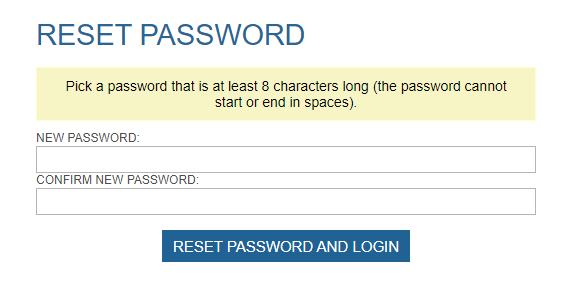
  4. Check your email for the link.
  5. Click the Reset Password button in the email, click the hyperlink, or copy and paste the link into the address bar of your preferred web browser.


  1. Enter your New Password. *Note: Passwords must be at least 8 characters in length and contain a number or a special character.
  2. Enter the new password again in the Confirm New Password field.
  3. Click the Reset Password and Login button to finalize the changes. You will be logged into Event Manager automatically.


Event Manager dashboard

The Dashboard acts as your homepage in Event Manager and will give you a quick view of upcoming events, registration information, and events that need approval. *Note: Only Tenant Administrators will see this dashboard upon entering Event Manager. Site Administrators and Requesters will see the event list by default.


Side bar navigation

  • Create an Event: Click this button to quickly begin creating an event request. *Note: If this button is grayed out, contact your system administrator for assistance.
  • View Public Calendar: The Public Calendar displays all published events marked as public for this site and provides a way for non-users of Event Manager to access event information.
  • Events: Click this menu option to expand the Events menu. From here, you can access the Pending Events list to approve pending events, or the Events List if you would like to view events that have already been approved.
  • Reports: Click this menu option to open the Reporting page, where you can report on different aspects of your Event Manager account.
  • Invoices: Click this menu option to select one of the available sub-menu options. *Note: The Invoices menu option will only be displayed if you are a client with a Professional or Premium Event Manager license.
    • Invoice List: This page displays your full list of invoices in Event Manager and can be filtered and searched as needed. You can also create invoices manually from this page.
    • Payment List: This page displays the full list of payments and refunds in Event Manager and can be filtered and searched as needed. You can also create payments and refunds for invoices manually from this page.
  • Tasks: Click this menu option to navigate to the Task List, which can be filtered and searched as needed. You can create standalone tasks or tasks for events manually from this page. *Note: This menu option will only be displayed if you are a client with a Professional or Premium Event Manager license.
  • Surveys: Click this menu option to select one of the available sub-menu options.
    • Dashboard: This page displays your list of surveys as well as aggregated data from Saved Questions. You can add new surveys, as well as manage existing surveys and view their results.
    • Templates: This page displays any templates that have been created from a survey. These templates can be viewed, edited, or archived if necessary.
    • Question Library: This page displays any saved questions that have been created from a survey. You can view the individual responses to a question and archive questions if necessary.
    • Reports: This page displays survey metrics and allows you to export or print a report that summarizes the information.
  • Settings: Click this menu option to navigate to the Event Manager Settings page, where many different options can be configured. This includes Site Administration, Calendar Settings, Advanced Settings, and Global Administration. *Note: The Settings available on this page depend on your permissions within Event Manager.
  • Help: Click this menu option to navigate to the Event Manager help site.
  • My Profile: Click this menu option to configure personal settings such as email notification settings and personal information.
  • Log Out: Click this menu option to log out of Event Manager.

Switching sites

The Site you are currently logged into within Event Manager is always displayed in the top right hand corner, regardless of the page you are on. The name of the user that is logged into Event Manager is displayed to the left of the site drop-down menu.


To switch sites:

  1. Click the down arrow to open the list of sites. *Note: You will only see sites you have access to in the drop-down menu. If you need to access additional sites, please contact a tenant administrator within your organization.
  2. Select the appropriate site. Event Manager will refresh with the site's information.