Back to Event Manager Main Menu
Viewing the Calendar
Once events have been created and approved in Event Manager, they will display on the appropriate calendar. The calendar can be viewed by both users that have signed in and members of your organization without an Event Manager account. The calendar has three distinct View Types: List View, Grid View, and Summary View. In addition to just viewing the calendar, you can also share and subscribe to it.
Navigating to the Calendar
- If you are an Event Manager user with an account, be sure you are logged in.
- Select the Site whose calendar you would like to view from the drop-down menu in the top right hand corner of your screen.
- Click on View Public Calendar from the navigation menu.
- If you are not a user in Event Manager, you may have received a link to the calendar from someone within your organization or found the link on the organization's website.
Calendar Views
Each of the three calendar views has particular advantages that you can make use of when searching for or viewing events.
Summary View
The Summary View displays your events in ascending order while prominently featuring the event summary and primary image uploaded for the event. This view also displays the event location and links to Email, Remind, Favorite, and Add to Calendar.
- From the calendar, click on the Summary View icon (
 ).
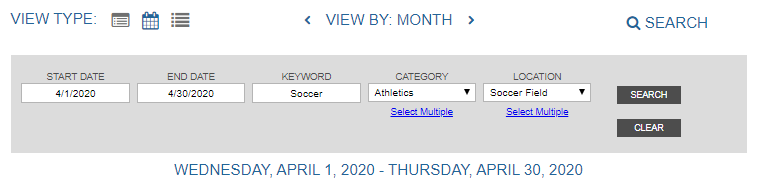
). - If you would like to select a different range of time to view, click on View By: Month. This will expand a drop-down menu that allows you to select a different range of time, such as Week or Next 30.
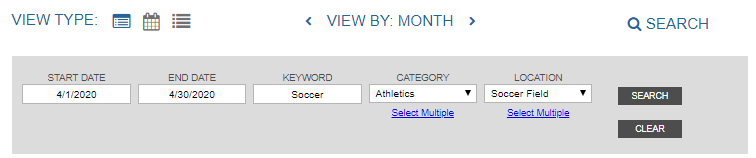
- If you would like to narrow the events that display, click Search. This will expand a panel with several possible filters to search by.
- Use the Start Date, End Date, Keyword, Category, and Location fields to filter your search.
- Click Search to refine the results on the calendar.
- Click Clear to return the calendar to its default view.
Event Details on the Summary View
- The Event Name, Event Description, Date, Time, and Location will all display on the Summary View of the calendar.
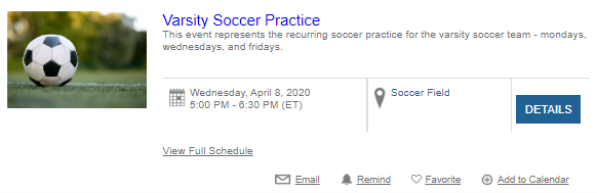
- If you need more information, click the Details button to open the summary of an event in a new page. You will be able to view additional information such as the event contact and custom questions on this page.
- Once you're done, click Back to Events to return to the calendar.
- If an event is part of a series, you can click View Full Schedule to open the summary of the full event series in a new page.
- Once you're done, click Back to Events to return to the calendar.
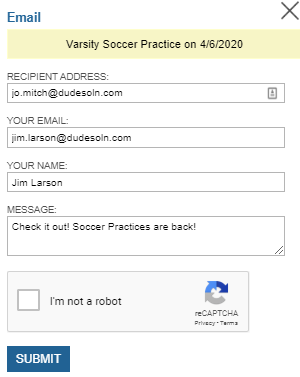
- Click Email to expand a side panel that will allow you to email an event to a recipient.
- Enter a Recipient Address. *Note: This must be a valid email address if you want the recipient to receive the event details.
- Enter Your Email, Your Name, and a Message to display for the recipient of the email.
- Complete the reCaptcha validation check.
- Click Submit.
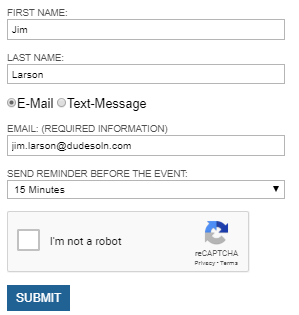
- Click Remind to expand a side panel that will allow you to receive a reminder about an event.
- Enter your First Name and Last Name.
- Select either E-Mail or Text-Message.
- If you selected E-Mail, enter your Email. *Note: This is a required field if E-Mail was selected.
- If you selected Text-Message, enter your Wireless Number and select your Wireless Carrier. *Note: These are required fields if Text-Message was selected.
- Select a time relative to the event to receive the reminder from the Send Reminder Before the Event drop-down menu.
- Complete the reCaptcha validation check.
- Click Submit.
- Click Favorite if you'd like to add an event to your list of favorite events. *Note: This will display under My Favorites in the My Events tab on your My Profile page. This requires you to be a user in Event Manager.
- Click Add to Calendar if you would like to download an event as an iCal file and add it to an external calendar.
Grid View
The Grid View is a traditional calendar grid with rows and columns representing days of the month. This is the simplest calendar view and is useful for getting a quick bird's-eye view of the events happening for the site whose calendar you are viewing.
- From the calendar, click on the Grid View icon (
 ).
). - If you would like to select a different range of time to view, click on View By: Month. This will expand a drop-down menu that allows you to select a different range of time, such as Week or Next 30.
-
If you would like to narrow the events that display, click Search. This will expand a panel with several possible filters to search by.
- Use the Start Date, End Date, Keyword, Category, and Location fields to filter your search.
- Click Search to refine the results on the calendar.
- Click Clear to return the calendar to its default view.
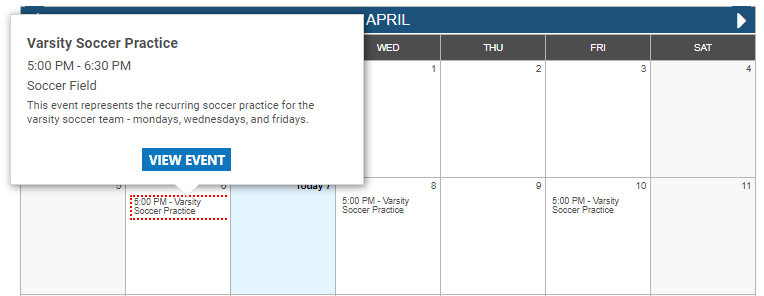
- Click on an event on the grid to open a panel displaying the Event Name, Time, Location, and Event Description.
- Click View Event to open the summary of an event in a new page. You will be able to view additional information such as the event contact and custom questions on this page. Once you're done, click Back to Events to return to the calendar.
List View
The List View displays your events in ascending order and only displays the event name, event date, and event time. This view also displays icons to share the event via Facebook, Twitter, or Email, as well as to Favorite the event.
- From the calendar, click on the List View icon (
 ).
). -
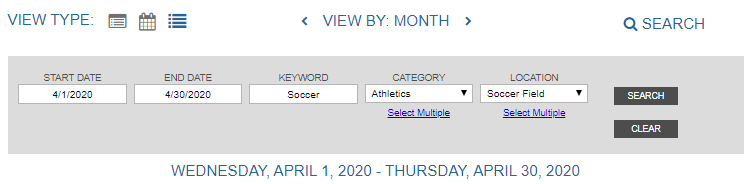
If you would like to select a different range of time to view, click on View By: Month. This will expand a drop-down menu that allows you to select a different range of time, such as Week or Next 30.
-
If you would like to narrow the events that display, click Search. This will expand a panel with several possible filters to search by.
- Use the Start Date, End Date, Keyword, Category, and Location fields to filter your search.
- Click Search to refine the results on the calendar.
- Click Clear to return the calendar to its default view.
Event details On the Summary View
- The Event Name, Date, and Time will all display on the Summary View of the calendar.
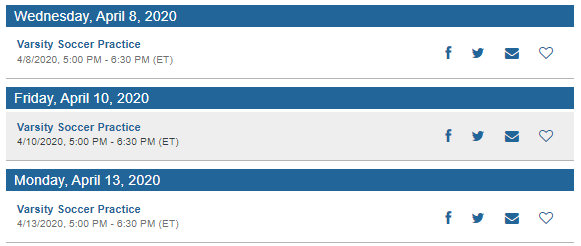
- Click on the Event Name to open the summary of an event in a new page. You will be able to view additional information such as the location, event contact and custom questions on this page. Once you're done, click Back to Events to return to the calendar.
- Click on the Facebook icon (
 ) to share a link for this event to Facebook. *Note: You will need to log in to Facebook to complete this action.
 - Click on the Twitter icon (
 ) to share a link for this event to Twitter. *Note: You will need to log in to Twitter to complete this action.
 - Click on the Email icon (
 ) to expand a side panel that will allow you to email an event to a recipient.
- Enter a Recipient Address. *Note: This must be a valid email address if you want the recipient to receive the event details.
- Enter your email address in the Your Email field.
- Enter Your Name.
- Enter a Message to display for the recipient of the email.
- Complete the reCaptcha validation check.
- Click Submit.
- Click on the Favorite icon (
 ) if you would like to add an event to your list of favorite events. *Note: This will display under My Favorites in the My Events tab on your My Profile page. This requires you to be a user in Event Manager.
How to Subscribe to the Calendar
- Navigate to either the List or Summary View on the calendar.
- There are multiple options to Subscribe to this calendar:
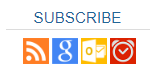
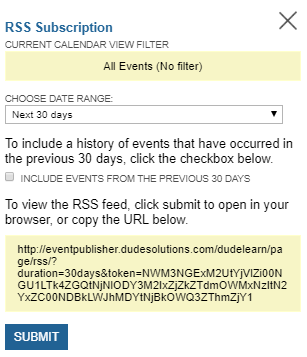
RSS
- Click the RSS icon (
 ) to expand a side panel where you can set up an RSS Feed share of this calendar.
 - Select the desired date range to display in your feed from the Choose Date Range drop-down menu.
- If you would like to include a history of events that occurred in the last 30 days, check the Include Events From The Previous 30 Days box.
- Click Submit to view the RSS Feed in your web browser, or copy the provided URL to an RSS reader if you have one.
Google Calendar
- Click the Google icon (
 ) to navigate to your Google calendar and add this calendar. *Note: If you are not logged in to Google Calendar, you will need to do so to finish this action.
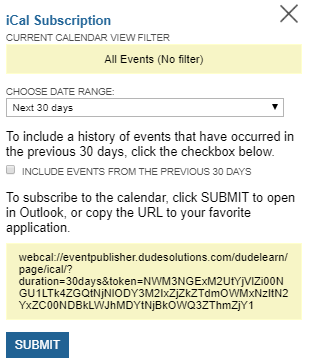
iCal
- Click the iCal icon (
 ) to expand a side panel where you can set up an iCal share of this calendar.
 - Select the desired date range to display in your iCal share from the Choose Date Range drop-down menu.
- If you would like to include a history of events that occurred in the last 30 days, check the Include Events From The Previous 30 Days box.
- Click Submit to view the iCal share in Outlook, or copy the provided URL to the desired calendar application.
Email Notifications:
- Click the Email Notification icon (
 ) to expand a side panel where you can set up email notifications for this calendar.
 - Enter the Email Address where you would like to receive calendar notifications. *Note: This must be a valid email address if you want to receive the event details.
- Complete the reCaptcha validation check.
- Click Submit to finalize the changes.

