Creating a license
The Licensing module in SmartGov allows you to create various types of licenses based on the License Types configured by your jurisdiction. If your jurisdiction is utilizing the Citizen Portal, many of your license applications may come from citizens applying online. This guide will walk you through how to create a license from within SmartGov.
How to create a license
- Click Licensing from the navigation menu.
- Click Create License.
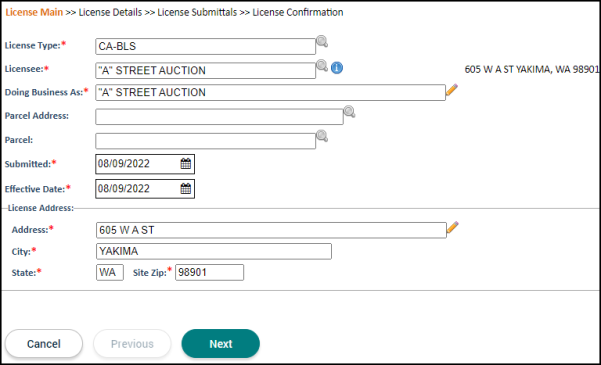
License main
- Begin typing or click the magnifying glass icon (
 ) to select the License Type.
 - Select the Applicant Type.
- If Contact is selected, begin typing or click the magnifying glass icon () to select the Licensee. *Note: This will automatically populate the Doing Business As and Site Address fields.
- If Business is selected, begin typing or click the magnifying glass icon () to select the Business Account. *Note: This will automatically populate the Doing Business As and Site Address fields. This option will only display if the Business feature has been enabled.
- If Contact is selected, begin typing or click the magnifying glass icon (
- Begin typing or click the magnifying glass icon () to select the Parcel Address or the Parcel, if applicable.
- The Submitted and Effective Date fields will populate with the current date. Update as needed.
- The Site Address section will populate with the address information associated with the Licensee. Adjust these fields as necessary.
- If this is a business license or has an Applicant Type of Business, select if SmartGov should Send bill and renewal notices to this address and/or Send certificates to this address.
- Click Next.
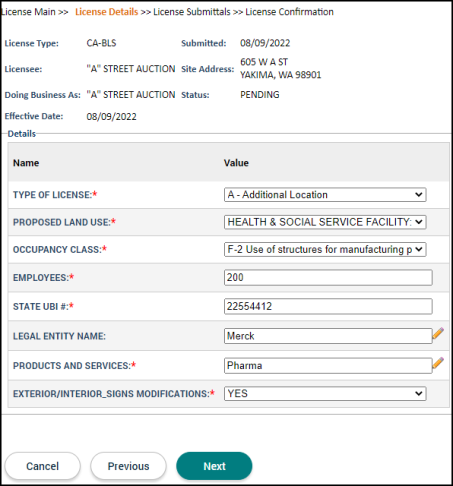
License details
Depending on the configuration for the selected license type, there may be details listed on this page.
- Enter the Value for any required or relevant details. *Note: Any detail marked with an asterisk (*) is required.
- Click Next.
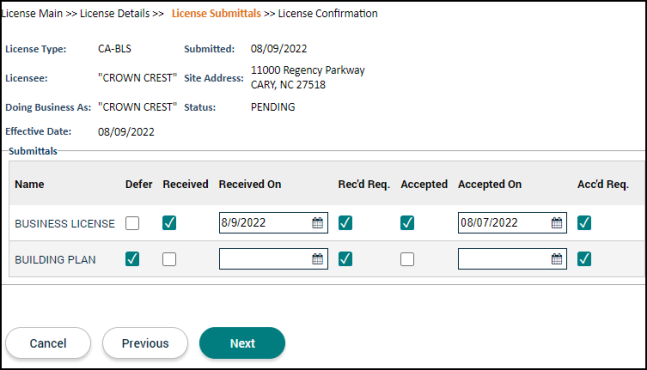
License submittals
If any submittals are configured for the initial application of the license type selected, they will be listed on this page. You have the ability to include information for the submittals on this page or address them at a later time. *Note: SmartGov has built in protections for PII and maintains high levels of storage encryption for data that is defined as sensitive Information. A submittal can be marked as containing sensitive information when configuring the submittals for the licensing module.
- Check the box in the Defer column if this submittal should be deferred.
- Check the box in the Received column to indicate that the document has been received by the jurisdiction. This will populate the Received On field with the current date, but can be adjusted as necessary.
- If the Rec'd Req. box is checked, this indicates the submittal must be received to issue the license.
- Check the box in the Accepted column to indicate that the document has been reviewed and accepted by the jurisdiction. This will populate the Accepted On field with the current date, but can be adjusted as necessary.
- If the Acc'd Req. box is checked, this indicates the submittal must be accepted to issue the license.
- Click Next.
License confirmation
This page will display an overview of the Licensee, Details, and Submittals that have been entered on this license application as well as any Fees configured for the license type. The Issuance Status section will list out any further requirements that must be addressed prior to issuing the license.
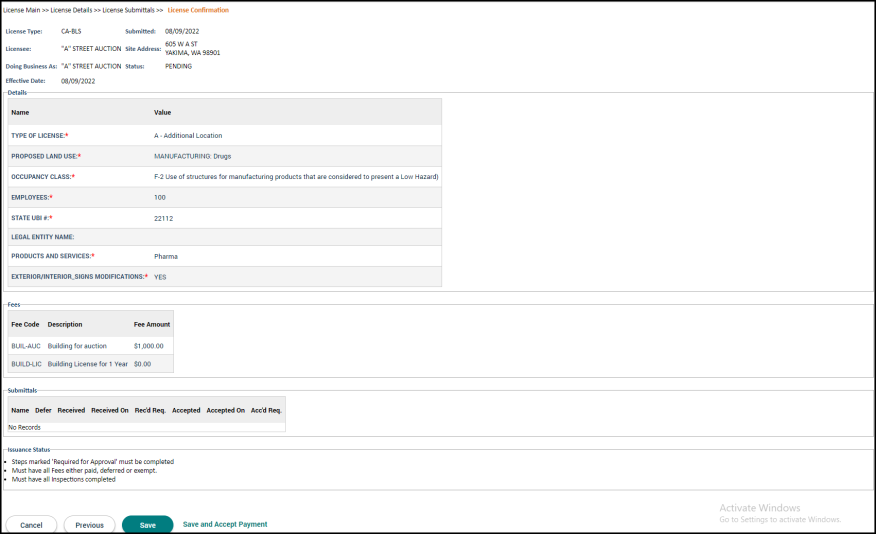
- If you would like to save the license and view the record, click Save and View.
- If you do not need to do anything further with the license at this time, click Save to return to the License List.
- If you have a payment to process, click Save and Accept Payment.
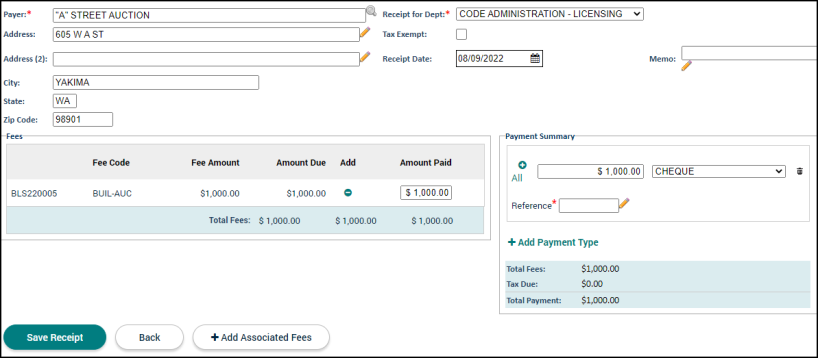
- Confirm the Payer is correct and enter any relevant address information.
- Use the Receipt for Dept drop-down to select the appropriate department this receipt is for.
- Check the Tax Exempt box if this payment is tax exempt.
- In the Payments section, select the Payment Type and enter a Reference Number if necessary.
- The Fees section displays any fee with a remaining balance.
- If you are entering a partial payment, type the Amount Paid next to the appropriate line item in the Fees section. This will total all payments in the Amount Paid field in the Payments section.
- Click the Save Receipt button to create the receipt for this payment.
License issuance
Once you have created the receipt, you will be directed to the License Issuance page where you are able to issue, print, and view the license.
- Check the Reports you would like to print.
- To issue the license and generate the reports that have been checked, click Issue and Print.
- To print the reports that have been checked without issuing the license, click Print Only.
- To return to the License List without generating any reports or issuing the license, click Back.
- To display the license and it's associated tabs without generating any reports, click View License.

Create a license from search license
You also have the ability to create a license from the License List page. *Note: You may also create a license from the License List if it is displayed on your Dashboard.
- Click Licensing from the navigation menu.
- Click Search License to view the License List.
- Click Create. This will direct you to the New License page where you can create a license.

