Parcels
The Parcels page lists any parcel that has been added to SmartGov. You can create new parcels from this page as well as view and update existing parcels. Parcel data information is typically managed and updated by the Parcel Job connector. *Note: The Parcel Load Job data will overwrite any fields on the parcel. If the job does not include information for a field that is currently populated in SmartGov, the information in that field will be overwritten with a blank value.
Creating a parcel
- Click Common in the navigation menu, then select Parcels.
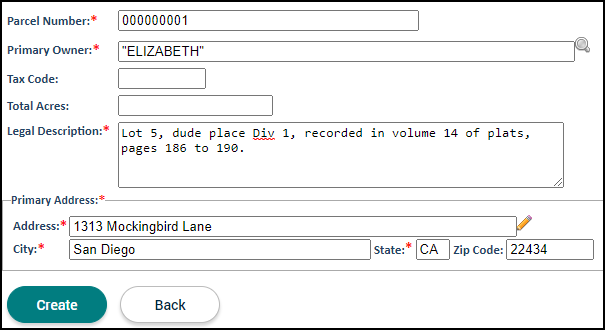
- Click Create New.
- Enter the Parcel Number.
- Begin typing or click the magnifying glass icon (
 ) to select the Primary Owner.
 - Enter the Tax Code and Total Acres, if needed.
- Enter the Legal Description for the parcel.
- In the Primary Address section, enter the address of the parcel.
- Click Create.
Viewing parcels
- Click Common in the navigation menu, then select Parcels.
- Search for and select a parcel in the list to view additional information related to the parcel.
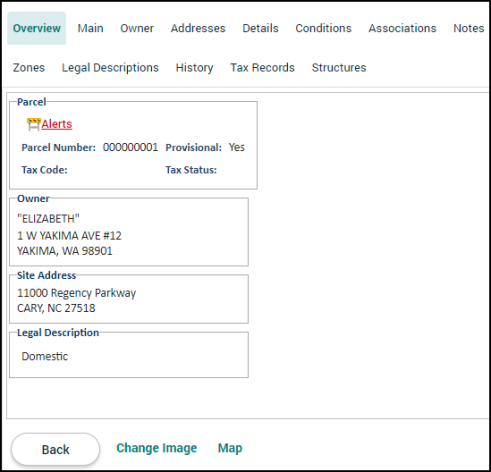
The Overview tab displays Parcel information, Owner contact information, the Site Address, and a Legal Description of the parcel. This information was entered when the parcel was created, either manually or through the Parcel Load Job, and cannot be edited through this tab.
You can add an image of the Parcel on this tab.
- Click Change Image at the bottom of the page.
- Click Select Image... in the window that displays.
- Find and select the image on your computer.
You can also view this parcel on a map.
- Click Map at the bottom of the page. This will display a map view of the parcel.
- Click Back to return to the parcel record.
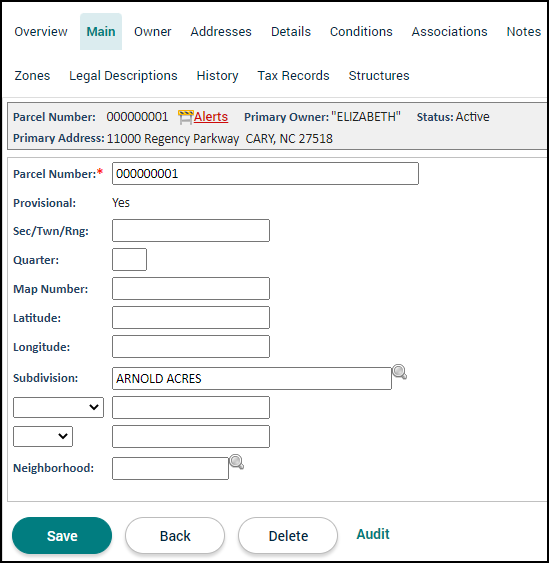
The Main tab allows you to add detailed information about the location of the parcel, including the Subdivision and Neighborhood. *Note: If you are using the Parcel Load Job Connector, we recommend that you reach out to whomever is managing the source data (this is typically the Assessor) to update this information. The parcel load job will overwrite any field that has been manually updated in SmartGov with the values from the job.
- Enter any relevant information in the fields provided.
- Click Save to update any changes.
The Owner tab allows you to keep up-to-date information on the current owner of the parcel. As the owner of the parcel changes, you have the ability to add a new owner and notate the end date of the prior owner. *Note: If you are using the Parcel Load Job Connector, we recommend that you reach out to whomever is managing the source data (this is typically the Assessor) to update this information. The parcel load job will overwrite any field that has been manually updated in SmartGov with the values from the job.
- If you need to change the owner, click Add.
- Begin typing or click the magnifying glass icon () to select the new Owner.
- Begin typing or click the calendar icon (
 ) to select the Begin Date for the new owner as well as the End Date for the previous owner.
 - Select Current beside the new owner.
- Click Save.

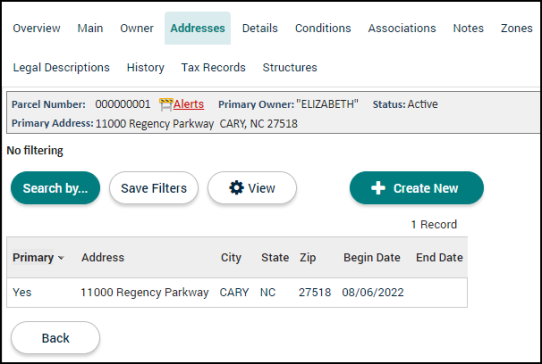
The Addresses tab lists any address associated with this parcel. You can create new addresses, adjust the primary address, and add end dates to existing addresses. *Note: If you are using the Parcel Load Job Connector, we recommend that you reach out to whomever is managing the source data (this is typically the Assessor) to update this information. The parcel load job will overwrite any field that has been manually updated in SmartGov with the values from the job.
- If you need to create a new address, click Create New.
- The Address information will populate with the primary address information. Adjust this as needed.
- Begin typing or click the magnifying glass icon () to select the Primary Contact for this address.
- Click Create.
- Click Back to return to the Addresses tab.
Bright Idea:Users must have the Admin.ParcelAddress secure function in order to add addresses to parcels. This can be added through the Secure Functions link at the bottom of the Security Groups tab of an individual user or to a Security Group if all users associated with this security group should have this ability.
- If you need to adjust the primary address or add an end date to an existing address, click the address in the list.
- Check the box beside Primary if this address should be the primary address for this parcel.
- Begin typing or click the calendar icon () to select an End Date for this parcel, if necessary.
- Click Save to update any changes.
- Click Back to return to the Addresses tab.
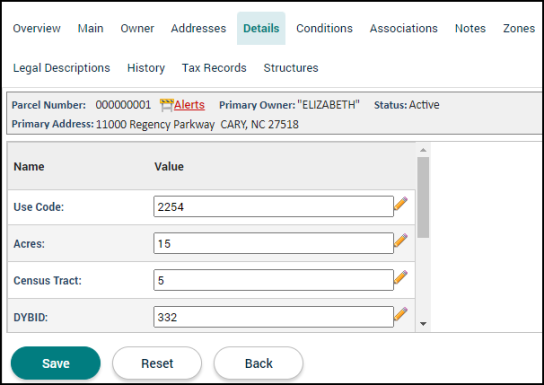
The Details tab lists any active custom attributes that have been added through the Parcel Custom Attributes page. *Note: If you are using the Parcel Load Job Connector, we recommend that you reach out to whomever is managing the source data (this is typically the Assessor) to update this information. The parcel load job will overwrite any field that has been manually updated in SmartGov with the values from the job.
- Enter any Value relevant to this parcel.
- Click Save to update any changes.
The Conditions tab allows you to associate conditions with the parcel. If a Permit Type or License Type is set to be Subject to Parcel Conditions, these conditions will display on the Conditions tab of any record this parcel is tied to.
- Click Add.
- Begin typing or click the magnifying glass icon () to select a Condition Name. *Note: These conditions are added through the Parcel Conditions page.
- Use the Follow-up Days field to enter the number of days needed to follow-up on the status of a condition if the condition has failed to meet its requirements.
- Check the Ver Req'd (Verification Required) box to require verification that this condition has been addressed.
- Enter a Begin Date and an End Date for this condition.
- If the condition needs to be associated with a particular inspection, begin typing or click the magnifying glass icon () and select the appropriate Inspection Type. This will populate the condition on the Actions tab of the associated inspection.
- Check the box in the Parent Cond. column if this condition is a parent condition.
- Click the Report Category icon (
 ) to control which report the condition will appear on.
 - In the Select Report Categories window, the reports listed in the left-hand column will include the condition you are configuring. Click the plus sign icon (
 ) in the right column beside any additional reports this condition should be added to. In addition, you may also drag and drop reports from one column to the other. *Note: Only the Permit report and the Certificate of Occupancy report will be available to select.
 - Click Save.
- In the Select Report Categories window, the reports listed in the left-hand column will include the condition you are configuring. Click the plus sign icon (
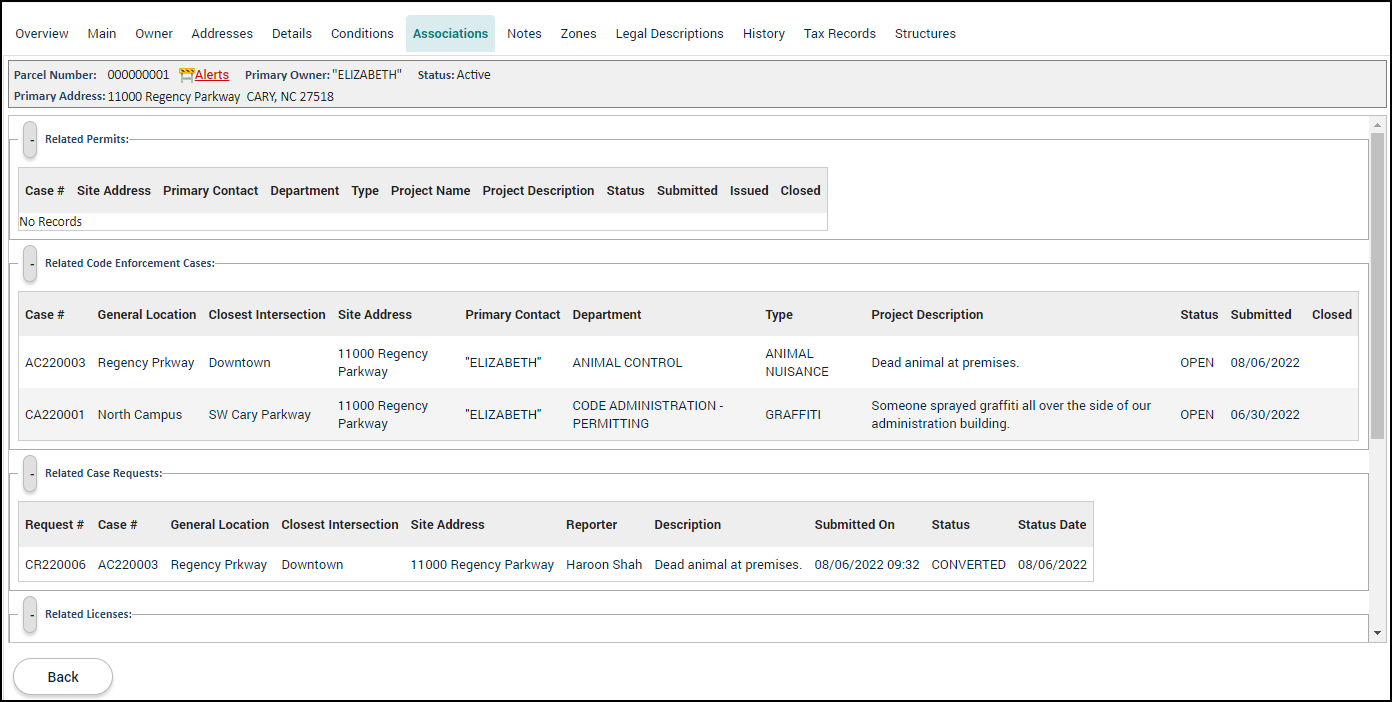
The Associations tab lists any record that has been associated with this parcel. To associate a parcel with a record, such as a license or permit, you must go to the Parcel tab on the license or permit and add the parcel. To view an associated record, click the record number.
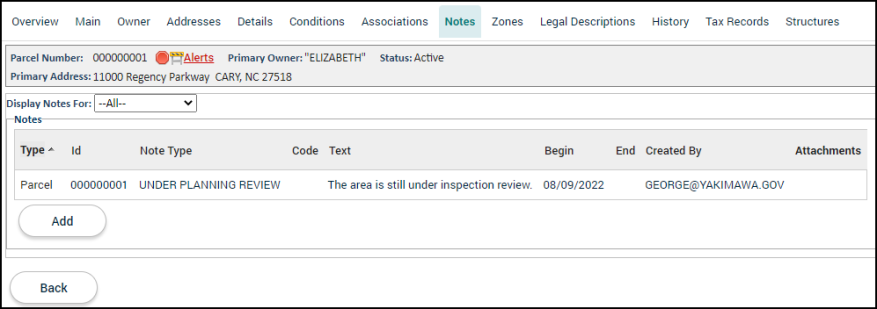
The Notes tab lists any note that has been added to the parcel or the parcel addresses. If a Hold or Tag note is added to a parcel, an alert will display on any open record associated with the parcel.
- Use the Display Notes For drop-down to view notes for the Parcel, Parcel Addresses, or All notes.
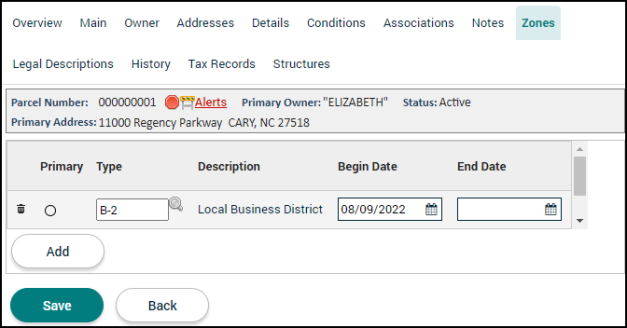
The Zones tab lists any zoning information for this parcel. You can add a zone and update existing zones as needed. *Note: If you are using the Parcel Load Job Connector, we recommend that you reach out to whomever is managing the source data (this is typically the Assessor) to update this information. The parcel load job will overwrite any field that has been manually updated in SmartGov with the values from the job.
- Begin typing or click the magnifying glass icon () to view and select the zone Type. *Note: Zone types are added through the Jurisdiction Lookup Values page.
- The Begin Date will default to the current date. Adjust this field as needed.
- Select if this zone is the Primary zone.
- If a zone needs to be deleted, click the trash can icon (
 ).
). - If the zoning has changed for the parcel, click Add and repeat this process to add the new zoning information.
- Ensure that an End Date has been added for the previous zone type.
- Click Save to update your changes.
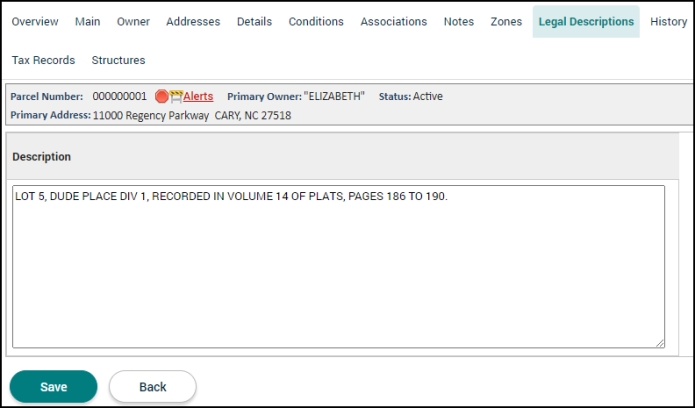
The Legal Descriptions tab displays the information entered when the parcel was created. Adjust this description as needed and click Save to update the field. *Note: If you are using the Parcel Load Job Connector, we recommend that you reach out to whomever is managing the source data (this is typically the Assessor) to update this information. The parcel load job will overwrite any field that has been manually updated in SmartGov with the values from the job.
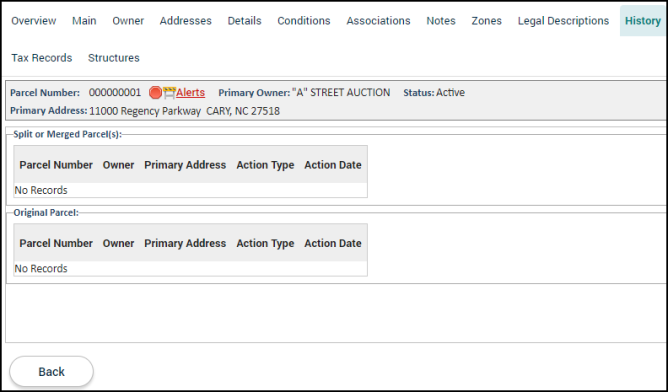
The History tab lists historical information related to the original parcel as well as any split or merged parcel(s). *Note: This tab is typically updated and handled through the parcel load job.
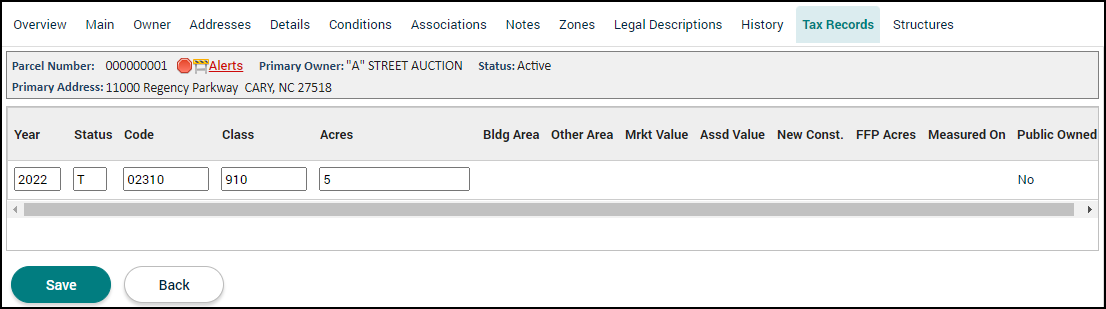
The Tax Records tab lists information related to the parcel's tax records, including the acreage, market value, and the year of the tax assessment.
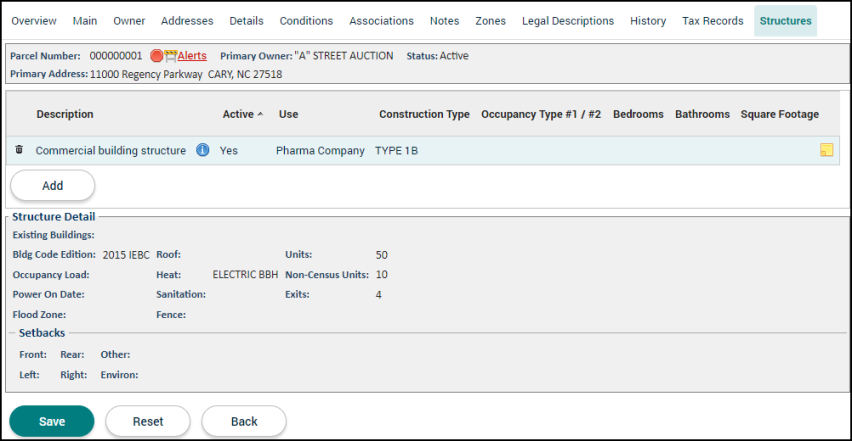
The Structures tab lists any structures that have been added to this parcel. The Structure Detail section at the bottom of the page will display details related to the structure that has been selected. You can add and update structures from this tab.
- Click Add.
- In the window that displays, enter any relevant information for this structure, such as Description, Square Footage, and any Setbacks.
- Click Create to add the structure to the parcel.
- If an existing structure needs to be updated, click the information icon (
 ) beside the existing structure, update the necessary fields, and click Save.
 - If a structure is removed from the parcel, click the information icon () beside the existing structure and click Inactivate at the bottom of the window that displays.