Fee codes
Fee Codes allow you to create and maintain fees throughout SmartGov. Fees are calculated by using various types of preconfigured calculators provided by SmartGov. The fee codes that are created here can be associated with record types and existing records.
We highly recommend making new fee codes or updating existing fee codes in your Training environment prior to making changes in your Production environment to ensure the fees are calculating correctly. Any new fees or updates to existing fees must be manually entered in your Production environment by someone from the jurisdiction.
Creating a fee code
- Click on Administration from the navigation menu, then click Financial Setup.
- Select Fee Codes.
- Click Create New.
- Enter the Fee Code and a Description of the fee.
- Ensure the Active box is checked to display this fee when associating fees with a record or record type.
- Select a Fee Category. The option selected here determines which module the fee will apply to or the fee type. *Note: If Misc is selected, the fee will not populate on the Fees tab of any record template or record. The fee code will only populate when a user selects the Misc Fees option when creating a receipt.
- Depending on the Fee Category selected, additional fields may display.
- Based On: This field will display if you select a Permitting, Code Enforcement, or Licensing fee category. Select if this fee type should be based on the Submitted Date of the associated record or the Current Date.
- Portal Payment State: This field will display if you select a Permitting or Licensing fee category. Select the process state the associated permit or license must be in to allow payment for this fee on the Citizen Portal. *Note: The selection made here will be the default for this fee code, but can be adjusted on an as-needed basis once it is associated with a record template or record.

- In the Fee Code Version section, enter a Begin Date for this fee.
- Begin typing or click the magnifying glass icon (
 ) to select the associated FMS/GL Account. *Note: If the FMS/GL account is not listed, you must add it through the FMS/GL Accounts page.
 - Click Configure Calculator to select how the fee should be calculated.
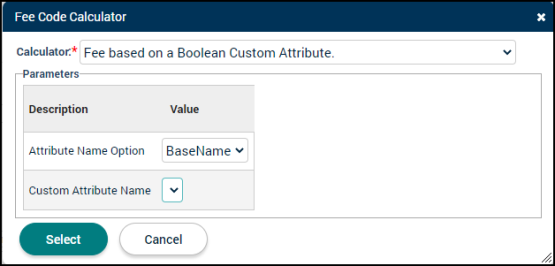
- In the Calculator drop-down menu, select the appropriate option for this fee.
- Depending on the calculator selected, additional Parameters may display. Enter any necessary values for these parameters. *Note: If a calculator based on a custom attribute is selected, the options that display in the Custom Attribute Name drop-down menu are configured through the Custom Attributes setup page of the associated module, such as Licensing Setup or Permitting Setup.
- Click Select.
- Select a Rounding Option for the fee.
- Round to the Nearest Penny: This option will round the dollar amount to the nearest cent. For example:
- If the fee calculates to $1.225, the charged amount will be $1.23.
- If the fee calculates to $1.991, the charged amount will be $1.99.
- Always Round Up to the Next Whole Dollar: This option will round the dollar amount up to the nearest whole dollar. For example:
- If the fee calculates to $1.225, the charged amount will be $2.00.
- If the fee calculates to $1.991, the charged amount will be $2.00.
- Always Round Down to the Next Whole Dollar: This option will round the dollar amount down to the nearest whole dollar. For example:
- If the fee calculates to $1.225, the charged amount will be $1.00.
- If the fee calculates to $1.991, the charged amount will be $1.00.
- Round to the Nearest Whole Dollar: This option will round the dollar amount to the nearest whole dollar. For example:
- If the fee calculates to $1.225, the charged amount will be $1.00.
- If the fee calculates to $1.991, the charged amount will be $2.00.
- Round to the Nearest Penny: This option will round the dollar amount to the nearest cent. For example:
- Enter a Minimum Charge and Maximum Charge, if applicable.
- Enter a Prompt for the fee.
- Enter a Based On Prompt. This value will display on the Fees tab of the associated record.
Bright Idea:We recommend using the Based On Prompt field to provide additional information on the Fees tab of an associated record to explain what value or field must be entered in order for this fee to calculate. The value entered here will display in the Based On column on the Fees tab.
- Check the box beside Exemption Allowed to display the Exempt option when this fee is applied to a record.
- Check the box beside Deferral Allowed to display the Defer option when this fee is applied to a record.
- If this fee is taxable, check the Taxable box and enter the Tax Fee.
- If you want to charge an increased rate for a permit using the FastTrack option, enter the percentage that you would like the fee amount to increase by in the FastTrack Fee Increase By field.
- In the Component Rates section, enter any relevant information.
Bright Idea:The Component Rates section allows you to configure how the fee will be calculated based on the quantity entered in relation to the selected Calculator. For example, if the Fee Based on Valuation Total calculator is selected, the total Quantity entered on the Valuations tab of the permit will determine the dollar amount charged for the fee.
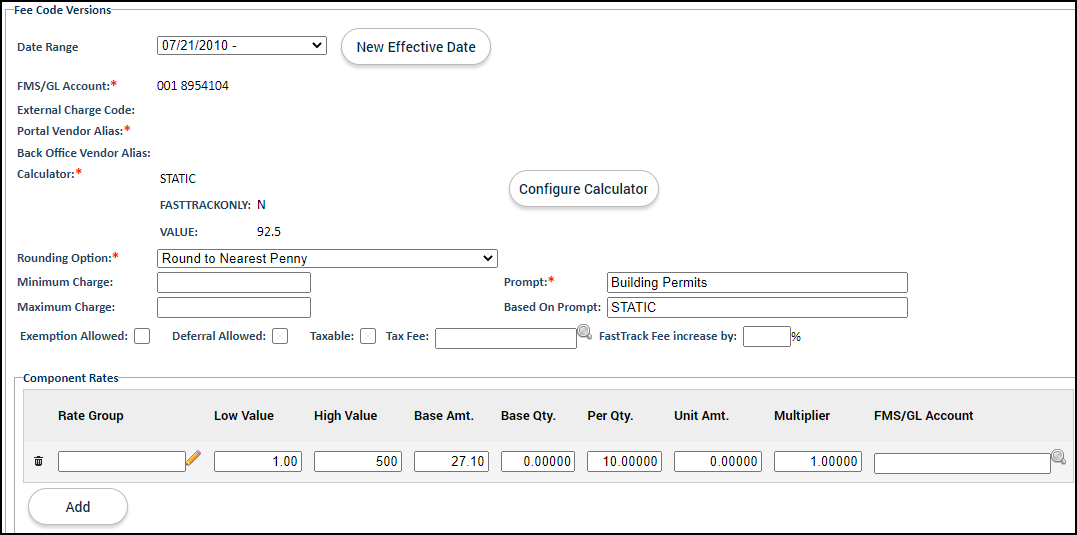
When the Total Valuation is between the Low Value and the High Value, the fee will be the Base Amount for the Total Valuation up to the Base Quantity. For each additional increment of the Per Quantity value, the Unit Amount will be added to the fee. The total amount is then multiplied by the Multiplier.
For example, using the image above:
- The Low Value and High Value determines the range in which the Valuation Quantity may fall.
- The Base Amt. is the base dollar amount that will be charged if the Valuation Quantity falls between the Low Value and High Value. If the Valuation Quantity on a permit is $1200.00, the base amount charged will be $22.00.
- Because $1200.00 is $700.00 more than the Base Qty. of 500.0, there are 7 incremental units of the Per Qty. value of 100. (700 ÷ 100 = 7)
- The fee will then multiply the 7 incremental units by the Unit Amt. value of 3.4000, which will add $23.80 to the fee (7 x 3.4 = 23.80), totaling $45.80 (22 + 23.80 = 45.80).
- The fee total will be multiplied by the Multiplier of 1, resulting in a fee charge of $45.80.
*Note: If you need additional assistance with Component Rates, please contact Client Services.
- Click Save.
Copying a fee code
Often times multiple fee codes are needed with similar configurations. After setting up the first fee code, you can easily copy the configurations from that fee code to a new one.
- Click on Administration from the navigation menu, then click Financial Setup.
- Select Fee Codes.
- Select the fee code to copy from the list.
- Click Copy at the bottom of the page.
- Enter the new Fee Code and Description.
- Ensure the Active box is checked.
- Update the Fee Category and Based On fields, if needed.
- The Begin Date will default to the current date. Update this field if needed.
- Update the FMS/GL Account, Rounding Option, Prompt, and Based On Prompt, if needed.
- Enter a Minimum Charge and Maximum Charge, if applicable.
- Ensure the box beside Exemption Allowed and/or Deferral Allowed is checked if the Exempt option or Deferral option should display when this fee is applied to a record.
- If this fee is taxable, check the Taxable box and enter the Tax Fee.
- If you want to charge an increased rate for a permit using the FastTrack option, enter the percentage that you would like the fee amount to increase by in the FastTrack Fee Increase By field.
- In the Component Rates section, update any information as needed.
- Click Save to create the new fee code.
Updating and managing fee codes
Fees can be updated if changes need to be made to their existing configuration. Any previous configuration will be viewable after a new begin date has been set.
- Click on Administration from the navigation menu, then click Financial Setup.
- Select Fee Codes.
- Select the fee code from the list.
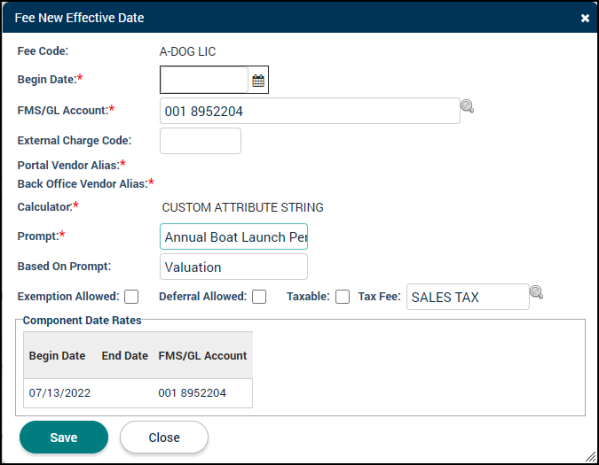
- Click the New Effective Date button beside the Date Range field.
- Begin typing or click the calendar icon (
 ) to select a Begin Date. *Note: You must enter the correct Begin Date. This field cannot be updated once it has been saved.
 - Update the FMS/GL Account, Prompt, or Based on Prompt if needed.
- Click Save.
- Click Close in the window that displays.
- Update any information on the page needed for the new date range, such as the Calculator or the Component Rates. Click Save to finalize the changes.
- You can view previous date ranges by selecting an option in the Date Range drop-down menu.

