Permitting lookup values
Permitting lookup values represent the options you will see in various fields and drop-down menus throughout a permit application. These can be customized to represent your jurisdiction's preferences and processes. *Note: At this time, this list may not include all Lookup Value options.
Managing lookup values
- Click Administration from the navigation menu.
- Click Permitting Setup, then click Lookup Values.
- Select the Lookup Value from the list to view its associated options.
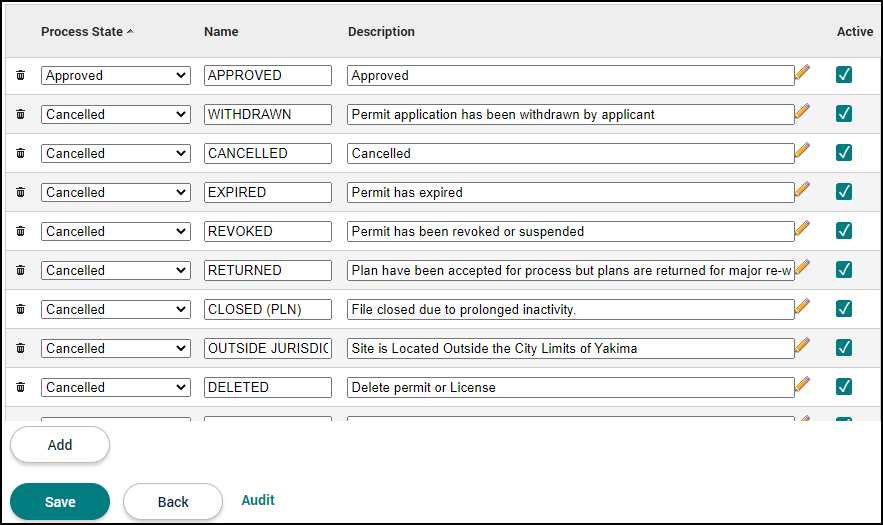
This lookup value refers to where the permit is in the application process. Each status must be tied to a Process State. You can have multiple statuses tied to a single process state. For example, you could create an "IN REVIEW" status and a "RETURNED FOR REVISIONS" status, both tied to the Technically Complete process state.
- Click Process Status from the list of lookup values.
- Click Add.
- Select the appropriate Process State from the drop-down menu.
- Enter the display name for the status in the Name field.
- Use the Description field to describe the status.
- Ensure the Active box is checked to display the process status in the list.
- Repeat this process to add any additional process statuses.
- Click Save.
- If you need to remove a process status from the list, click the trash can icon (
 ).
).
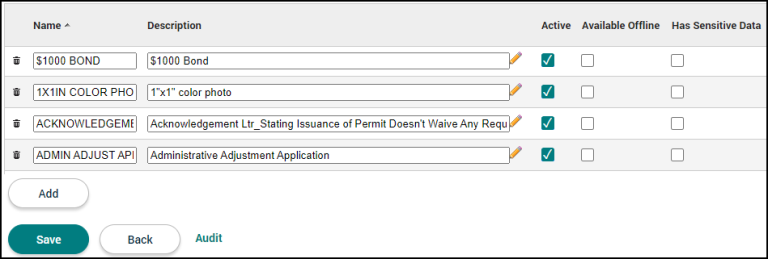
This lookup value refers to a document that can be uploaded to a permit as part of the permit application process. Submittals in this list can be added to any permit type. You can make any of the submittals in this list available to download offline when using the SmartGov mobile app.
Security Notice:
SmartGov has built in protections for PII and maintains high levels of storage encryption for data that is defined as sensitive Information.
If your jurisdiction has configured SmartGov to integrate with a third-party document management system, documents stored on the third-party system are outside of the boundary and controls of your Dude Solutions product. Security and privacy controls provided in Dude Solutions product documentation and contracts will not apply to documents stored in third-party systems. The Client is responsible for assessing and maintaining the security of documents stored in third-party systems.
- Click Submittal from the list of lookup values.
- Click Add.
- Enter the display name for the submittal in the Name field.
- Use the Description field to describe the submittal.
- Ensure the Active box is checked to display the submittal in the list of submittals available to associate to the permit type or to an active permit.
- Check the Available Offline button if you would like to allow this submittal to be downloaded via the SmartGov mobile app.
- If this submittal could potentially include sensitive data, check the Has Sensitive Data box. *Note: This will result in restrictions on who can view this submittal in SmartGov and on the Citizen Portal. You must be given the "Submittal.HasSensitiveData" security function to configure a submittal as containing personally identifying information.
- Repeat this process to add any additional submittals.
- Click Save.
- If you need to remove a submittal from the list, click the trash can icon (
 ).
).
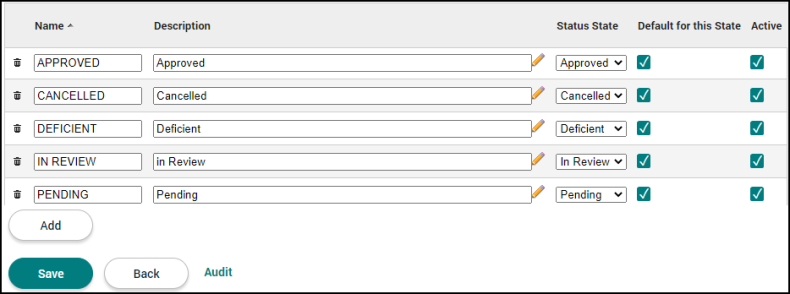
This lookup value refers to a submittal's status on the permit application. Each status must be tied to a default status state. You can have multiple statuses tied to a status state, however one status must be set as the default status for the status state.
- Click Submittal Version Item Status from the list of lookup values.
- Click Add.
- Enter the display name for the status in the Name field.
- Use the Description field to describe the status.
- Select the appropriate Status State from the drop-down menu.
- Check the Default for this State box to make this status the default display option for the selected status state.
- Ensure the Active box is checked to display the record in the list of available submittal version item statuses.
- Repeat this process to add any additional submittal version item statuses.
- Click Save.
- If you need to remove a submittal version item status from the list, click the trash can icon (
 ).
).
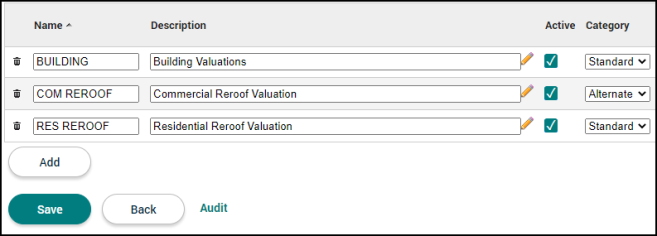
This lookup value allows you to categorize different valuation types, which are typically tied to building codes. Each valuation type within SmartGov must be tied to a valuation class created here.
- Click Valuation Class from the list of lookup values.
- Click Add.
- Enter the display name for the valuation class in the Name field.
- Use the Description field to describe the valuation class.
- Ensure the Active box to display the valuation class in the list.
- Select the appropriate Category from the drop-down menu.
- The Standard category suggests the valuation class is related to the ICC (International Code Council) building codes.
- The Alternate category suggests the valuation class may be custom for your jurisdiction.
- Repeat this process to add any additional valuation classes.
- Click Save.
- If you need to remove a valuation class from the list, click the trash can icon (
 ).
).
This lookup value refers to building codes and are organized by valuation class. Here you will be able to configure the different valuation types along with their associated rates (typically calculated by square feet), as well as the date the rate went into effect. There is also an option to bulk increase the charge rate by a percentage for all valuation types.
Adding a valuation type
- Click Valuation Type from the list of lookup values.
- Click Create New.
- Enter the display name for the valuation type in the Name field.
- Use the Description field to describe the valuation type.
- Select the Valuation Class this valuation type should be associated with in the drop-down menu.
- Select the appropriate Occupancy Type from the drop-down menu, if applicable.
- Select the appropriate Construction Type from the drop-down menu, if applicable.
- Ensure the Active box to display the valuation type in the list.
- Begin typing or click the calendar icon (
 ) to input the Begin Date for the calculation of the valuation type.
 - Enter a Rate at which the valuation type should assess fees per unit of measure.
- Enter the UOM (Unit of Measure) for the valuation type.
- Click Create.
- Repeat this process to add any additional valuations types.
Changing the unit of measure and/or rate for the valuation type
- Click the Valuation Type from the list.
- Click Add.
- Begin typing or click the calendar icon (
 ) to select a Begin Date for this change to take effect.
 - Update the UOM, if necessary.
- Select the appropriate options:
- New Amount: This option allows you to type in a new rate in the text field.
- Increase Percentage: This option allows you to increase the current rate by a percentage.
- Increment Current Amount By: This option will increase the current rate by a fixed amount.
- Click Save. *Note: There is an option to bulk update all valuations through a CSV file. Please contact Client Services for assistance with this.
Deleting a valuation type
- Click the Valuation Type from the list
- Click the Delete button.
- Click Delete Record.
Increasing the rate of all valuation types by a percentage:
- Click the Bulk Rate Increase button at the bottom of the list of valuation types.
- Begin typing or click the calendar icon (
 ) to select a Begin Date for this change to take effect.
 - Use the Increase by Percentage field to enter the percentage at which to increase the rate for all valuation types.
- Click Save.
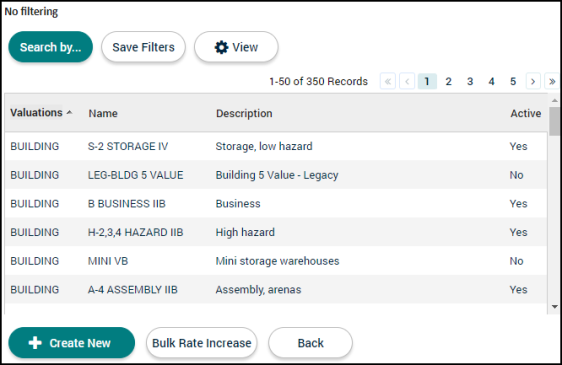
This lookup value refers to the status of individual workflow steps. When configuring the workflow step, you will be able to choose from the list of statuses created here.
- Click Workflow Status from the list of lookup values.
- Click Add.
- Enter the display name for the workflow status in the Name field.
- Use the Description field to describe the workflow status.
- Ensure the Active box is checked to display the record in the list of available workflow statuses.
- Repeat this process to add any additional workflow statuses.
- Click Save.
- If you need to remove a workflow status from the list, click the trash can icon (
 ).
).
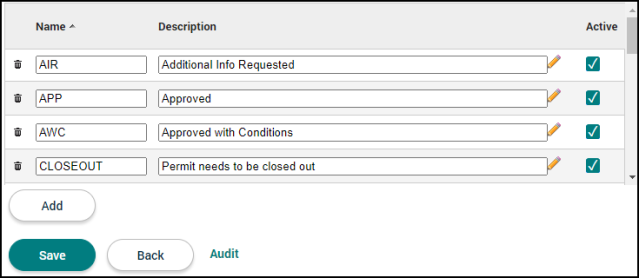
This lookup value allows you to categorize the different fixture types under a fixture class. Each fixture class must be associated with one of four categories: Electrical, Mechanical, Plumbing, or Resources *Note: There is not a way to add additional categories at this time.
- Click Fixture Class from the list of lookup values.
- Click Add.
- Enter the display name for the fixture class in the Name field.
- Use the Description field to describe the fixture class.
- Ensure the Active box is checked to display the record in the list of available fixture classes.
- Use the Category the fixture class is associated with from the drop-down menu.
- Use the Type drop-down menu to select the appropriate type.
- Enter in the number of Decimal Places a user can enter for the fixture value.
- Repeat this process to add any additional fixture classes.
- Click Save.
- If you need to remove a fixture class from the list, click the trash can icon (
 ).
).

This lookup value refers to the individual fixtures that need to be tracked on a permit. Each fixture type must be associated with a fixture class. You will be able to set up each fixture type with a specific charge amount and the date the charge goes into effect. There is also an option to bulk increase the charge rate by a percentage for all fixture types.
Adding a fixture type
- Click Fixture Type from the list of lookup values.
- Click Create New.
- Enter the display name for the fixture type in the Name field.
- Use the Description field to describe the fixture type.
- Select the Fixture Class this fixture type should be associated with in the drop-down menu.
- Ensure the Active box is checked to display the record in the list of available fixture types.
- Begin typing or click the calendar icon (
 ) to input the Begin Date for the charge of the fixture type.
 - Enter the Charge for the fixture.
- Click Create.
- Repeat this process to add any additional fixture types.
Changing the charge for the fixture type
- Click the Fixture Type from the list.
- Click Add.
- Begin typing or click the calendar icon (
 ) to select a Begin Date for this change to take effect.
 - Select the appropriate option:
- New Amount: This option allows you to type in a new rate in the text field.
- Increase Percentage: This option allows you to increase the current rate by a percentage.
- Increment Current Amount By: This option will increase the current rate by a fixed amount.
- Click Save.
Deleting a fixture type
- Click the Fixture Type from the list
- Click the Delete button.
- Click Delete Record.
Increasing the charge of all fixture types by a percentage
- Click the Bulk Charge Increase button at the bottom of the list of fixture types.
- Begin typing or click the calendar icon (
 ) to select a Begin Date for this change to take effect.
 - Use the Increase by Percentage field to enter the percentage at which to increase the charge for all fixture types.
- Click Save.
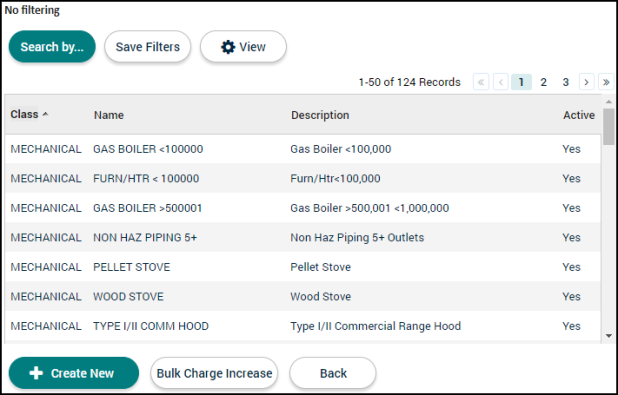
This lookup value allows you to categorize the different condition types that will be available to add to permits.
- Click Condition Types from the list of lookup values.
- Click Add.
- Enter the display name for the condition type in the Name field.
- Use the Description field to describe the condition type.
- Ensure the Active box is checked to display the record in the list of available condition types.
- Repeat this process to add any additional condition types.
- Click Save.
- If you need to remove a condition type from the list, click the trash can icon (
 ).
).
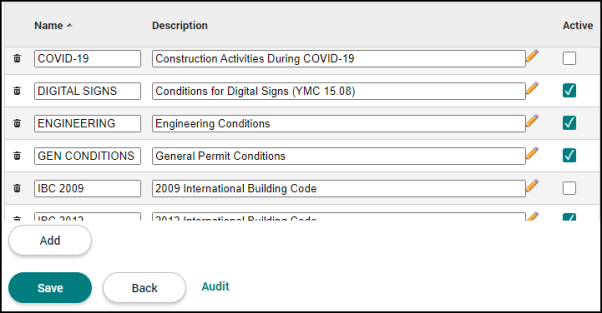
This lookup value refers to the individual conditions that can be added to permit types or individual permits. Each condition must be associated with a condition type. You can setup the condition to be verified required, as well as associated with a particular inspection type.
- Click Condition from the list of lookup values.
- Click Add.
- Enter the display name for the condition in the Name field.
- Use the Condition Text field to describe the condition.
- Ensure the Active box is checked to display the record in the list of available conditions.
- Begin typing or click the magnifying glass icon (
 ) to select the associated Condition Type.
 - Check the Ver Req'd (Verification Required) box if the condition needs verification that its requirements have been met. This indicates that the condition must be validated before the permit can be closed.
- Begin typing or click the magnifying glass icon (
 ) to select the associated Inspection Type, if applicable.
 - Repeat this process to add any additional conditions.
- Click Save.
- If you need to remove a condition from the list, click the trash can icon (
 ).
).

