Creating a recurring inspection
The Recurring Inspection module in SmartGov allows you to create various types of recurring inspections based on the Recurring Inspection Types configured by your jurisdiction. This guide will walk you through various ways to create a recurring inspection from within SmartGov.
How to create a recurring inspection
- Click Recurring Inspections from the navigation menu.
- Click Create Recurring Inspection.
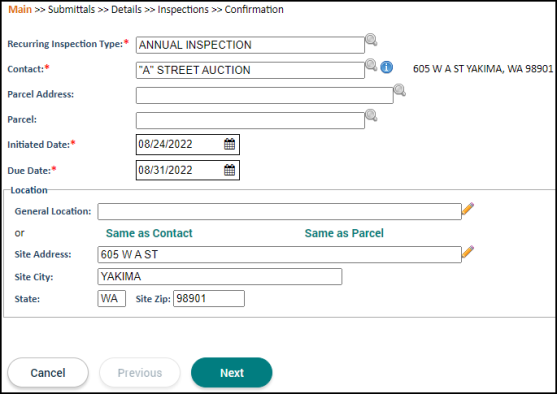
Recurring inspection main
- Begin typing or click the magnifying glass icon (
 ) to select the Recurring Inspection Type and the Contact.
 - Begin typing or click the magnifying glass icon () to select the Parcel, if applicable.
- The Initiated Date field will populate with the current date. You can update this field as needed.
- Enter the Due Date of the recurring inspection.
- In the Location section, either enter a General Location or a Site Address.
- You can click Same as Contact or Same as Parcel to copy the address from the contact or parcel into the Site Address fields.
- Click Next.
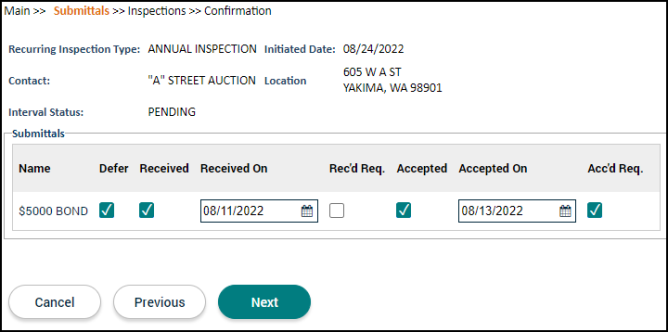
Recurring inspection submittals
If any submittals are configured for the selected recurring inspection type, they will be listed on this page. You have the ability to include information for the submittals on this page or address them after the recurring inspection has been created. You cannot attach a submittal on this step; you must create the recurring inspection and then attach the submittal through the Submittals tab.
- Check the box in the Defer column if this submittal should be deferred.
- Check the box in the Received column to indicate that the document has been received by the jurisdiction. This will populate the Received On field with the current date, but can be adjusted as necessary.
- If the Rec'd Req. box is checked, this indicates the submittal must be received to close a recurring inspection interval.
- Check the box in the Accepted column to indicate that the document has been reviewed and accepted by the jurisdiction. This will populate the Accepted On field with the current date, but can be adjusted as necessary.
- If the Acc'd Req. box is checked, this indicates the submittal must be accepted to close a recurring inspection interval.
- Click Next.
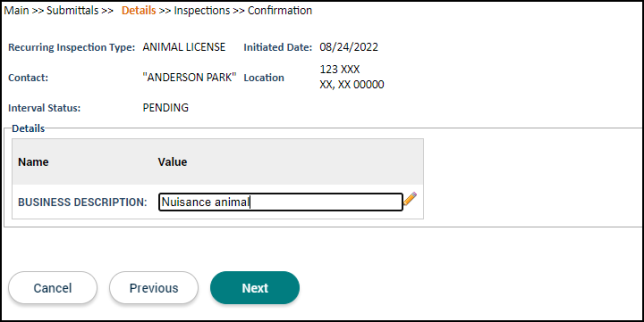
Recurring inspection details
Depending on the configuration for the selected recurring inspection type, there may be details listed on this page.
- Enter the Value for any required or relevant details. *Note: Any detail marked with an asterisk (*) is required and must be filled out to continue to the next step.
- Click Next.
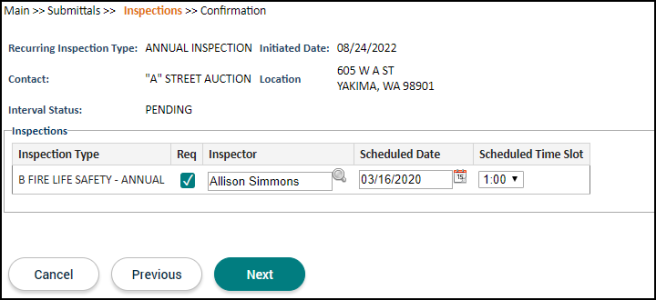
Recurring inspection inspections
This step will lists the inspections that have been configured for this recurring inspection type. You have the ability to enter information about the scheduling and assignment of the inspections now or address them after the recurring inspection has been created.
- The Required box will be checked if this inspection is required for this recurring inspection type. This can be adjusted if necessary.
- To assign an inspection to an inspector, begin typing or click the magnifying glass icon () to view and select the Inspector.
- Enter the Scheduled Date and Scheduled Time Slot to schedule the inspection.
- Click Next.
Recurring inspection confirmation
This page will display an overview of the contact information, Inspections, Details, and Submittals that have been entered on this recurring inspection as well as any Fees configured for the recurring inspection type.

- If any information is inaccurate, click the Previous button to navigate to the section that needs to be updated.
- Once changes have been made, continue clicking Next to return to the Confirmation page.
- If you would like to save the recurring inspection and view the record, click Save.
- If you have a payment to process, click Save and Accept Payment.
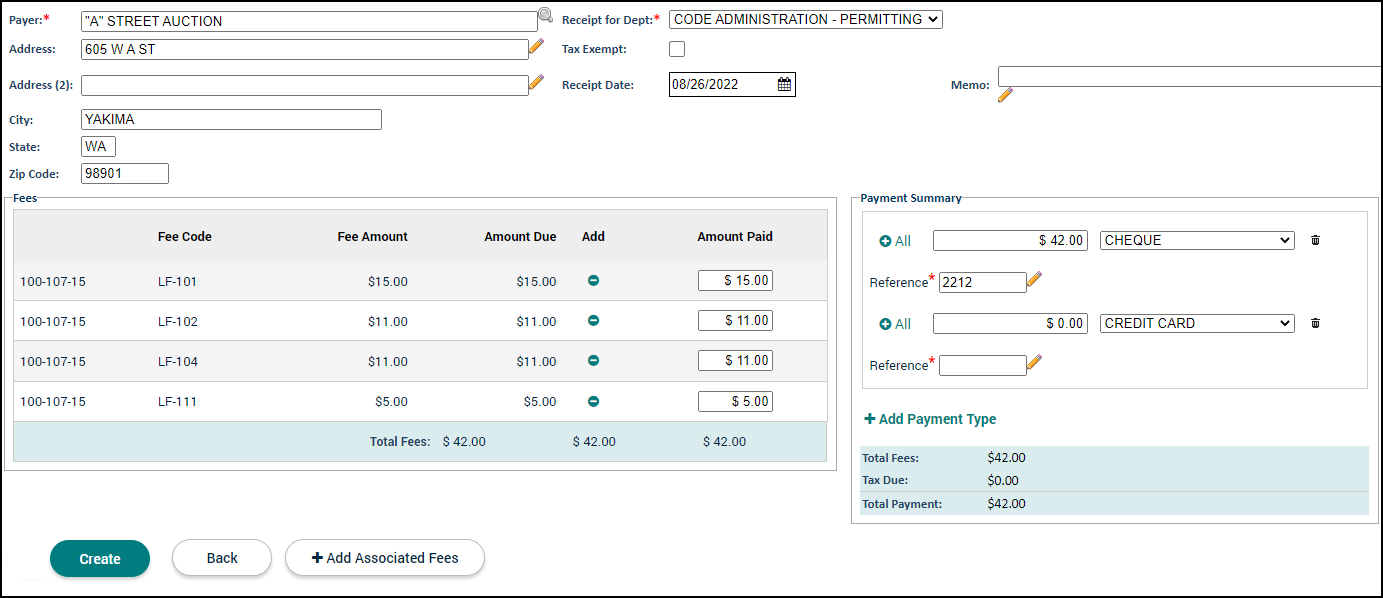
- Confirm the Payer is correct and enter any relevant address information.
- Use the Receipt for Dept drop-down to select the appropriate department this receipt is for.
- Check the Tax Exempt box if this payment is tax exempt.
- In the Payments section, select the Payment Type and enter a Reference Number, if necessary.
- If you are entering the full amount, click the Pay In Full button. This automatically populates the Amount Paid field with the total amount.
- The Fees section displays any fee with a remaining balance.
- If you are entering a partial payment, type the Amount Paid next to the appropriate line item in the Fees section. You can also click the arrow icon (
 ) to enter the entire line item amount. This will total all payments from the Fees section in the Amount Paid field in the Payments section.
 - Click the Create button to create the receipt for this payment. The page will update to display the recurring inspection record.
How to create a recurring inspection from search recurring inspections
You also have the ability to create a recurring inspection from the Recurring Inspection list page. *Note: You may also create a recurring inspection from your Dashboard if the Recurring Inspection List is displayed.
- Click Recurring Inspections from the navigation menu.
- Click Search Recurring Inspections to view the Recurring Inspection list.
- Click Create New. This will direct you to the New Recurring Inspection page where you can create a recurring inspection.

