Back to Event Manager Main Menu
Users
The Users page is where you can view, add, and manage the users, roles, and visitors that have access to your sites.
To access the Users page:
- Click on the gear icon (
 ) to access the Site Administration settings page.
 - Click on Users under Site Administration.
- Use the radio buttons at the top to navigate between the lists of Users, Roles, and Visitors. Whichever option is selected determines what shows in the list, as well as what you are editing or adding to the list.
- User accounts are tied to a single individual and their permissions.
- A Role allows you to define a set of permissions and add users to the role. This is helpful when managing a large number of users who all need the same permissions. Once the user is added to the role, that user has the role's permissions. *Note: If you plan on using roles, you may want to add those before you start adding users.
- A Visitor is an individual who has accessed your calendar, and if showing in this list, has created a profile by supplying an email address and password.
- The All option lets you see all three lists on the page at one time.
Adding a new user
- With the User option selected, click Add new user.

User information
- Enter the Email Address of the user. This will be the email address they use to log in, as well as the address that is sent event notifications and approval requests. *Note: Make sure their email address is not currently in use by other calendar sites.
- Click the Add button.
- Enter the user's information, including First Name, Last Name, and Phone Number.
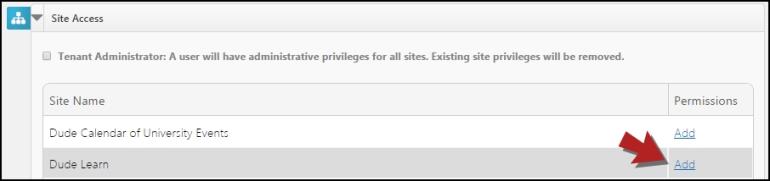
You have two options in the Site Access section:
- Check off the box next to Tenant Administrator if you would like this user to have full access to all parts of the application, and have administrative privileges for all sites.
- If this user will not be a Tenant Administrator, do not check the box. Instead, click the Add link next to any of the calendar sites to give the user permissions for those sites.
Permissions
- Once you click Add, the Permissions view will show for that site. The default is the Basic view, which simply allows you to determine if this user is an Administrator for the site, or just a Standard User. Checking the box next to one of these user types will give them the default permissions associated with that user type:
- Administrator default permissions include approving events submitted for approval, publishing events to the calendar without review, viewing reports, and accessing all site settings with the exception of Global options.
- Standard User default permissions include creating and submitting events for approval, but does not include access to reports or site settings.
- If you would like to configure permissions yourself, click on the Advanced View link to check or uncheck the permissions as needed:

- Site Permissions
- Calendar Settings: Selecting this option will allow the user to access layouts, media library, event setup, product setup, aggregation, and search settings.
- Advanced Settings: Selecting this option will allow the user to access: Analytics, API Configuration, External Authentication, and Site Management.
- Reports: Selecting this option will allow the user to access the "Reports" link found in the top level navigation of all administration pages. They will have access to all reports with the exception of the Location Conflict Report.
- Layouts: Selecting this option will allow the user to access the Layouts page from the Settings page.
- Categories: Selecting this option will allow the user to access the Categories page from the Settings page. *Note: This does not include Global Categories.
- Event Admin: Selecting this option will allow the user to edit other people's events.
- Administer Event Form: Selecting this option will allow the user to edit event submission forms currently in use, and to create new ones as needed. *Note: This permission is only available if you are using the Customizable Event Form. For more information, contact Client Services.
- Community Setup: Selecting this option will allow the user to access the Community Setup page from the Settings page.
- Room Configuration: Selecting this option will allow the user to access the Location Configurations section of Location Settings. *Note: This permission will only function if the user is also assigned the Locations permission.
- Service Provider: Selecting this option will allow the user to edit tasks in the task list.
- Approval Process: Selecting this option gives the user access to the Approval Process page from the Settings page.
- User and Role Management: Selecting this option will allow the user to access to the Users page from the Settings page.
- Imports: Selecting this option will allow the user to create and modify event imports.
- Sharing: Selecting this option will allow the user to access the Sharing page from the Settings page.
- Locations: Selecting this option will allow the user to access the Locations page from the Settings page. *Note: This does not include Global Locations.
- Survey Admin: Selecting this option will allow the user to edit, monitor, and activate or deactivate existing surveys, as well as create new surveys.
- Manage Organizations: Selecting this option will allow the user to access the Organization Settings page, approve users for organizations, and create new organizations.
- Invoice Configuration: Selecting this option will allow the user to access the Invoice Settings page to configure the Invoicing feature.
- Universal Org Submitter: Selecting this option will allow the user to submit an event for an organization the user is not a member of.
- Event Permissions
- Media Library: Selecting this option will allow the user to browse the media library for images or attachments.
- Paid/Donation Items: Selecting this option will allow the user to add items to an event with a cost associated to them.
- Highlighted Events: Selecting this option will allow the user to feature or highlight an event.
- Upload Images / Attachments: Selecting this option will allow the user to upload their own images or attachments.
- Free Items: Selecting this option will allow the user to add items to an event without a cost associated to them.
- Advanced WYSIWYG: Selecting this option will allow the user to use the advanced editor when creating an event to style the event's description.
- Display Permissions allows you to choose whether the users can view private events. The View Private Events box can only be unchecked for a Standard User, as an Administrator can view all events for this site by default.
- If this user will have the same set of permissions across all sites they can access, check the box next to Apply selected privileges to other sites and then check the boxes for the sites this user has access to.
- Click Save to save the users permissions.
If there are any previously created Roles, they will show in the Role Access list.
- Click the Add link next to the role to give this user the role's permissions.
- Click Save at the bottom of the User profile page to add this user to the application.
Once you save, the new user will receive an email informing them that they have been added as a user. They will then need to verify their user account by clicking the hyperlink in the email. This will open a page where they can enter their own password and confirm it. Once they have completed this process, they will be able to log in.
Managing users
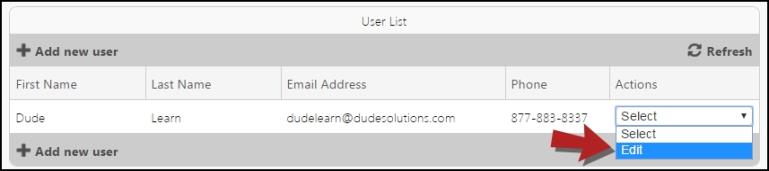
Once you have added a user, you can access their profile to make changes as needed:
- From the Users page, select Edit from the Actions drop down menu next to the user's name. This will bring up the user's profile page.
- Make any changes needed, then click Save at the bottom.
Roles
A Role allows you to create a combination of privileges to be applied to multiple users. You can use all of the privileges available to users in roles as well.
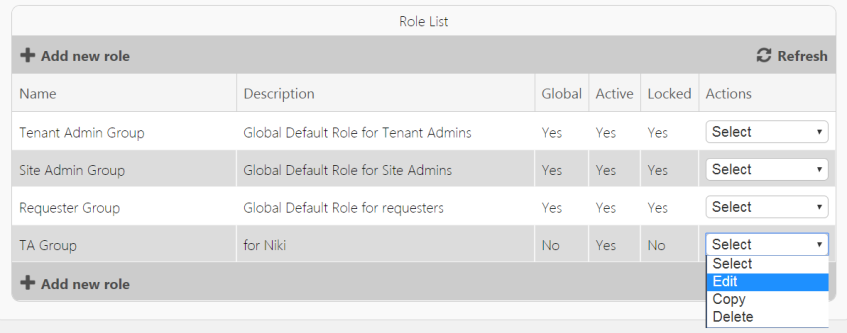
Default Roles
There are four roles available by default in Event Manager. These roles cannot be changed or deleted, but you can select Edit from the Actions drop down to view the permissions associated with each role.
- Tenant Admin: A Tenant Administrator is a Global Administrator role with access to all parts of the application, including events and site settings across all calendar sites within the Tenant account. A Tenant Admin can also force-approve events they are editing from the Events list.
- Site Administrator: A Site Administrator can manage various site and calendar settings for any assigned calendar sites, submit events, and can approve events if added to the approval process.
- Service Provider: A Service Provider can add and manage tasks. They cannot add or manage events, invoices, or anything else unless given additional roles or permissions.
- Requester: A Requester can create and submit events, but do not approve or publish these events.
Adding a Role
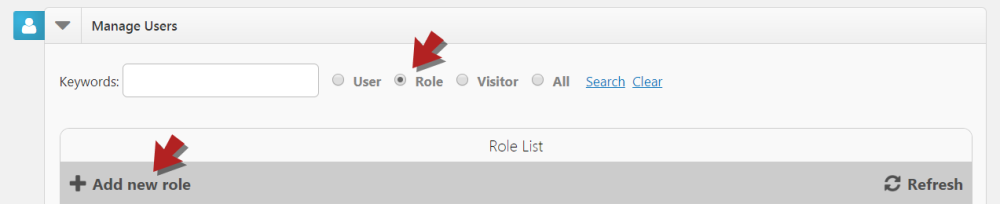
- Select the Role option at the top of the page, and the page will refresh with a list of all current roles.
- Click Add new Role.
- Enter a Role Name and Role Description.
- Check the box next to Active to make it available for use. This will apply all role permissions to users who are added to the role.
- Check the box next to Global to make the role available for use on all current and future sites. If you do not check this box, permissions associated with this role will only apply to the site you are currently on.
Select the permissions needed for this role in the Permissions section.
Permissions
- The Permissions section will default to the basic view, which simply allows you to determine if the users in this role are Administrators for the site, or just Standard Users. Checking the box next to one of these user types will give them the default permissions associated with that user type:
- Administrator default permissions include approving events submitted for approval, publishing events to the calendar without review, viewing reports, and accessing all site settings with the exception of Global options.
- Standard User default permissions include creating and submitting events for approval, but does not include access to reports or site settings.
- If you would like to configure permissions yourself, click on the Advanced View link to check or uncheck the permissions as needed:
- Site Permissions
- Calendar Settings: Selecting this option will allow the user to access layouts, media library, event setup, product setup, aggregation, and search settings.
- Advanced Settings: Selecting this option will allow the user to access: Analytics, API Configuration, External Authentication, and Site Management.
- Reports: Selecting this option will allow the user to access the "Reports" link found in the top level navigation of all administration pages. They will have access to all reports with the exception of the Location Conflict Report.
- Layouts: Selecting this option will allow the user to access the Layouts tile on the Site Settings Page.
- Categories: Selecting this option will allow the user to access the Categories tile on the Site Settings Page. *Note: This does not include Global Categories.
- Event Admin: Selecting this option will allow the user to edit other people's events.
- Approval Process: Selecting this option gives the user access to the Approval Process tile on the settings page.
- User and Role Management: Selecting this option will allow the user to access to the Users tile on the Site Settings Page.
- Imports: Selecting this option will allow the user to create and modify event imports.
- Sharing: Selecting this option will allow the user to access the sharing and template management tile on the Site Settings Page.
- Locations: Selecting this option will allow the user to access the Locations tile on the Site Settings Page. *Note: This does not include Global Locations.
- Event Permissions
- Media Library: Selecting this option will allow the user to browse the media library for images or attachments.
- Paid/Donation Items: Selecting this option will allow the user to add items to an event with a cost associated to them.
- Highlighted Events: Selecting this option will allow the user to feature or highlight an event.
- Upload Images / Attachments: Selecting this option will allow the user to upload their own images or attachments.
- Free Items: Selecting this option will allow the user to add items to an event without a cost associated to them.
- Advanced WYSIWYG: Selecting this option will allow the user to use the advanced editor when creating an event to style the event's description.
- Display Permissions allows you to choose whether the users in this role can view private events. The View Private Events box can only be unchecked for a Standard User, as an Administrator can view all events for this site by default.
- Click the Add link next to any user you'd like to add to the role.
- Click Save at the bottom of the Role page to add this Role to the application.
Managing roles
Once you have added a role, you can access the role profile to make changes as needed.
- From the Users page, select Role at the top.
- Once the page refreshes, select Edit from the Actions drop down menu next to the role name. This will bring up the role profile page.
- Make any changes needed, then click Save at the bottom.