Back to Event Manager Main Menu
Processing Payments And Refunds
In Event Manager, invoices can be paid or refunded from both the Payment List and Invoice List. Once a payment or refund has been processed, it will be displayed on the Payment List. *Note: If you do not currently have access to this feature, please contact your Sales Representative or Client Services for more information.
Watch the Video Tutorial
Processing a Payment
If you know the number of the invoice you need to process a payment for, make your payment from the payment list.
If you do not know the number of the invoice you need to process a payment for, locate and make your payment from the invoice list.
Making a Payment From the Invoice List
- Click Invoices from the side navigation menu and select Invoice List.
- Find the invoice you wish to process a payment for and click Pay. This will open the payment window for this invoice.

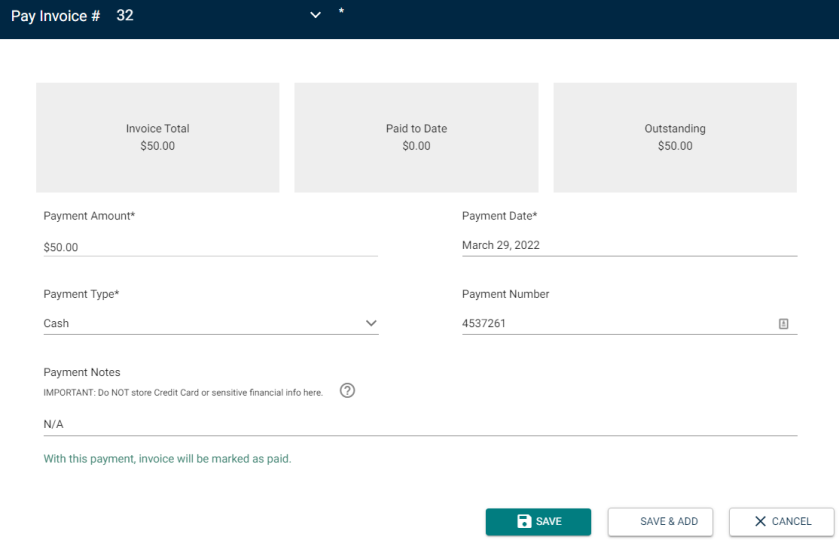
- The Invoice Total, Paid to Date, and Outstanding balances are listed at the top.
- The Payment Amount will be auto-populated with the outstanding balance, but can be manually adjusted if necessary.
- The Payment Date will be auto-populated with the date the payment is being added, but can be manually adjusted if necessary.
- Select the Payment Type from the drop down menu. The options available are Cash, Check, Credit, Purchase Order, Online, or Other. *Note: Online Payment is only available if a payment gateway has been configured.
- Enter a Payment Number, if applicable. *Note: This number will be displayed underneath the payment date on the payment list, and can be used as a search term to find the payment later.
- Enter any necessary Payment Notes. *Note: Do not store Credit Card or other sensitive financial information here. Event Manager is not meant to store this type of information.
- Click Save to finalize the changes, or Save & Add to finalize the changes and process another payment.
Making a Payment From the Payment List
- Click Invoices from the side navigation menu and select Payment List.
- Click Make a Payment. This will open up the payment window.
- Select the appropriate Invoice # from the drop down menu. *Note: This will auto-populate the Invoice Total, Paid to Date, and Outstanding balance boxes at the top of the payment window. Additionally, the Payment Amount will be auto-populated with the outstanding balance of the invoice.
- The Invoice Total, Paid to Date, and Outstanding balances are listed at the top.
- The Payment Amount will be auto-populated with the outstanding balance, but can be manually adjusted if necessary.
- The Payment Date will be auto-populated with the date the payment is being added, but can be manually adjusted if necessary.
- Select the Payment Type from the drop down menu. The options available are Cash, Check, Credit, Purchase Order, Online, or Other. *Note: Online Payment is only available if a payment gateway has been configured.
- Enter a Payment Number, if applicable. *Note: This number will be displayed underneath the payment amount and date on the payment list and can be used as a search term to find the payment later.
- Enter any necessary Payment Notes. *Note: Do not store Credit Card or other sensitive financial information here. Event Manager is not meant to store this type of information.
- Click Save to finalize your changes, or Save & Add to finalize the changes and process another payment. *Note: If Online was selected as the Payment Type, the Save buttons will be replaced with a Pay Online button that will navigate to the configured payment gateway for payment.
Processing a Refund
Refunds can be processed for payments in Event Manager as long as they were not made online through a payment gateway. *Note: Online payments made through the Stripe payment gateway can be refunded from Event Manager. For all other payment vendors, contact the vendor directly for refunds.
- Click Invoices from the side navigation menu and select Payment List.
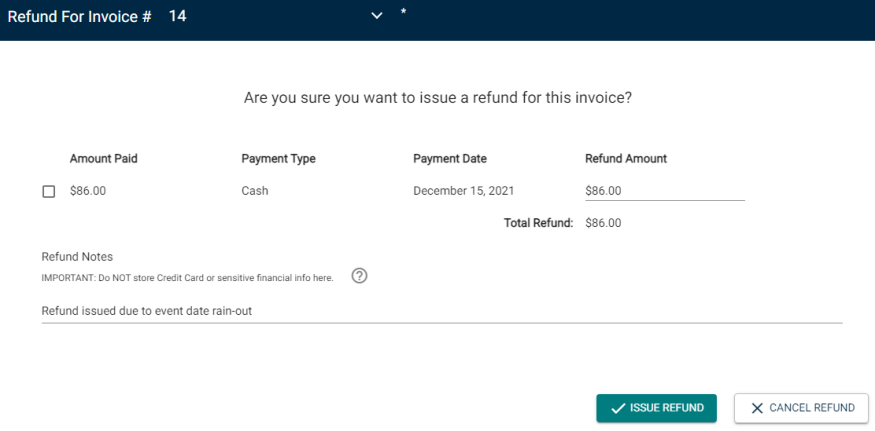
- Click Add a Refund. This will open up the refund window.
- Select the appropriate Invoice # from the drop down menu. *Note: This will auto-populate the Amount Paid, Payment Type, and Payment Date fields with any payments made to the invoice.
- Check the box next to the Amount Paid to populate that amount in the Refund Amount field, or enter the amount manually if you are issuing a partial refund.
- Enter any Refund Notes, if applicable. *Note: Do not store Credit Card or other sensitive financial information here. Event Manager is not meant to store this type of information.
- Click Issue Refund to finalize the changes.