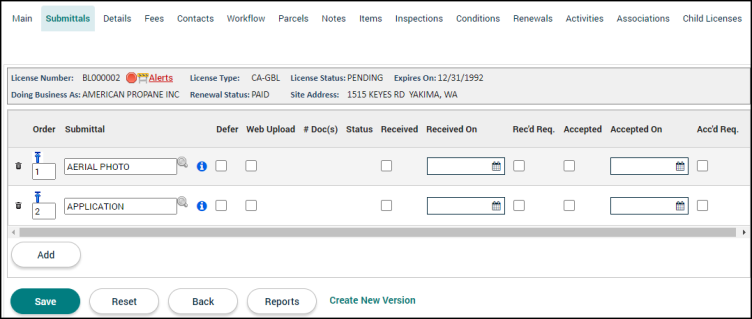
Licensing: Submittals tab
The Submittals tab allows you to add and manage any submittals needed to process a license application or renewal. Submittals are documents that may be required for issuing and renewing a license. Depending on your jurisdiction's configuration, this tab may be populated with a list of submittals based on the license type that was selected when the application was initially created. Additional submittals can be added if necessary.
Security Notice:
SmartGov has built in protections for PII and maintains high levels of storage encryption for data that is defined as sensitive Information. A submittal can be marked as containing sensitive information when configuring the submittals for the licensing module.
If your jurisdiction has configured SmartGov to integrate with a third-party document management system, documents stored on the third-party system are outside of the boundary and controls of your Dude Solutions product. Security and privacy controls provided in Dude Solutions product documentation and contracts will not apply to documents stored in third-party systems. The Client is responsible for assessing and maintaining the security of documents stored in third-party systems.
Adding a submittal
- Begin typing or click the magnifying glass icon (
 ) to select the appropriate Submittal. *Note: If the submittal is not listed, it will need to be added through the Licensing Lookup Values page.
 - If any additional submittals are needed, click Add and repeat this process.
- Click Save.
Submittal options
Once all submittals have been added to the license, various column headers will display that allow you to edit and process those submittals.
- Order: Adjust the order of the submittals listed on the tab using the text field. Click the up arrow icon (
 ) to move the specific submittal to the top of the list.
 - Information Icon (
 ): Clicking this icon will allow you to view important details about the submittal, as well as upload documents. You can also create a new submittal version, generate a deficiency report, add deficiency comments, or view the version history in order to help you process the license.
 - Defer: Checking this box allows the license to be issued without receiving or accepting this submittal.
- Web Upload: Checking this box allows associated contacts or contractors with portal access to upload the document through the Citizen Portal.
- By default, the Rec'd Req. field and Acc'd Req. fields will be automatically checked when the Web Upload box is checked. This will require a citizen to upload the submittals prior to submitting their license application. Uncheck these boxes to make the submittal optional prior to submitting the license application for Citizen Portal users.
- # Doc(s): This number indicates how many documents have been uploaded to this submittal.
- Status: This column shows the status of the submittal. Each status is configured by the jurisdiction and is tied to either the Pending, In Review, Approved, Deficient, or Cancelled submittal state.
- Received: This box should be checked to indicate that the document has been received by the jurisdiction, but has not been reviewed. *Note: This box will automatically be checked as soon as any document is uploaded to the submittal.
- Received On: The date entered here is the date the document was received by the jurisdiction.
- Rec'd Req. (Received Required): Checking this box requires you to mark the submittal as Received in order for the license to progress.
- Accepted: Check this box to indicate that the document has been reviewed and accepted by the jurisdiction for department review. This will also check the Received box if it has not already been checked. *Note: If the Acc'd Req box is checked, the Accepted box must be checked in order to issue the license unless the submittal has been deferred.
- Accepted On: The date entered here is the date the document was accepted by the jurisdiction.
- Acc'd Req. (Accepted Required): Checking this box requires you to mark the submittal as Accepted in order for the license to progress.
- Notes Icon (
 ): Clicking this icon will allow you to add a note to the submittal. These notes can include attachments such as documents, pictures, or spreadsheets.
 - Delete: Click the trash can icon (
 ) to remove the submittal from the license application. *Note: If child records exist, you cannot delete the submittal from the license.
Processing submittals
- Click the information icon () next to the Submittal.
- In the Version Detail window that displays, check the Received On box to indicate the submittal has been received by the jurisdiction.
- This will automatically populate the current date into the adjacent field, however this date can be changed if necessary. This date will represent the date the submitted file was received by your jurisdiction. *Note: Uploading a document will automatically check this box.
- If the file is the correct submittal, check the Accepted On box.
- This will automatically populate the current date into the adjacent field, however this date can be changed if necessary.
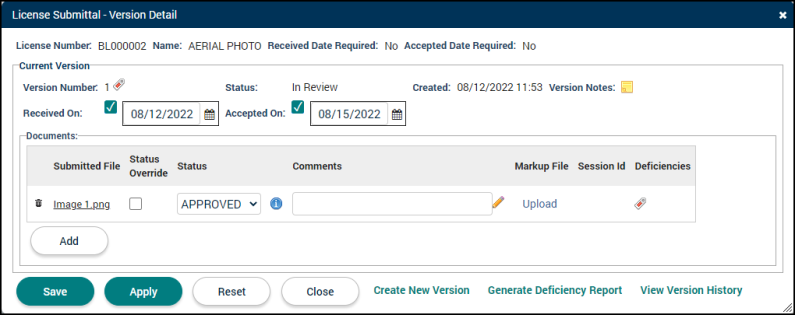
- If the file is not already associated with the submittal, you can add the file through the Version Detail window.
- Click Add in the Documents section.
- Click Upload and select the document to attach in the window that appears. *Note: You can upload one file at a time.
- Click Add in the Documents section.
- Once the file has been uploaded, you have the following options:
- Markup File: Click Upload to attach a Markup File related to this document.
- Status Override: Check this box to override the status of this particular submittal document.
- Status: Use this drop-down menu to select the Status of the submitted file. *Note: This field cannot be edited until the document has been accepted.
- Comments: This field will list any comments that portal users have provided when uploading the document to the license.
- Deficiencies: Add a deficiency to the submittal if there are any issues that require a new version to be submitted. *Note: You will also need to change the status of the submitted file to Deficient.
- Click the deficiency icon (
 ) beside the Version Number of the submittal or the submitted file in the Documents section.
 - Click Add.
- Select the document the deficiency is associated with in the Document drop-down menu.
- Select the step the deficiency is associated with in the Step drop-down menu, if applicable.
- Enter any Deficiency Comments.
- Click Save.
- Change the Status of the submitted file to Deficient.
- Click Save.
When changing the status of a Submitted File, you may receive an error message that says "The Item Status must match the rollup status. The current rollup status is [status]. Override status if needed." This may occur if the Submittal is tied to a Workflow step. You can check the Status Override box in the Version Detail window you are working in or close the window and navigate to the Workflow tab to continue changing the status of the submittal.
