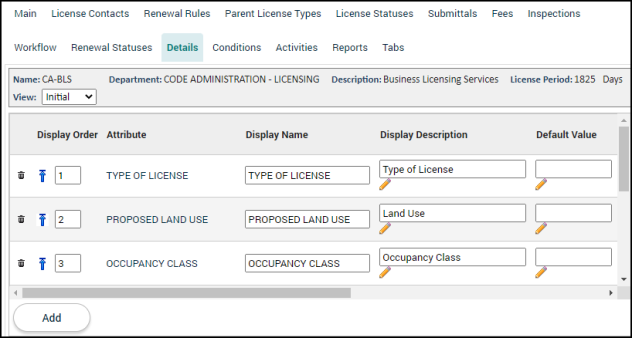
Licensing setup: Details tab
The Details tab represents additional data needed by the jurisdiction for a particular license type. When creating a license type, you will select which custom attributes should appear on an initial license application or a license renewal of this license type. Please review the Custom Attributes page if you need help creating or editing custom attributes in your account.
Adding custom attributes to the license type
- Click on Administration in the navigation menu, then select Licensing Setup.
- Click License Types.
- Select the license type from the list.
- Click the Details tab.
- Use the View drop-down menu in the license type information box to display the Initial application list or the Renewal application list.
- Begin typing or click the magnifying glass icon (
 ) to select the Custom Attribute you would like to add to the license type. The custom attribute will populate into the newly created row.
 - Click Add. Repeat this process to add any additional custom attributes.
- Click Save.
- If you would like to copy the custom attributes on the initial list to the renewal list, click the Copy Initial to Renewal link at the bottom of the page.
- Check the box beside each Display Name you would like to copy to the renewal list.
- Click Select.

Custom attribute options
These options will affect how the custom attribute is displayed and how it behaves on licenses of this type.
- Display Order: This column determines the sequential order that the custom attributes appear on the tab. Click the up arrow icon (
 ) to bring a custom attribute to the top of the list.
 - Attribute: This is the attribute name that is configured when creating the custom attribute.
- Display Name: This will be how the custom attribute is displayed to users on the license in SmartGov.
- Display Description: This will be how the custom attribute is displayed to users on the Citizen Portal.
- Default Value: Information entered in this field will automatically populate on licenses of this type. The default value entered here must follow the formatting rules for the custom attribute's type. For example, if a custom attribute is formatted using the date type, you must enter the date in the mm/dd/yyyy format. *Note: Information entered in this field will override any default values configured for the custom attribute.
- Active: This controls whether the custom attribute is populated on licenses of this type. Once unchecked, any licenses created of this type will no longer include this custom attribute. *Note: Once a license has used a custom attribute, the custom attribute cannot be deleted, only inactivated using this checkbox.
- Required: Checking this box will cause the custom attribute to be displayed with an asterisk indicating a user must enter the custom attribute information before the license application can be submitted. *Note: This can affect status changes of licenses during processing.
- Web Private Accessible: Checking this box allows Citizen Portal users who are contacts or contractors associated with a license of this type to view the custom attribute in the Details section of the license on the Citizen Portal.
- Web Public Accessible: Checking this box allows the general public to view this custom attribute in the Details section of a license of this type on the Citizen Portal. *Note: The Details tab must also be set to Public for this license type on the Tabs tab.
- Web Required: Checking this box will require Citizen Portal users to enter the custom attribute information when submitting a license application or renewing a license of this license type. *Note: Citizen Portal users will be unable to proceed with their license application unless all custom attributes marked as Web Required are filled out.
- Web Updateable: Checking this box will allow Citizen Portal users to enter the custom attribute information when submitting a license application or renewing a license of this license type.
- Delete: Click the trash can icon (
 ) to remove a custom attribute from the list. The custom attribute will appear with a strike-through mark.
 - Click Save to finalize any changes that have been made.
