Back to Event Manager Main Menu
Modifying, canceling, and deleting events
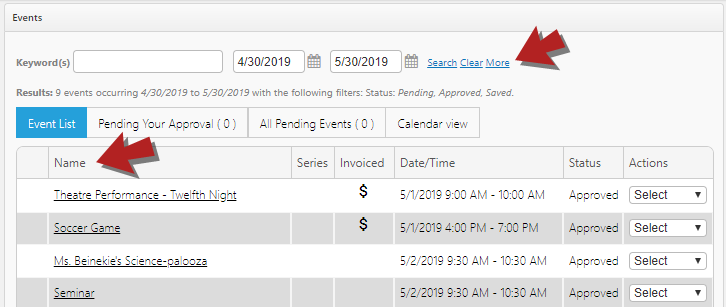
Tenant and Site Administrators can modify and cancel events from the Events Dashboard. You can filter the list of events displayed in the dashboard using the options at the top of the screen.
- Click on Events from the side navigation menu.
- Enter any Keywords, Schedule IDs, and/or a Date Range and click the Search link to pull up those results.
- Click More to filter the list by Category, Location, or Status.
- You can also sort the list by clicking on the column headings.
When managing your events from the Event Dashboard, you may see an exclamation mark icon ( ![]() ) next to an event in the list. Be advised, when this icon is displayed, it means that action is needed on the event for some reason. Reasons that you may need to take action on an event include:
) next to an event in the list. Be advised, when this icon is displayed, it means that action is needed on the event for some reason. Reasons that you may need to take action on an event include:
- The event has expired insurance and needs to be updated with current insurance information.
- The event is double booked with another event and one of the two events should be moved.
Event actions
If you need to edit, delete, copy, or cancel an event, use the Actions drop down menu next to the event on the dashboard.
- Dashboard will take you to an event specific dashboard for that event.
- Edit is the same as clicking on the event's name. If the event is a series, this option modifies only the single date and time or occurrence of that series event.
- If you wish to edit all dates and times or occurrences of a series event, click Edit Series. This will modify all future occurrences in the series.
- Copy allows you to create a new event based on this event's information. You will be redirected to the Create an Event page with the event's details already filled in.
- Cancel will add "Canceled" to the event name and take you to a Cancellation Dashboard where you can select the options for canceling this event.
- Delete removes the event's next occurrence from the site.
- If you wish to remove all dates and times or occurrences of a series event, click Delete Series.
- Invoice will open the invoice form, automatically add the event to the invoice, and populate the To section with the event requester's information.
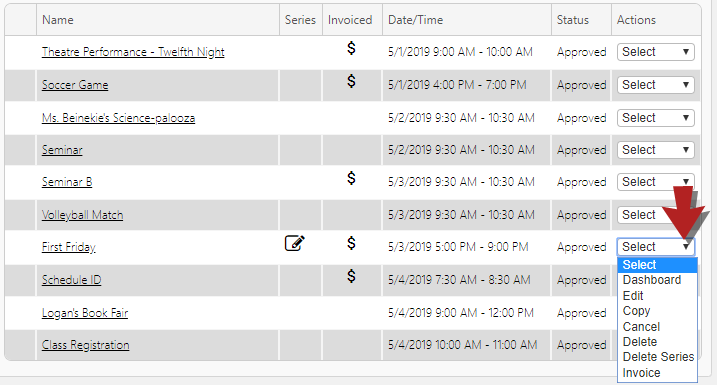
- To modify an individual event, click on the event's name or select Edit from the Actions drop down.
- To modify an event series, click on the series icon (
 ) or select Edit Series from the Actions drop down.
 - Make necessary changes to the event.
- Click:
- Submit to finalize the changes.
- Invoice to begin creating an invoice for this event or series.
- Cancel to exit the Modify an Event page without saving any changes.
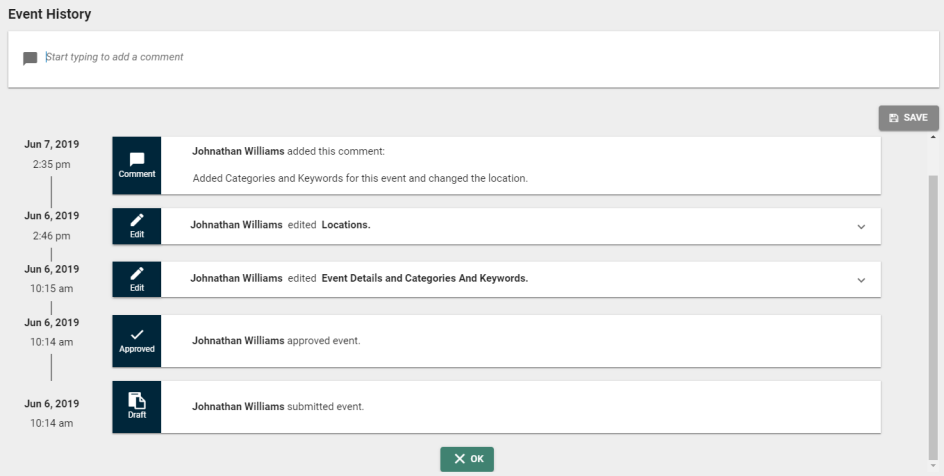
- Click on the event's name or select Edit from the Actions drop-down.
- Click See Event History under the Event History panel.
- Changes to the Event or Event Series are displayed with a time and date stamp.
- To view more details about an edit, click the down arrow to expand the panel.
- To add a comment to the event history, start typing in the field at the top of the page and click Save.
Viewing terms and conditions in event history
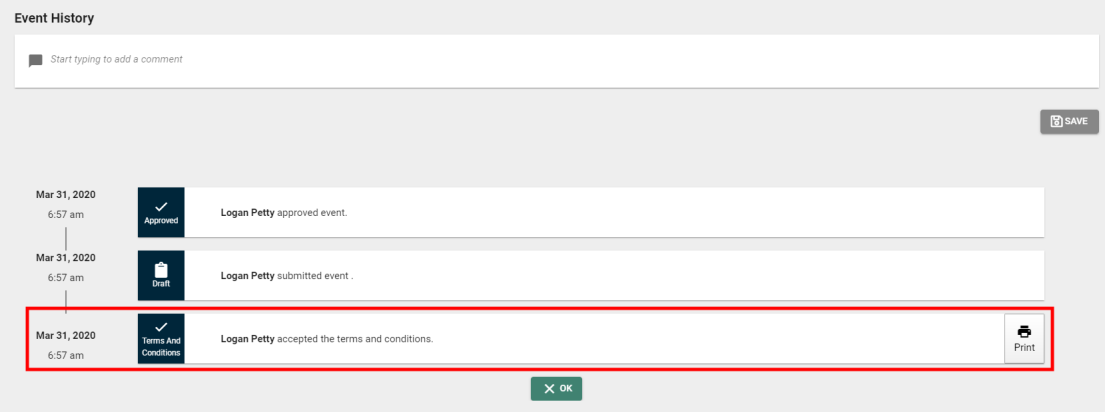
If the event was created using an event form with terms and conditions, the time and date that the user accepted the terms and conditions will be recorded in the event history. Additionally, you can view the version of the terms and conditions that the user accepted.
- Click on the event's name or select Edit from the Actions drop-down.
- Click See Event History under the Event History panel.
- Changes to the Event or Event Series are displayed with a time and date stamp.
- Locate the time and date that the user accepted the terms and conditions in the Event History list.
- Click Print next to the Terms and Conditions line to view the version of the terms and conditions that the user accepted. The terms and conditions will open in a new tab, where they can be downloaded to your computer or printed, if necessary.
- From the Events Dashboard, select Copy from the Actions drop down next to the event you'd like to copy.
- All information from this event will be copied into a new event form.
- Make any necessary changes.
- Click the Save button at the bottom of the form to save the details of the event.
- Click the Submit button to save the event and submit it for review and approval. *Note: Only Standard users will see the Submit button.
- Click the Publish button to save the event and publish it on the calendar. *Note: Only Site Administrators and Tenant Administrators will see the Publish button.
- Click the Discard button to cancel requesting the event and return to the Events Dashboard.
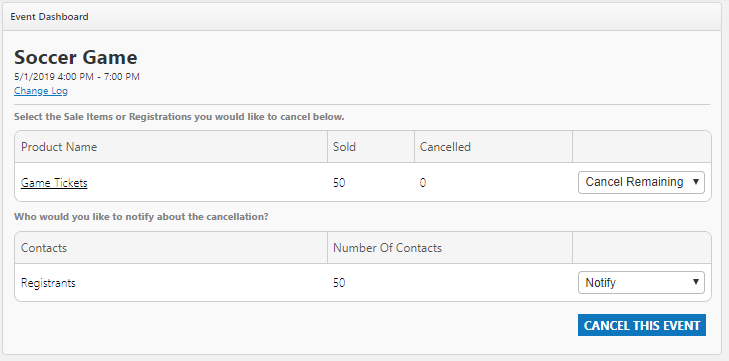
- From the Events Dashboard, select Cancel from the Actions drop down next to the event you'd like to cancel. This will take you to the Cancel Event screen.
- If there are no Sale Items or Registrations for this event, click Cancel This Event and then click OK in the confirmation pop-up.
- If there are Sale Items or Registrations for this event, there are two cancellation options to select from:
- Select Cancel Remaining to automatically cancel and alert the registrant or purchaser for the product indicated. *Note: This will not automatically issue a refund. Refunds must be issued via the Events Dashboard.
- Select Do Not Cancel to retain all registrants as active for this event. This option is not recommended if the event is cancelled.
- If there are Contacts for this event, select either Notify or Do Not Notify to choose whether or not to alert them of the cancellation.
- To delete an individual event, select Delete from the Actions drop down.
- To delete a series event, select Delete Series from the Actions drop down.
- Click OK in the pop-up window to confirm.
Restoring a deleted event
- From the Events Dashboard, next to the deleted event, select Restore or Restore Series from the Actions drop down and click OK in the pop-up to confirm.
- Restoring an event will change the status from Deleted to Saved.
Purging a deleted event
- To permanently remove an event with a deleted status, select Purge or Purge Series from the Actions drop down and click OK in the pop-up to confirm.
- Purged events cannot be recovered.
Calendar view
To easily see a month view of your events, or to quickly change a date of an event, utilize the Calendar View feature. *Note: Only the date of the event can be changed from the calendar view. To change time, location, or any other details, utilize the Edit option on the Event Actions menu.
- Above the list of events, click on Calendar view.

- To move an event to another day, click and hold your mouse on the event you wish to move.
- Drag the event to the new date, then release your mouse. As long as there is no conflict, the event will save on the new date.

