Recurring inspection: Main tab
The Main tab displays an overview of the recurring inspection. This tab includes primary contact information and location information as well as any associated inspections.
Recurring inspection information
The information bar that displays across the top of the recurring inspection lists the RI Number, Recurring Inspection Type, RI Status, and Due Date of the current inspection. The due date will update as inspections on the recurring inspection interval are performed and completed.
- Click the sticky note icon (
 ) to add notes to the recurring inspection . These notes can include links and attachments, such as documents, pictures, or spreadsheets.
 - Click the edit icon (
 ) to update information related to the recurring inspection , including the Due Date field and the RI Status.
- Click Save if any updates are made.

Recurring inspection interval information
The information displayed below the information bar gives an overview of the current interval of the recurring inspection as well as dates relevant to the recurring inspection .
- Use the drop-down to update the Status of the recurring inspection interval inspections are carried out and completed.
- Click Add Note to add a note to the interval.
- If this recurring inspection interval needs to be Assigned To a User or Group, select the appropriate option in the drop-down menu and then begin typing or click the magnifying glass icon (
 ) to select the assignee. *Note: Assigning a user or group to a recurring inspection interval will not populate the on their User To Do list.
 - Click the information icon (
 ) beside the Primary Contact to view more information about the contact.
- Last Activity displays a time stamp of the last changes made.
- The Initiate Date defaults to the date the recurring inspection interval was created. You can adjust this field as needed.
- Once the recurring inspection interval is in a 'Closed' Process State, the Completed date will populate with the current date.

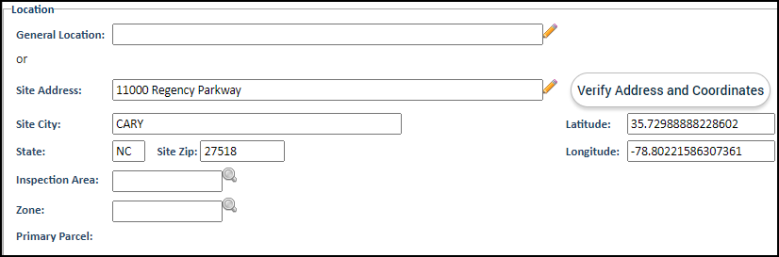
Location
The location section will populate with information entered when the recurring inspection was created.
- Click the Verify Address and Coordinates button to match the entered address to the Esri address service.
- Click Use Address as Entered to keep the address as it was originally entered on the recurring inspection .
- Click the Address Only button to copy the appropriate Esri address to the Site Address fields.
- Click the Coordinates Only button to copy the Latitude and Longitude coordinates of the Esri address to the recurring inspection .
- Begin typing or click the magnifying glass icon () to select an Inspection Area and Zone, if applicable.
- Click Save if any changes are made.
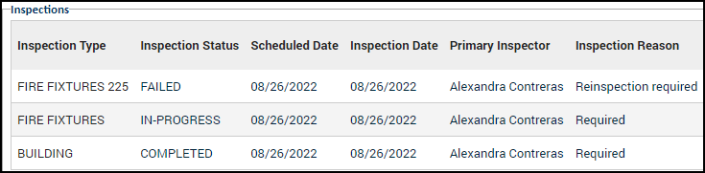
Inspections
The Inspections section lists the Inspection Type, Inspection Status, and Inspection Date of any inspection on the current interval of this recurring inspection. These inspections are managed through the Inspections tab.
Recurring inspection options
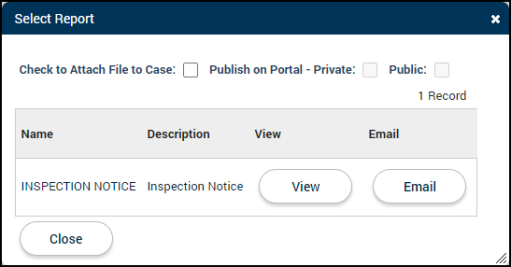
Reports
- Click the Reports button at the bottom of the page.
- Check the Check to Attach File to Case box if you would like to attach one or more available reports to the recurring inspection as a note. *Note: Recurring inspection reports will not display on the Citizen Portal.
- Click the View button next to the report you want to make available. This opens the report in a new browser tab.
- If you would like to send the report directly to contacts listed on the recurring inspection, click the Email button beside the report.
- Check the box in the Send column next to the contact that should receive this report. *Note: The contact must be active and have a valid email address in order to appear in this window.
- Click the Send button.
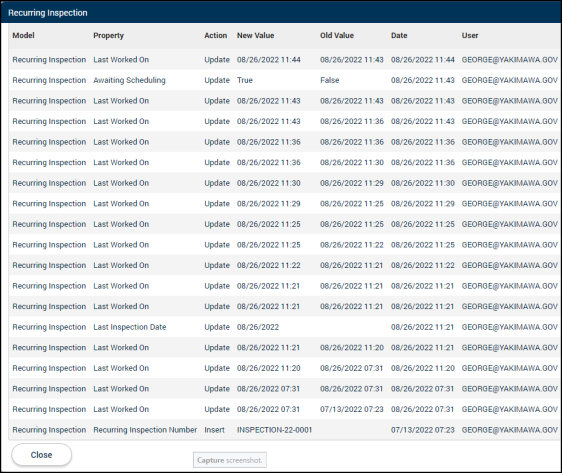
Retrieving audit information
- Click Audit at the bottom of the page to see a list of all changes made to the recurring inspection.
Changing the recurring inspection number
- Click the edit icon () in the recurring inspection information bar.
- Click Change RI Number in the window that displays.
- Enter a new RI Number. *Note: Changing the RI number could have negative effects on your recurring inspection sequencing. We recommend contacting your SmartGov administrator before using this feature.
- Click Save.

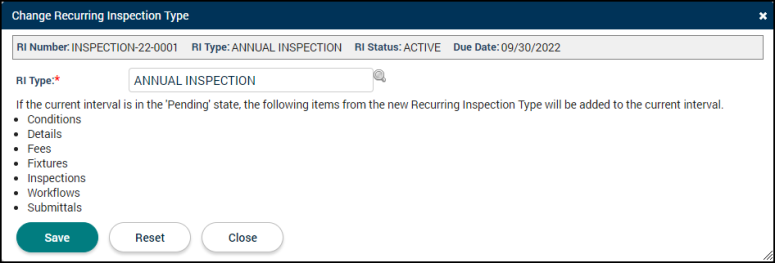
Changing the recurring inspection type
- Click the edit icon () in the recurring inspection information bar.
- Click Change RI Type in the window that displays.
- Begin typing or click the magnifying glass icon () to select the new Recurring Inspection Type. *Note: If the current interval is in the Pending state, the items listed in the Change Recurring Inspection Type window will be added to the current interval.
- Click Save to update the recurring inspection type.
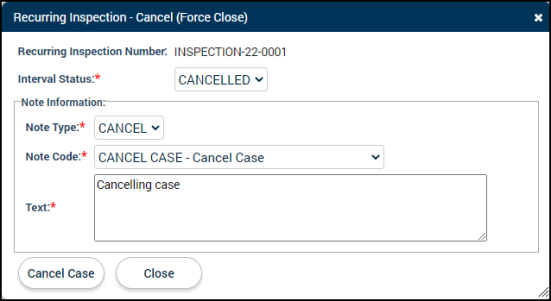
Cancelling a recurring inspection interval
- Click Cancel Recurring Inspection at the bottom of the page.
- The Status will update to the default status for the cancelled state configured for the recurring inspection type.
- Select a Note Type and Note Code. *Note: The Note Code drop-down menu will not populate until a Note Type has been selected.
- The Text field will auto-populate with a description of the cancellation. You can adjust this as needed.
- Click Cancel Case.