Recurring inspections: Conditions tab
The Conditions tab allows users to associate standard and custom conditions to a specific recurring inspection interval. Conditions can be set up to automatically populate when a recurring inspection is created, or the conditions can be added to a recurring inspection interval as needed. Once a condition has been added to a recurring inspection interval, it will apply to any future intervals until manually removed.
Adding additional conditions
Depending on the recurring inspection type selected, the Conditions tab may already have one or more conditions listed. However, you can add additional conditions if needed.
- Click Add.
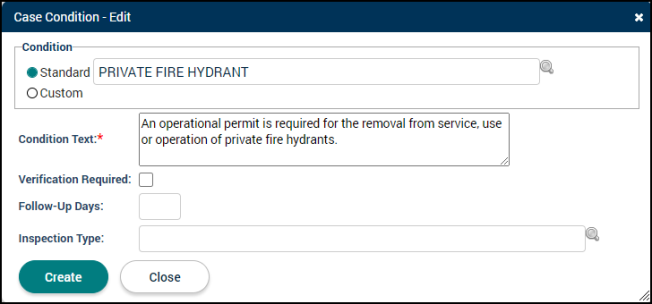
- If you are adding a Standard condition, begin typing or click the magnifying glass icon (
 ) in the Case Condition window to select the condition from the list.
 - If the condition you need to add is not available in the list of standard conditions, click the Custom option to create a custom condition for the permit. *Note: If you choose a standard condition and then update the condition text, the standard condition will change to a custom condition.
- The Condition Text will automatically populate if you have selected a standard condition. If you are creating a custom condition, enter the condition requirements into the Condition Text field.
- If the condition needs verification that its requirements have been met, check the Ver Req'd (Verification Required) box. This indicates that the condition must be validated before the recurring inspection interval can be closed.
- Enter the number of Follow-Up Days needed to address the condition if its requirements are not met during the inspection review.
- If the condition references, or needs to be associated with, a specific Inspection Type, begin typing in the field or click the magnifying glass icon () to select the inspection type from the list.
- Click Create to add the condition to the recurring inspection.
- Click Save on the Conditions tab.
Managing conditions
- Delete: Click the trash can icon (
 ) to remove the condition from the recurring inspection.
 - Display Order: Adjust the order of the conditions listed on the tab using the text field. Click the up arrow icon (
 ) to move a condition to the top of the list.
 - Parcel Number: This displays the parcel number if a parcel associated with the recurring inspection has conditions configured. *Note: Click Refresh Parcel Conditions at any time to update this list to display any conditions that have been associated with the parcel.
- Ver Req'd: Check the verification required box to require verification that this condition must be addressed to close the recurring inspection interval.
- Passed: Check this box if the condition has been passed.
- Verified: This field will populate with the date the Passed box is checked. Edit this field as needed.
- Failed: Check this box if the condition has failed to meet its requirements.
- Follow-Up Days: This field will list the number of days needed to follow-up on the status of a condition if the condition has failed to meet its requirements. Edit this field as needed.
- Follow-Up Date: This field will list the follow-up date to check on the status of the condition. This is calculated based on the date the Failed box is checked plus the number of Follow-Up Days. Edit this field as needed.
- For example, if the Failed box is checked on 11/1/2019 and the Follow-Up Days field is set to 3, the Follow-Up Date will be 11/4/2019.
- Inspection Type: This column will list any inspection type the condition has been associated with. This will populate the condition on the Actions tab of the associated inspection.
- Rpt Cat: Click the report categories icon (
 ) to view the reports the condition will display on.
- The left side of the table will show the reports where the condition will appear.
- Click the plus sign icon next any report this condition should populate on.
- If you do not want this condition to appear on a report, click the minus sign icon next to the report name.
- Click Save.
- Notes: Click the sticky note icon (
 ) to add notes to the condition. These notes can include links and attachments, such as documents, pictures, or spreadsheets.
 - Click Save if any changes are made on this tab.
