Permitting: Workflow tab
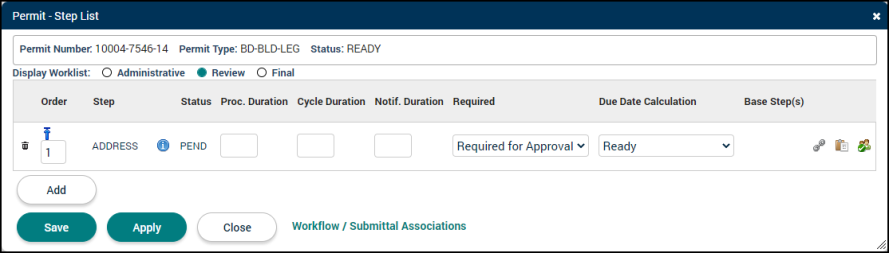
The Workflow tab shows the steps required to process the permit to completion. Typically, the workflow steps are grouped into Administrative, Review, and Final worklists. Depending on your jurisdiction's configuration, this tab may already be populated with multiple workflow steps based on the permit type that was initially selected. However, additional workflow steps can be added.
Adding a workflow step
- Click the Step Maintenance button below the list of existing workflow steps.
- Select either the Administrative, Review, or Final worklist. *Note: The worklist you select will determine the options for each step listed.
- Click Add. An additional row will appear.
- Begin typing or click the magnifying glass icon (
 ) to select the workflow step from the list. The workflow step's details will populate into the row.
 - Adjust the fields for each step as necessary
- Delete (
 ): Click this icon to remove a step from the list.
 - Order: Enter a number to indicate where in the list this step should appear. You can also click the up arrow icon (
 ) to move the specific step to the top of the list.
 - Def Note Reqd: Checking this box will require a deficiency note to be added to the workflow step if the status is changed to Deficient. *Note: This column will only display while in the Review Worklist.
- Information Icon (
 ): This will detail the Statuses and Actions tied to this step as well as the default unit of measurement for Processing and Notification duration, such as business days.
 - Proc. Duration: Use this field to edit the processing duration for the step. This will populate a due date for the workflow step in the user's To Do list as long as a due date calculation is selected.
- Cycle Duration: Use this field to edit the cycle duration for this step. This will recalculate the due date of subsequent cycles of the permit once the previous cycle has been completed.
- Notif. Duration: Use this field to edit the notification duration for the step. This setting will trigger an email notification if the user is subscribed to email notifications and will change the color of the workflow step on the user's To Do list.
- Required: Select Not Required, Required for Approval, or Required for Closure as applicable.
- Due Date Calculation: Select an option from the drop-down menu to determine how the due date will be calculated for this step. If the step you are editing has a base step associated with it, you must select either Base Due Date or Base Completed Date. *Note: If the Due Date Calculation is set to Technically Complete and the Process Duration is 5 calendar days, the due date of the step will be set to 5 days after the permit has moved to the Technically Complete state.
- Base Step(s): This column will list any base steps associated with the particular workflow step.
- Step Dependencies (
 ): Click this icon to add and view any associated base steps or dependent steps to the current step.
 - Step Actions (
 ): Click this icon to add or remove any additional step actions as well as edit the order, action field, and description of the step actions for the selected workflow.
 - Step Assignments (
 ): Click this icon to assign the workflow step to specific users and/or groups. *Note: We recommend assigning steps to Distribution Groups as this allows the jurisdiction to easily update the assignee configuration without having to update each individual step.
- Delete (
- Click Save.
Processing workflow steps
You can process a workflow step through the Step Detail window or through the Workflow tab on the code enforcement case. Processing the workflow step from the Step Detail window allows you to update the status of any actions associated with the step individually as well as assign the step. Processing the workflow steps from the Workflow tab allows you to quickly update the status of any workflow step associated with the permit.
Processing from the step detail window
- Select the appropriate Display Worklist button.
- Click the information icon () next to the workflow step.
- In the Detail window, select the appropriate Workflow Step Status.
- The Status Date and Status By fields will automatically populate with the current date and your name if you have changed the status. You may adjust these fields as necessary.
- The Due Date field may automatically populate based on the due date calculation method for this step. You may adjust this date as necessary. *Note: If the Due Date Calculation for this step is set to None, a due date will not populate into this field.
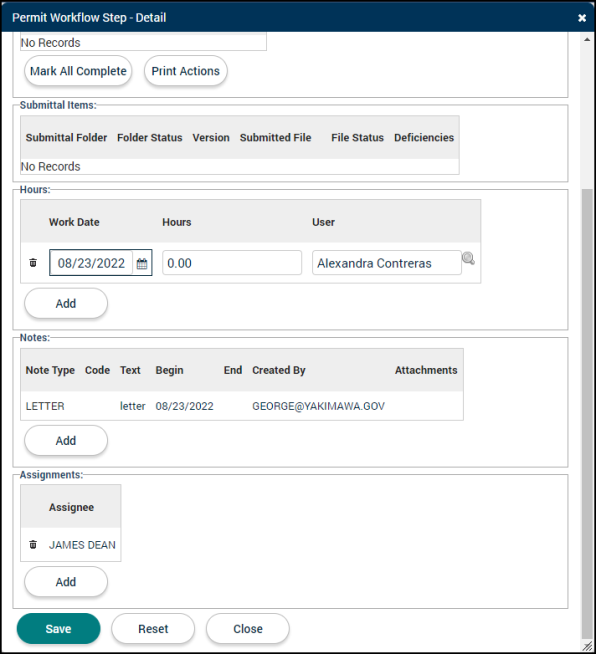
- In the Actions section, address each action individually by changing the action's Status or click the Mark All Complete button to complete all the actions in this section.
- The Status Date and Status By fields will automatically populate with the current date and your name, but can be adjusted as necessary. *Note: If the workflow step actions do not have the required statuses selected, you may receive a "Step has uncompleted actions." error message. You can address this error by correcting the statuses for the actions or bypass the error message by clicking Ignore.
- If any submittals are associated with this workflow step they will display in the Submittal Items section. This will display the Version Status, Version, allow you to open the document, add deficiencies, and edit the status of the submittal.
- In the Hours section, click Add to add time spent working on this workflow step to as many users as necessary.
- In the Notes section, click Add to add any notes to the workflow step.
- In the Assignments section, click Add to assign the workflow step to one or more users or groups. Begin typing or click the magnifying glass icon () to select an assignee from the list.
- Click Save.
Processing from the workflow tab
- Use the Workflow Step Status drop-down to edit the status of the workflow step.
- This will populate the Status Date field with the current date and the Status By field with your name. Adjust these as necessary. *Note: If your jurisdiction is using the Deficiency Note type and you change the status of the workflow step to Deficient, you will be prompted to enter a deficiency note.
- Click the notes icon (
 ) to add, edit, and view any notes associated with the workflow step.
Creating a deficiency
If there is a deficiency in a submittal associated with a workflow step, you are able to note this deficiency from the Workflow tab. *Note: In order to create a deficiency, a submittal must be tied to the workflow step.
- Click the information icon () next to the workflow step.
- In the Submittals section, click the Deficiencies icon (
 ).
). - Click Add in the Deficiency Comments section of the Version Deficiencies window.
- Use the Document drop-down to select the document with deficiencies.
- Select the associated Step in the drop-down menu.
- List any Deficiency Comments in the text field.
- Click Save.
- If necessary, change the Item Status to Deficient for the submittal.
- Click Save.

