Search license renewals
The Search License Renewals page allows users to view a list of all license renewal requests. From this page, you can view and quickly process a license renewal.
Processing license renewals
- Click Licensing in the navigation menu, then click Search License Renewals.
- Click the License Number of the renewal you would like to view. *Note: You may run a standard search to narrow down the renewals that display in this list.
- The page will display a condensed view of the renewal occurrence and includes the Main Information, Details, Fees, Submittals, Workflow, Inspections, and Conditions if they have been configured for the license type. Click the plus sign icon (
 ) to expand the section to verify or process, if needed.
- Any section marked with a triangle (
 ) needs verification.
 - Any section marked with an exclamation point (
 ) needs further action.
 - Any section marked with a check mark (
 ) has either been manually verified or verified by SmartGov.
- Any section marked with a triangle (
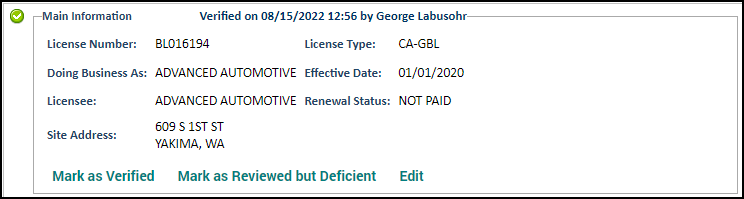
The Main Information section will list out the Licensee information, Effective Date, and Renewal Status.
- If the information has been verified, click Mark as Verified.
- If the information has been reviewed but is incorrect, click Mark as Reviewed but Deficient. The exclamation point () will display beside this section to notify anyone viewing the renewal that this information needs to be corrected.
- If the information listed needs to be updated, click Edit. This will direct you to the license where the information can be updated.
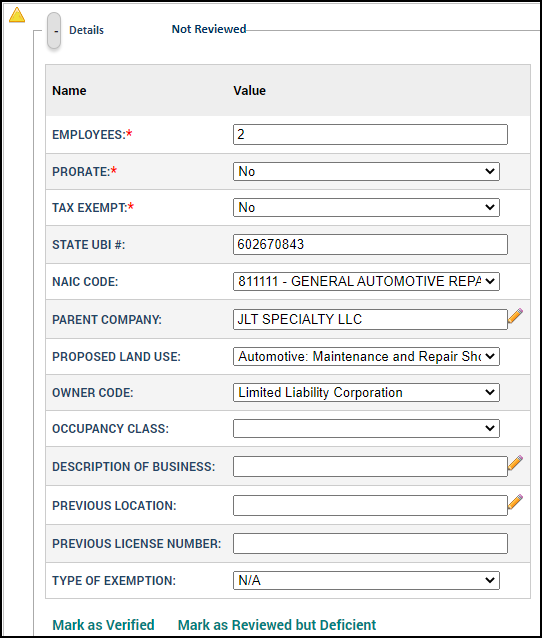
The Details section will list any custom attributes configured for the license type. Any values that have been entered on the license record will display here.
- If the information has been verified, click Mark as Verified.
- If the information has been reviewed but is incorrect, click Mark as Reviewed but Deficient. The exclamation point () will display beside this section to notify anyone viewing the renewal that this information needs to be corrected.
- If the information listed needs to be updated, enter the new Value for the custom attribute.
The Fees section will list any fees associated with the renewal. You can process the payment or view a receipt history.
- To process a payment, click Create Receipt.
- The Payer field, as well as the address fields, will automatically populate with the primary contact's information. This information can be edited as needed. *Note: The Payer does not need to be a listed contact in SmartGov. Any name can be entered here.
- In the Payments section, select the Payment Type and enter a Reference Number if necessary.
- If you are entering the full amount, click the Pay In Full button. This automatically populates the Amount Paid field with the total amount.
- The Fees section displays any fee with a remaining balance.
- If you are entering a partial payment, type the Amount Paid next to the appropriate line item in the Fees section. You can also click the arrow icon (
 ) to enter the entire line item amount. This will total all payments in the Amount Paid field in the Payments section.
 - Click the Create button to create the receipt for this payment.
- Click Close in the window that displays to return to the renewal.
- To view past receipts, click Receipt History.

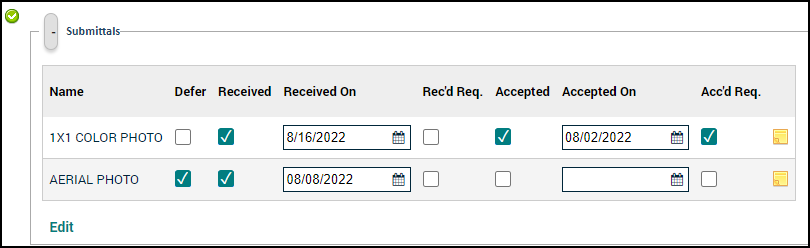
The Submittals section allows you to defer, receive, and accept renewals needed for the renewal of the license.
- Defer: Checking this box allows the license to be issued without receiving or accepting this submittal.
- Received: This box should be checked to indicate that the document has been received by the jurisdiction, but has not been reviewed. *Note: This box will automatically check as soon as any document is uploaded to the submittal.
- Received On: The date entered here is the date the document was received by the jurisdiction.
- Rec'd Req.: Checking this box requires you to mark the submittal as Received in order for the license to progress.
- Accepted: Check this box to indicate that the document has been reviewed and accepted by the jurisdiction for department review. *Note: If the Acc'd Req box is checked, this box must be checked in order to issue the license unless the submittal has been deferred.
- Accepted On: The date entered here is the date the document was accepted by the jurisdiction.
- Acc'd Req.: Checking this box requires you to mark the submittal as Accepted in order for the license to progress.
- Notes Icon (
 ): Clicking this icon will allow you to add a note to the submittal. These notes can include attachments, such as documents, pictures, or spreadsheets.
The Workflow section allows you to address any workflow steps required to renew the license.
- Select the appropriate Display Worklist option.
- Click the information icon (
 ) next to the workflow step.
 - In the Detail window, select the appropriate Workflow Step Status.
- The Status Date and Status By fields will automatically populate with the current date and your name if you have changed the status. You may adjust these fields as necessary.
- The Due Date field may automatically populate based on the due date calculation method for this step. You may adjust this date as necessary. *Note: If the Due Date Calculation for this step is set to None, a due date will not populate into this field.
- In the Actions section, address each action individually by changing the action's Status or click the Mark All Complete button to complete all the actions in this section.
- The Status Date and Status By fields will automatically populate with the current date and your name, but can be adjusted as necessary. *Note: If the workflow step actions do not have the required statuses selected, you may receive a "Step has uncompleted actions." error message. You can address this error by correcting the statuses for the Actions or bypass the error message by clicking Ignore.
- In the Hours section, click Add to enter time spent working on this workflow step to as many users as necessary.
- In the Notes section, click Add to enter any notes to the workflow step.
- In the Assignments section, click Add to assign the workflow step to one or more users or groups. Begin typing or click the magnifying glass icon (
 ) to select an assignee from the list.
 - Click Save.

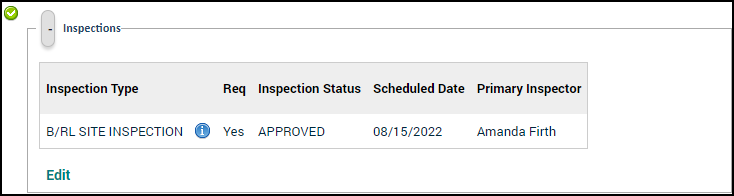
The Inspections section allows you to process any inspection required for renewal.
- Click the information icon () beside the inspection needing to be addressed.
- The inspection window will display where you can update information on the various tabs as needed. *Note: You can find more details about each individual tab on the Licensing Inspections Tab page.
- Click Save to return to the renewal.
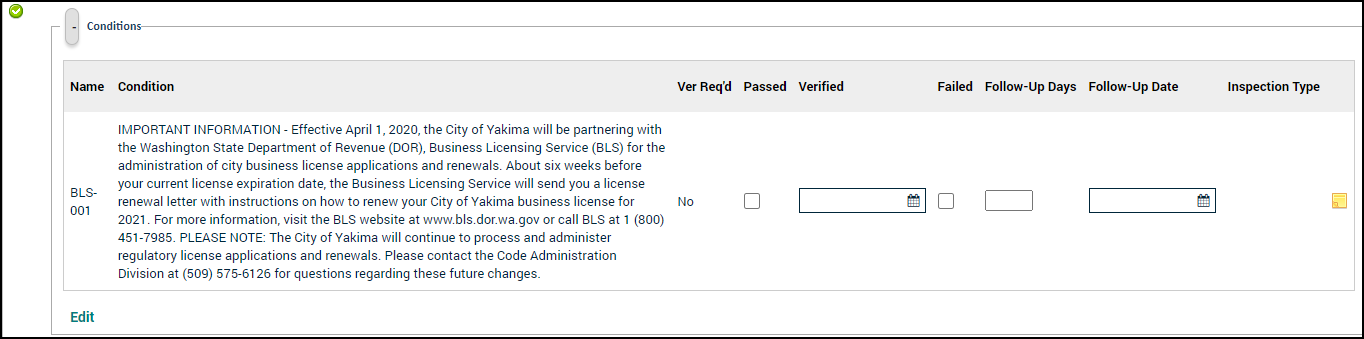
The Conditions section allows you to verify any conditions that have been configured for the license type.
- Passed: Check this box if the condition has been passed.
- Verified: This field will populate with the date on which the Passed box is checked. Edit this field as needed.
- Failed: Check this box if the condition has failed to meet its requirements.
- Follow-Up Days: This field will list the number of days needed to follow-up on the status of a condition if the condition has failed to meet its requirements. Edit this field as needed.
- Follow-Up Date: This field will list the follow-up date to check on the status of the condition. This is calculated based on the date the Failed box is checked plus the number of Follow-Up Days. Edit this field as needed. For example, if the Failed box is checked on 11/1/2019 and the Follow-Up Days is 3, the Follow-Up Date will be 11/4/2019.
- Inspection Type: This column will list any inspection type the condition has been associated with. This will populate the condition on the Actions tab of the associated inspection.
- Notes: Click the sticky note icon () to add notes to the condition. These notes can include links and attachments, such as documents, pictures, or spreadsheets.
- Check the Print Receipt box to generate a receipt when you select a print option at the bottom of the page.
- Check the Print License box to generate the license when you select a print option at the bottom of the page.
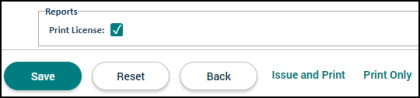
- Click one of the following options at the bottom of the screen:
- If you have made changes to the page but are not ready to issue or print the license, click Save.
- To issue the license and print any reports that have been checked, click Issue and Print.
- To print the reports that have been checked but not issue the renewal, click Print Only.
