Licensing: Main tab
The Main tab displays an overview of the license. This tab includes contact and address information as well as dates relevant to the license application and renewal.
License information
The information bar that displays across the top of the license lists the License Number, License Type, License Status, expiration date, and when the license was first issued. Some of these data fields will update as the license is processed, issued, and renewed.
- Click the sticky note icon (
 ) to add notes to the license. These notes can include links and attachments, such as documents, pictures, or spreadsheets.
 - Click the edit icon (
 ) to update information related to the license, including the Doing Business As field and the License Status.
- Click Save if any updates are made.

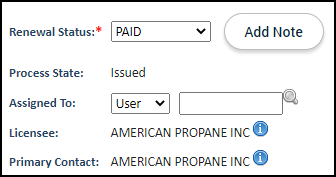
Renewal information
The information displayed below the information bar gives an overview of the current renewal for the license as well as dates relevant to the license renewal.
- Use the drop-down to update the license Renewal Status as you process the license or renewal application. *Note: Licenses whose license type is portal enabled and identified as Business will be created in the Incomplete process state to allow Citizen Portal users to make changes to their license applications as needed. This feature is available to clients with the Business Account option enabled in their jurisdiction. Contact Client Services if you would like more information on enabling the Business Accounts feature.
- Click Add Note to add a note to the license.
- If this license needs to be Assigned To a User or Group, select this option in the drop-down menu and then begin typing or click the magnifying glass icon (
 ) to select the assignee.
 - Click the information icon (
 ) beside the Licensee or Primary Contact to view more information about the contact.
License application timeline
This section shows important dates in the license's life cycle.
- Last Activity displays a time stamp of the last changes made.
- The Submitted field displays the date the license or renewal application was submitted. This date can be changed by clicking on the calendar icon or typing the date in the field.
- The Completed date is the date on which all submittals have been received and accepted. The number of submittals that have been received is displayed next to this field.
- The Approved date is the date on which all required workflow steps have been completed. The number of workflow steps that have been completed is displayed next to this field.
- The Issued date is the date on which the license is issued. All inspections, including deferred inspections, and all fees must be addressed prior to issuing the license.
- The Effective date is the date on which the license will go into effect for the Licensee.
- The Expires field will display the license expiration date if this license type has been configured to expire after a specific time frame.
- If you need to change the expiration date, you must check the Exp Override box and then update the Expires field.

License address
The License Address will populate with information entered on the initial license application. If no address or parcel information was included on the application, you can enter that information here. *Note: You may not be able to edit the physical address for a license if you have not been given secured functions that control who can update the license address.
- Click the Verify Address and Coordinates button to match the entered address to the Esri address service.
- Click Use Address as Entered to keep the address as it was originally entered on the application.
- Click the Address Only button to copy the appropriate Esri address to the Site Address fields.
- Click the Coordinates Only button to copy the Latitude and Longitude coordinates of the Esri address to the license application.
- Begin typing or click the magnifying glass icon () to select an Inspection Area and Zone, if applicable.
- Click Save if any changes are made.
License options
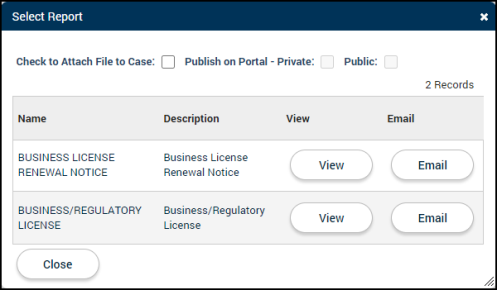
Reports
- Click the Reports button at the bottom of the page.
- Check the Check to Attach File to Case box if you would like to attach one or more available reports to the license as a note.
- Check the Publish on Portal - Private box to allow users associated with this license that have Citizen Portal accounts to view the report.
- Check the Publish on Portal - Public box to allow users without Citizen Portal accounts to view the report.
- Click the View button next to the report you want to make available. This opens the report in a new browser tab and automatically adds this report as a note on the license application.
- If you would like to send the report directly to contacts listed on the license application, click the Email button beside the report.
- Check the box in the Send column next to the contact that should receive this report. *Note: The contact must be active and have a valid email address in order to appear in this window.
- Click the Send button.
Retrieving audit information
- Click Audit to see a list of all changes made to the license.
- Select an option in the drop-down menu, such as Detail or Case Fee, if you would like to only view changes that have been made to that specific option.

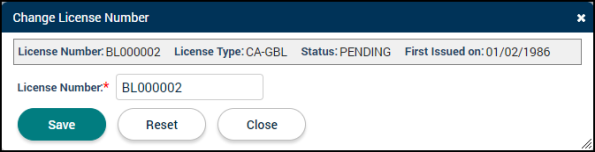
Changing the license number
- Click the edit icon () in the license information bar.
- Click Change License Number in the window that displays.
- Enter a new License Number. *Note: Changing the license number could have negative effects on your license sequencing. We recommend contacting your SmartGov administrator before using this feature.
- Click Save.
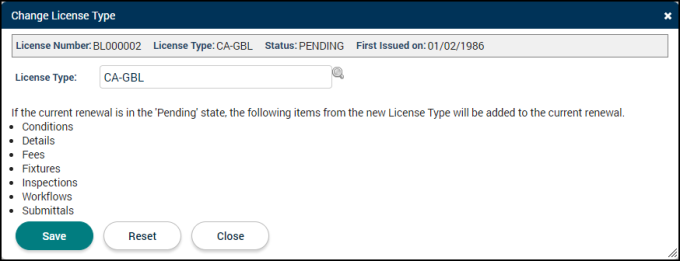
Changing the license type
*Note: The license type cannot be changed if the license has child licenses. If it does not have child licenses, then it can only be changed to a license type that is valid for the new parent license type.
- Click the edit icon () in the license information bar.
- Click Change License Type in the window that displays.
- Begin typing or click the magnifying glass icon () to select the new License Type. *Note: If the current renewal is in the Pending state, the items listed in the Change License Type window will be added to the current renewal.
- Click Save to update the license type.
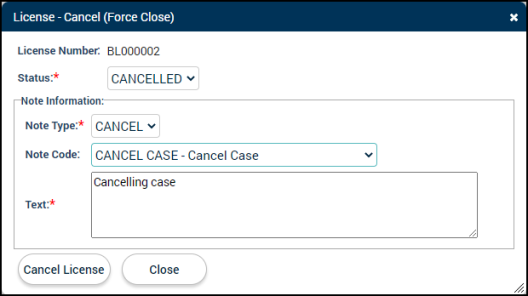
Canceling a license
- Click the edit icon () in the license information bar.
- Click Cancel License in the window that displays.
- The Status will update to the default status for the cancelled state configured for the license type.
- Select a Note Type and Note Code. *Note: The Note Code drop-down menu will not populate until a Note Type has been selected.
- The Text field will auto-populate with a description of the cancellation. Adjust this as needed.
- Click Cancel License.