Workflow steps
Permit steps represent the individual segments in a workflow. Workflow Steps can be associated with a permit type in any combination or order through the Workflow tab.
Adding a workflow step
- Click on Administration from the navigation menu, then select Permitting Setup.
- Click Steps.
- Click the Create New button.
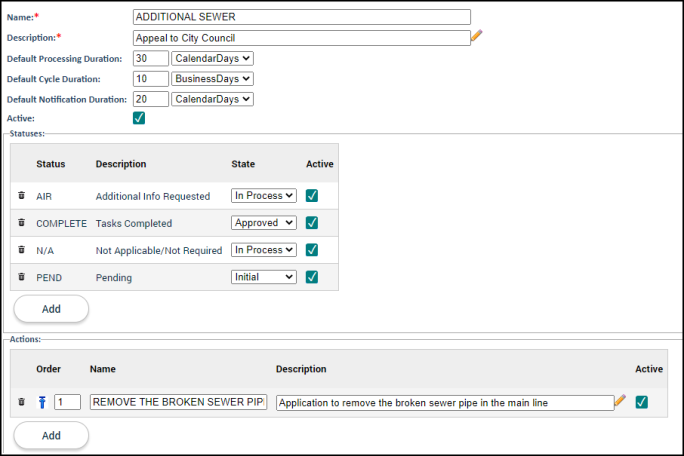
- Enter a Name for the step.
- Use the Description field to describe the step.
- Enter how many days it will take to complete this step in the Default Processing Duration field. Use the drop-down menu to select Business Days or Calendar Days.
- Enter how many days the cycle will take to complete in the Default Cycle Processing Duration field. Use the drop-down menu to select Business Days or Calendar Days.
- Enter how many days prior to the end of the processing duration a notification should be sent in the Default Notification Duration field. Use the drop-down menu to select Business Days or Calendar Days. *Note: This setting will change the color of the step on the assignee's User To-Do List as well as send an email notification, if that event subscription has been selected.
- Ensure the Active box is checked to display this step in the list of available workflow options when adding steps to a permit type or an existing permit..
- Add any Statuses associated with this workflow step.
- Use the drop-down menu to select a Status.
- Select the corresponding State in the drop-down menu.
- Ensure the Active box is checked if this status should show on the workflow step.
- Click Add to display an additional row. Repeat this process to add any additional statuses.
- Add any Actions associated with this workflow step.
- Click Add.
- Enter a Name and Description for the action.
- Ensure the Active box is checked if this action should show on the workflow step.
- Click Add to display an additional row. Repeat this process to add any additional actions.
- Click Save.
Copying a workflow step
Workflow steps with similar configurations are often needed. After setting up the first workflow step, you can easily copy the configurations from one workflow step to a new one.
- Click Administration in the navigation menu, then select Permitting Setup.
- Select Steps.
- Select the step from the list to copy.
- At the bottom of the page, click Copy.
- Enter a New Name and New Description for the workflow step.
- Check the Copy Actions box if you wish to copy the actions from the original step to the new step.
- Click Copy. The new step will be created with the same configurations of the original step.

