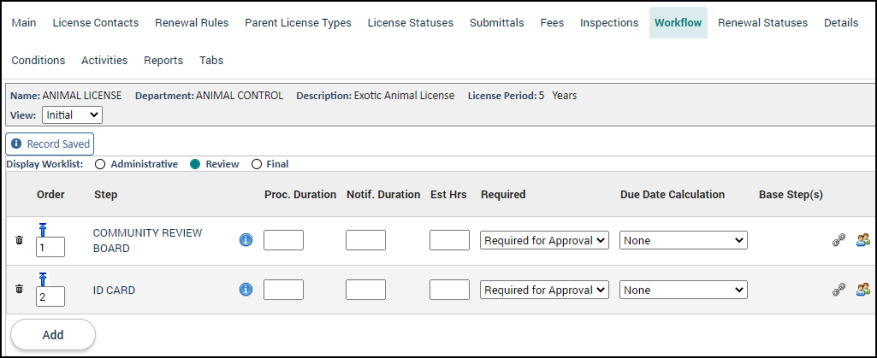
Licensing setup: Workflow tab
The Workflow tab allows you to add workflow steps to the license type. When creating a license type, you will select which workflow steps should appear on an initial license or a license renewal of this license type. You can add workflow steps to the Administrative, Review, or Final worklists so that they will populate on licenses of this type.
Adding workflow steps to a license type
- Click on Administration in the navigation menu, then select Licensing Setup.
- Click License Type.
- Select the license type from the list.
- Click the Workflow tab.
- Use the View drop-down menu in the license type information box to display the Initial application list or the Renewal application list.
- Select whether the workflow step should appear in the Administrative, Review, or Final worklist.
- Click Add. An additional row will appear.
- Begin typing or click the magnifying glass icon (
 ) to select the Step you would like to add to the license type.
 - Repeat this process to add any additional workflow steps.
- Click Save at the bottom of the screen.
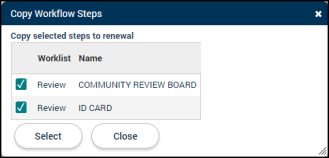
- If you would like to copy the workflow steps on the initial list to the renewal list, click the Copy Initial to Renewal link at the bottom of the page.
- Check the box beside each Name you would like to copy to the renewal list.
- Click Select.
Workflow step options
- Order: The display order determines the sequential order in which the workflow steps appear on licenses of this type. Click the up arrow icon (
 ) to move the step to the top of the list.
 - Proc. Duration (Process Duration): Enter how many days it would take to complete this workflow step. This will populate a due date for the workflow step in the user's to do list as long as a due date calculation is selected. *Note: A value may populate into this field if a Default Processing Duration was configured for this licensing workflow step, however the value can be changed here if needed.
- Notif. Duration (Notification Duration): Enter the number of days before the workflow step is due that SmartGov should send the assigned user an email notification if they are subscribed to receive emails. The due date is determined by the value entered in the process duration field.
- Est Hrs: Enter the expected number of hours to complete this workflow step.
- Required: Select whether the step is Not Required, Required for Approval, or Required for Closure. *Note: The options available in this drop-down menu depend on the workflow list you have selected.
- Due Date Calculation: The selection made here will determine how the due date is calculated. You can select whether the due date should be calculated based on the license's process state or base workflow steps. *Note: If the step you are editing has a base step associated with it, you must select Base Due Date or Base Completed Date for the Due Date Calculation.
- None: This option will not list a due date on the workflow step, even if the process duration is filled in.
- Selecting a process state, such as Approved or Submitted, in the drop-down menu will calculate the workflow step's due date based on the date the license moves to the selected state plus the process duration amount configured for the step.
- For example, if the license moves to Approved on 7/1 and the process duration is set to 3 days, the step will be due 7/4.
- Base Due Date: If the workflow step is dependent on another step, this option will use the same due date of the base workflow step plus the process duration amount configured for the step.
- For example, if Base Due Date is selected and the Base Step has a due date of 7/1 and a processing duration of 2 days, the Dependent Step will have a due date of 7/3.
- Base Completed Date: If the workflow step is dependent on another step, this option will calculate the due date according to when the base step is completed plus the process duration amount configured for the step.
- For example, if Base Completed Date is selected and your Base Step is due on 7/15 but is completed on 7/10, the due date of the Dependent Step will be based off of the 7/10 completion date plus the processing duration.
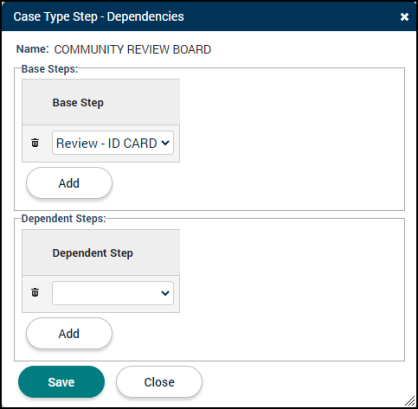
- Base Step(s): This column will show the base step that the current workflow step is dependent on.
- Step Dependencies: Click the link icon (
 ) if this step should be dependent on another step or if you would like to identify another step as dependent upon the currently selected workflow step.
- Click Add in the Base Steps section to add one or more workflow steps that must be completed before the currently selected workflow step can be completed.
- Click Add in the Dependent Steps section to add one or more workflow steps that cannot be completed before the currently selected workflow step is completed.
- Click Save.
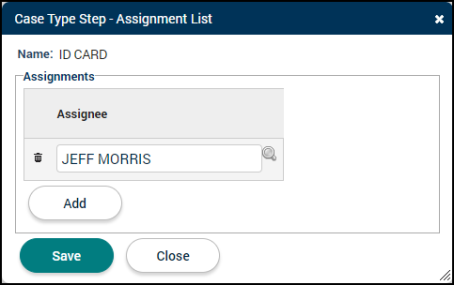
- Step Assignments: Click the people icon (
 ) if you would like to assign the workflow step to a user or group. *Note: Once a license of this type is created, this step will automatically be assigned to the user or group selected.
- Select whether the Assignment Type is a User or Group.
- Begin typing the Assignee or click the magnifying glass icon () and select the appropriate user or group. *Note: We recommend assigning steps to Distribution Groups as this allows the jurisdiction to easily update the assignee configuration without having to update each individual step.
- Click Add if any additional assignees are needed and repeat this process.
- Click Save.
- Click Save to update any changes on this tab.
