Mapping setup
The Map in SmartGov can be configured and customized to best suit the needs of your jurisdiction. *Note: Though you can define these settings yourself with the appropriate permissions, they are typically set up for you during implementation. We recommend contacting Client Services for assistance if you need to adjust these settings.
How to set up mapping
- Click on Administration from the navigation menu.
- Select Jurisdiction Setup.
- Click on Mapping Setup.
Basic settings
- The Default Center Lat/Long is set during the configuration of your GIS Connector, but can be adjusted if the map should be centered on a different point if necessary.
- Enter a value in the Map Zoom field to define how zoomed in or out the map will be when it is opened. *Note: The Zoom range is 0-24 and a higher number is more zoomed in.
- The ArcGIS Server Print Service URL is used to print and preview maps from the print button when viewing the map. This URL can be used to create printable documents with the layouts available in that print service. This will be set during the configuration of your GIS connector, but can be adjusted if you would like to create a custom print service URL through your GIS provider.
- The ArcGIS Server Geometry Service URL represents a geometry service resource exposed by the ArcGIS Server REST API. This is used to provide alternate map layers and base map layers for the portal. This will be set during configuration of your GIS connector, but can be adjusted if you would like to create a custom geometry service URL through your GIS provider.

Map layers
These settings determine what layers from ArcGIS you want to be available to display on the map. The layers added can be selected to display when viewing the map.
- To add a new layer, click the Add button.
- Enter the URL to the end point for this map layer.
- If necessary, enter a value for the Parcel Layer that contains your parcel data. This can be left blank if this layer does not contain parcel data.
- If necessary, enter the parcel number in the Parcel Field. This can be left blank if this layer does not contain parcel data.
- Select the appropriate Layer Type from the drop-down menu.
- Check the Display Layer by Default box if you would like this layer to be turned on by default when viewing the map. *Note: If this is not checked, the layer can still be manually turned on using the map legend buttons in the top right corner of the map.

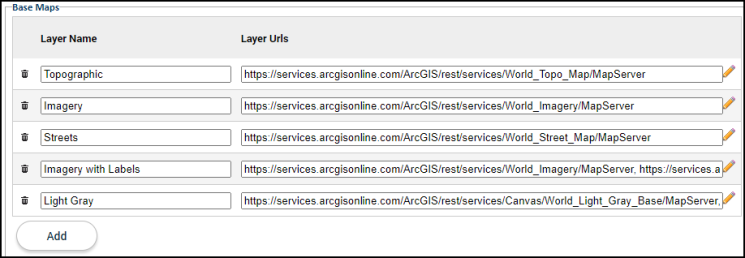
Base maps
The base maps listed here are the defaults provided by SmartGov. This is typically set during configuration of your GIS connector, but can be adjusted if you would like to have your own base maps created and hosted. *Note: We do not recommend removing the existing layers, but if you have your own, feel free to add them here.
- To add a new layer, click the Add button.
- Enter a Layer Name. This is what the layer will be called in the map legend.
- Enter the Layer URL for this map layer.
Proxy settings
Proxy Settings only apply if you are using a Proxy server for authentication in SmartGov. *Note: Do not adjust these settings if you do not need authentication on your mapping layers. If you are unsure whether you are using Proxy Servers for authentication, contact Client Services for assistance.
- To add a new Proxy Server, click the Add button.
- Enter the url of the Proxy Server that the authentication should run through.
- Enter the url of the Proxied Domain to authenticate.

Portal mapping
Portal Mapping is used to provide alternate map layers and base map layers for the portal. If no values are provided here, the Portal Map will use the same layers that were added in the Map Layers and Base Map Layers.
- Check the Display Map On Portal box if the map should be available on the Citizen Portal.
Override layers for portal
- To add a new layer, click the Add button.
- Enter the URL to the end point for this map layer.
- If necessary, enter the ID for the Parcel Layer that contains your parcel data. This can be left blank if this layer does not contain parcel data.
- If necessary, enter the name of the column containing the parcel number in the Parcel Field. This can be left blank if this layer does not contain parcel data. *Note: Doing this will allow SmartGov to tie the stored parcel data to the parcel on the map, which will then display parcel information when it is clicked on the map.
- Select the appropriate Layer Type from the drop-down menu.
- Check the Display Layer by Default box if you would like this layer to be turned on by default when viewing the map. *Note: If this is not checked, the layer can still be manually turned on using the map legend buttons in the top right corner of the map.

Override base maps for portal
- To add a new layer, click the Add button.
- Enter a Layer Name. This is what the base map will be called in the map legend.
- Enter the Layer Urls for this map layer.

- Click Save to finalize any changes you have made on this page.
