Inspection types
Inspection Types act as templates for inspection records in SmartGov. You can create and customize as many inspection types as needed for your jurisdiction as well as organize them by department.
Creating new inspection types
- Click Administration in the navigation menu, then select Inspection Setup.
- Click Inspection Types.
- Click Create New.
- Select the appropriate Module in the drop-down menu.
- Enter the following information *Note: The Name field is the only required field.:
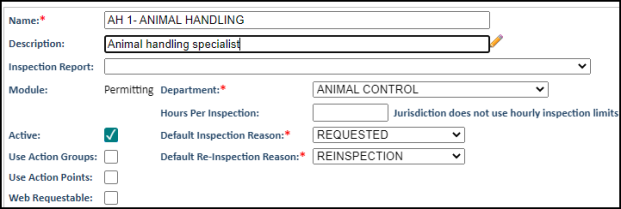
- Name: This required field is displayed on the list of inspections that are available to associate with a record in the selected module.
- Description: Use this field to describe the inspection.
- Inspection Report: Use this drop-down menu to select the appropriate inspection results report to be associated with this inspection type.
- Active: Ensure this box is checked to allow inspections of this type to be associated with a record type or an existing record in the selected module, such as a Permit Type or a Permit.
- Use Action Groups: Check this box to use action groups with this inspection. *Note: Action groups are set up through Lookup Values in the corresponding modules, such as Permitting or Code Enforcement, that the inspection is associated with.
- Use Action Points: Check this box to allow inspectors to create inspections with a point system.
- Department: Use this drop-down menu to select the department this inspection should be associated with.
- Hours Per Inspection: Enter in the number of hours this inspection will take to complete. *Note: If your jurisdiction does not use hourly inspection limits, leave this field blank.
- Default Inspection Reason: Use this drop-down menu to select the default reason for the initial inspection.
- Default Re-Inspection Reason: Use this drop-down menu to select the default reason for any re-inspections requested for this inspection type.
- Default Inspection Period:Use this field to enter the default inspection period for this inspection type. *Note: This field will only display when creating an inspection type for the Licensing module.
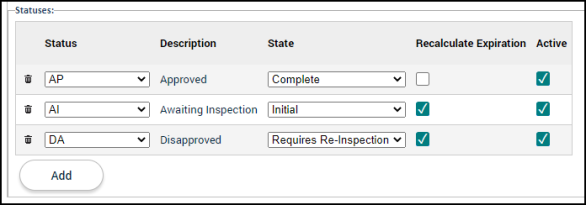
- Statuses: List any statuses that should be available for this inspection type.
- Use the Status drop-down menu to select a status.
- Select the appropriate State to associate with the status in the drop-down menu.
- Check the Recalculate Expiration box if the expiration for the inspection should be recalculated when the inspection moves to this status.
- Ensure the Active box is checked to allow this status to display on the inspection type.
- If additional statuses are needed, click Add to display an additional row and repeat this process. *Note: There must be a status listed for the Initial state and the Complete state.
- If you need to remove a status from the list, click the trash can icon (
 ).
).
- Correction Levels: List any correction levels that should be available to associate with actions on this inspection type.
- Select the Correction Level in the drop-down menu.
- Click the Default radio button if this correction level should be the default for any corrections added to actions on this inspection type. *Note: You must have one default correction level selected.
- Ensure the Active box is checked to allow this correction level to display on the inspection type.
- If additional correction levels are needed, click Add to display an additional row and repeat this process.
- If you need to remove a condition from the list, click the trash can icon ().
- Click Save. The page will refresh and display the Inspection Type Detail view.
Copying an inspection type
Often times multiple inspection types are needed with similar configurations. After setting up the first inspection type, you can easily copy the configurations from one inspection type to a new one.
- Click Administration in the navigation menu, then select Inspection Setup.
- Select Inspection Types.
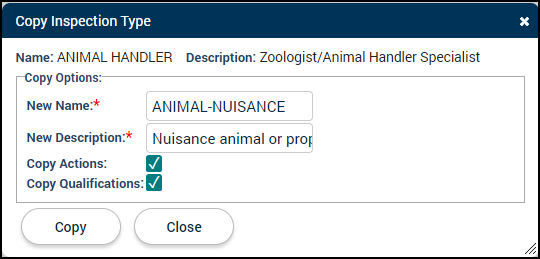
- Select the Inspection Type from the list to copy.
- Be sure you are on the Main tab of the inspection type.
- At the bottom of the page, click Copy.
- Enter the name for the new inspection type in the New Name field.
- Enter the New Description.
- Check the Copy Actions box to copy all actions to the new inspection type.
- Check the Copy Qualifications box to copy all qualifications to the new inspection type.
- Click Copy. The new inspection type will be created with the same configurations as the original inspection type.