Adding a business account
A Business Account represents any business within your jurisdiction. Once a business account is added to SmartGov, you will have easy access to view and manage any licenses, fees, permits, or actions associated with the business. *Note: You must have the Admin.Business security function in order to view Business Accounts.
*Note: SmartGov has built-in protections for PII and maintains high levels of storage encryption for data that is defined as sensitive Information.
How to add a business account
- Click Accounts in the navigation menu, then select Business Accounts.
- Click Create.
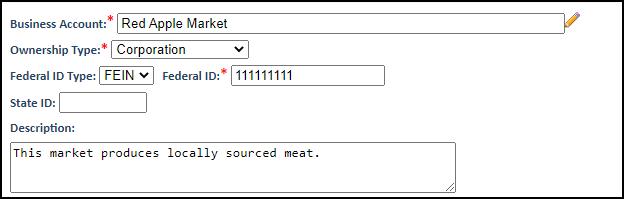
- Enter the Business Name.
- Select the Ownership Type from the drop-down menu.
- Select the Federal ID Type from the drop-down menu and enter the Federal ID. *Note: If SSN is selected, the Owner must have the SSN field filled out on the Secure Details tab.
- If applicable, enter the State ID.
- Enter a Description of the business.
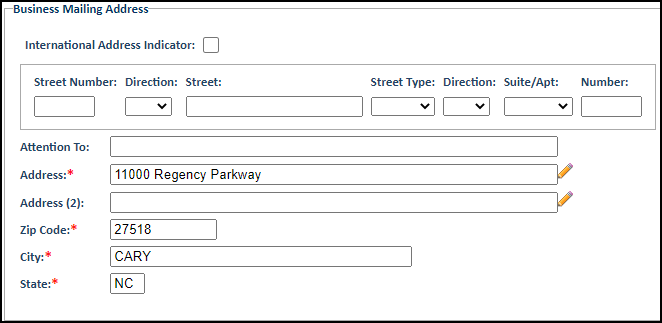
- Use the Business Mailing Address section to enter in any applicable mailing address information. *Note: Any field marked with an asterisk (*) is required.
- If this is an International address, check the box to adjust the fields that display. This will remove the City, State, and Zip Code fields and display International Line and Country.
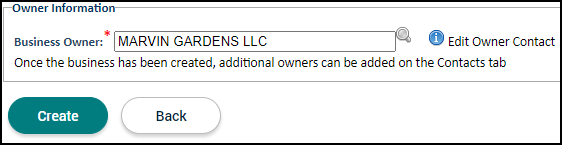
- Begin typing or click the magnifying glass icon (
 ) and select the Owner from the list of existing contacts in SmartGov. *Note: You must add one owner with a primary email address prior to saving the record. The owner listed must also have any required details on the Secure Details tab filled in. Once the business account has been created, additional owners can be added on the Contacts tab.
 - Click Create.
Copying a business account
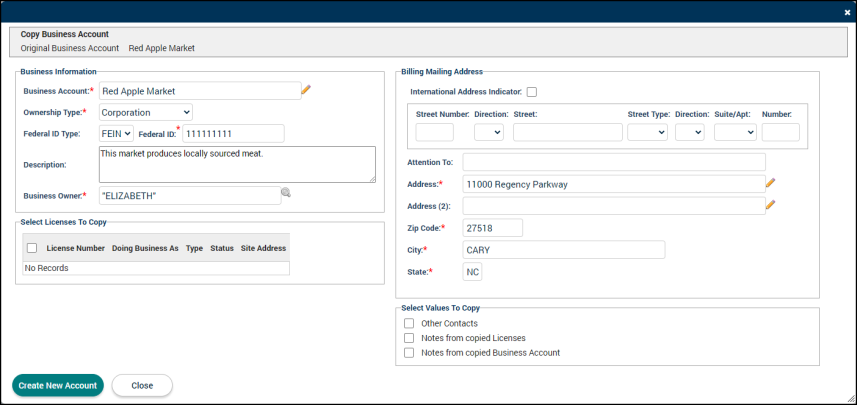
If an existing account needs to be copied, you can do so from the Main tab of the account. This may be useful to help expedite ownership transfers or if there is a change in business type. This will allow you to copy some or all of the license locations along with the business information.
- Click Accounts in the navigation menu, then select Business Accounts.
- Select the business you would like to copy from the list.
- Ensure you are on the Main tab of the account and click Account Options at the bottom of the page.
- Select Copy Business Account.
- In the window that displays, update any necessary information to reflect the new business account.
- In the Select Licenses to Copy section, uncheck the box beside any license that should not be copied to the new account.
- In the Select Values to Copy section, check the box beside any value that should be copied to the new account.
- Click Create New Account. This will direct you to the Main tab of the new business account.
- A Copied From Business field will display on the new account. Click the information icon (
 ) to view the original business account.
- A Copied From Business field will display on the new account. Click the information icon (
