Event Manager Release Archive
Below is a list of archived enhancements and bug fixes deployed to Event Manager.
2023 Release Notes
Display External tag on imported events
We've added the ability for you to specify the event types on your Events List. Therefore, you'll now see an External icon displayed on events that are imported from various third party integrations.
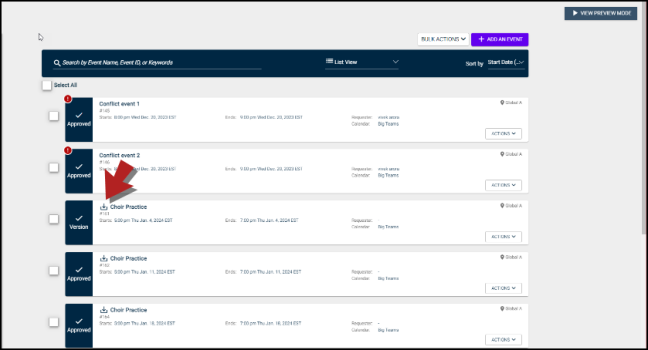
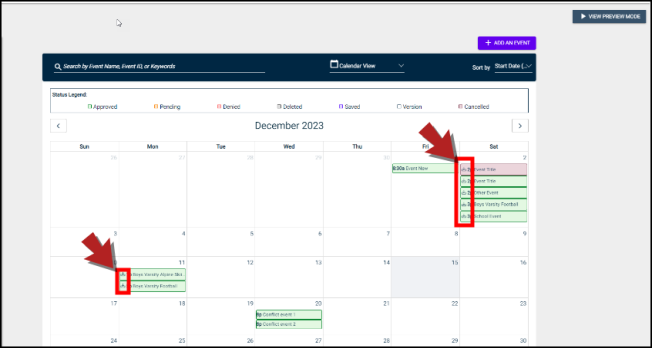
You can see the external icon next to the integrated events on all three views, i.e., List View, Calendar View, and Timeline View.
Let's take a look:
List View
Calendar View
Timeline View
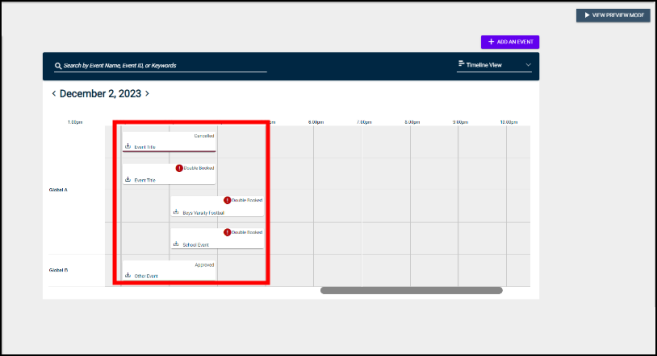
*Note: The External icon on an event does not trigger any action upon clicking.
Receive email notifications for cancelled events
We've added the ability for tenant admins to receive email notifications whenever an event is cancelled. You can subscribe to receive these emails or unsubscribe anytime.
To do so, click on My Profile in the left navigation panel. Switch to My Subscriptions tab. Select Subscribe to receive event cancellation emails or No Notifications to cancel. Then, click Update to save these changes.
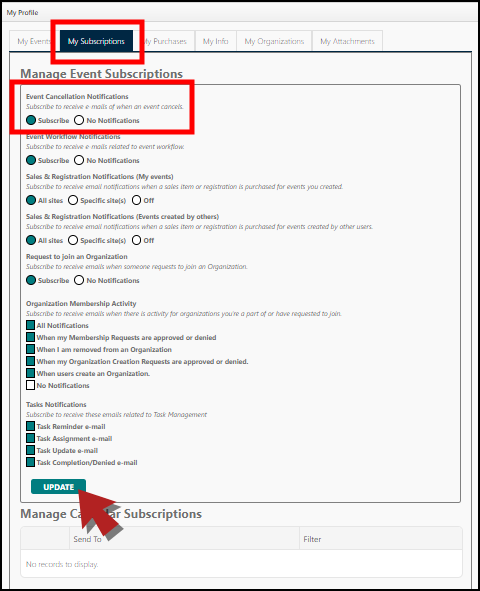
*Note: The Subscribe option is enabled by default. You can change it based on your preferences.
After subscribing to receive these notifications, you'll receive the following email every time an event gets cancelled:
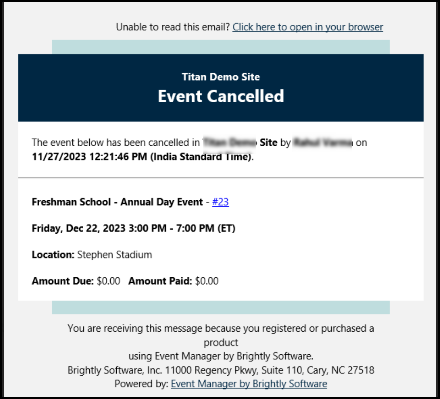
You'll find the following information:
-
Site name: The name of the site where the event is cancelled.
-
User name: The name of the user who cancelled the event.
-
Event cancellation date and time stamp: The local date and time stamp of when the event was cancelled.
-
Event name and ID: The name of the event that got cancelled and the event ID. The event ID is a hyperlink that will direct you to the Public Calendar view for the cancelled event.
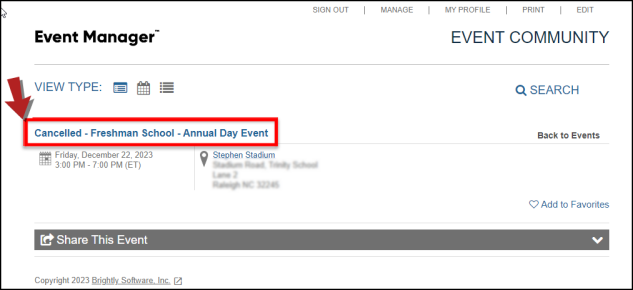
-
Date and time stamp detail: The actual date and time of the event start and end date.
-
Location: The name of the location where the event was scheduled.
-
Invoice due: An overview of the total amount due and the total amount paid for this event.
Sending notifications to Room Owners
We've added the ability for a group of users associated with a specific location, including both Parent and Child locations, to receive an email notification every time an event is approved.
Tenant admins now have the capability to add users who want to receive these notifications. These designated users will be referred to as Room Owners. So, whenever an event is approved for a tagged location, the Room Owners will receive an email notification.
To add users, go to Settings and navigate to Locations under Site Administration. Then, scroll down to Additional Details and switch to the Notifications tab. Go on to add the required users from the list of existing users by clicking on the User dropdown.

Or simply enter the name and email address of the users who should receive a notification. Click the Add button to add the users as Room Owners, and then click Save to confirm the changes made.
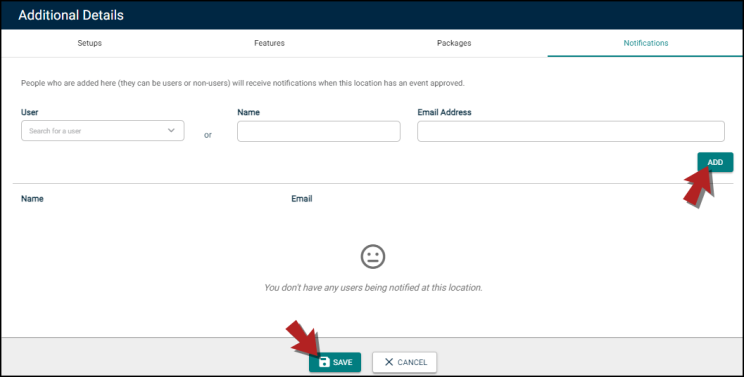
Here's a few things to take note of:
-
You can add as many users as required to the list of Room Owners.
-
You can configure Room Owners for both parent and child locations.
-
The deactivated users will automatically be removed from the users list.
Restart workflow on a pending event
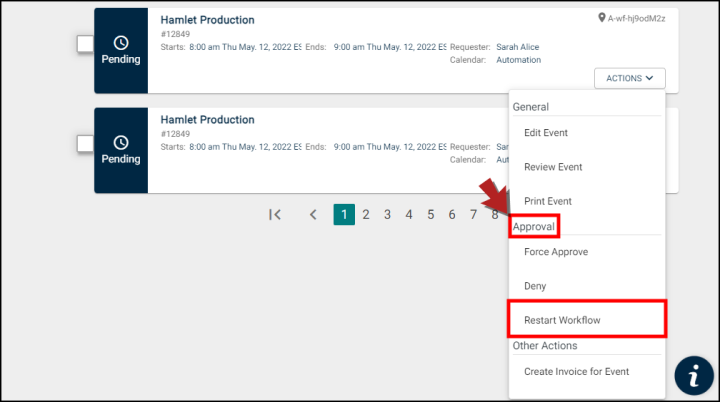
We've added the ability for tenant admins (TAs) to restart the workflow on any pending event. To do this, navigate to the Events List or Pending Events list. Click Actions on the pending event card, scroll down to the Approval section, and select Restart Workflow.
A dialogue box will open prompting you to confirm the new workflow. Click Confirm to proceed or Cancel to go back.
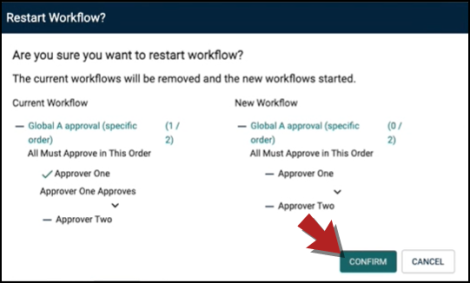
*Note: The option to restart workflow is available to tenant admins only and is applicable solely to Pending events.
Added a user name list in Roles Edit page
We've updated the Roles Edit page to display a list of users, which enables the admins to add users to an existing role.
To do this, go to Settings, navigate to Users and Roles *New* (under Site Administration), and switch to the Roles tab. Then click on the horizontal ellipsis in the Actions column, select View/Edit Role, and switch to the Members tab.
Under Add Users to Role, you'll see a list of users arranged in alphabetical order. Click Add on the right side to add the user to this role.
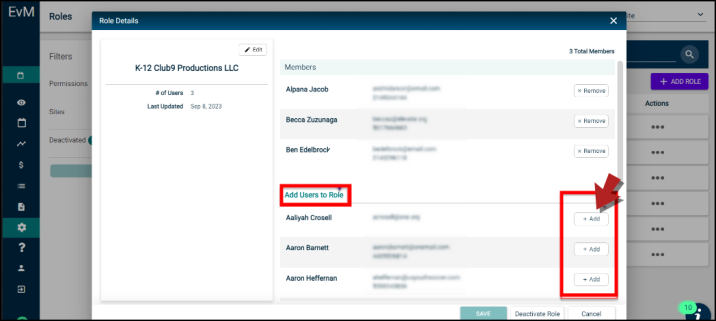
*Note: Please note that you'll see a list of first 20 users in an alphabetical order on the first page. To add more users, navigate through the other pages.
Added a Hide button to the Event Setup form
We've added a Hide functionality to the Event Setup form. It allows admins to hide functions that do not need to be edited by requestors.
Go to Settings and navigate to Event Request Forms under Advanced Settings. You'll see the Hide button in the Location & Time section.
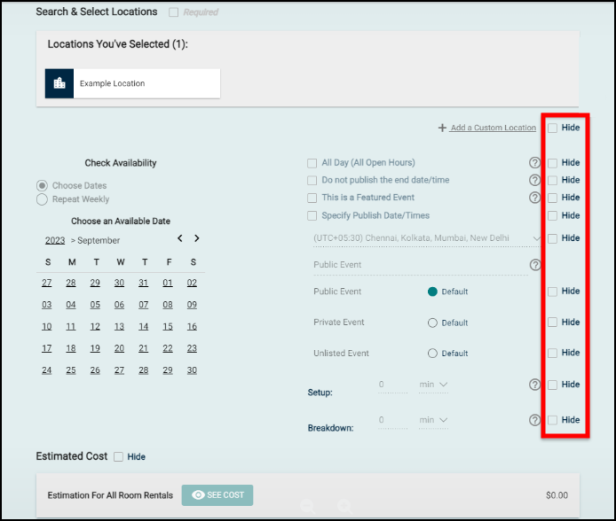
Here's a list of features you can hide:
-
All Day (All Open Hours)
-
Do not publish the end date/time
-
This is a Featured Event
-
Specify Publish Date/Times
-
Time Zone Selector
-
Event Type Selector
-
Setup Time selector
-
Breakdown time selector
-
Estimated Cost
*Note: The Hide button does not alter the functionality of any feature listed above.
Event Form customization: Hide and Default (Private, Public, and Unlisted Events)
We've enhanced customization on the event form. Before this, the admins could only set one default event type and hide the whole section. However, with this feature upgrade, users can select a default event type and hide either a specific event type or the entire section. This is to allow the requestors flexibility to hide certain event types.
To view, go to Settings and navigate to Event Request Forms under Advanced Settings. You'll find the upgraded Hide and Default functionality in the Location & Time section.
This update enables admins to select one default event type. To hide the entire section, click on the Hide button next to the default event type.
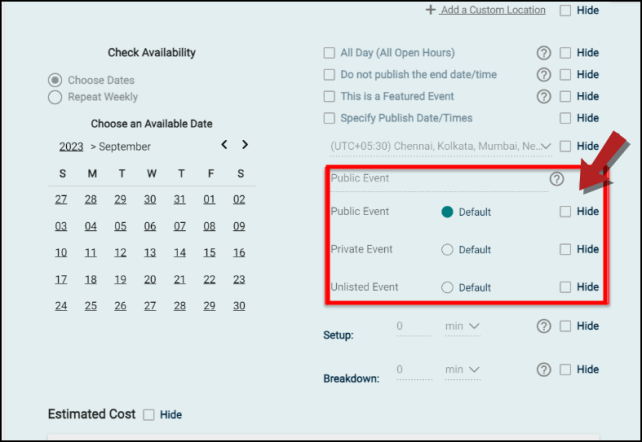
Or you can hide specific event types as required. Here's how it works:
-
Choose Public Event as default and click Hide next to it. This will hide the entire section from the requestors who are accessing the event form to create new events.
-
Choose Public Event as default and then click Hide next to the Private Event field. This will allow requestors to see a dropdown with Public Events as default event type and Unlisted Event as an option to select while creating a new event.
View pending event conflicts
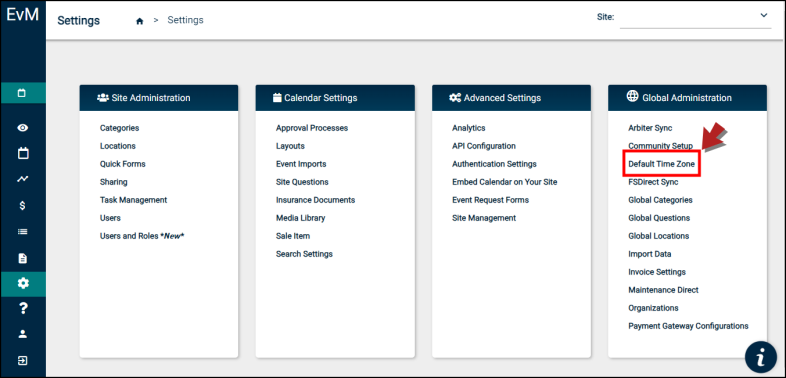
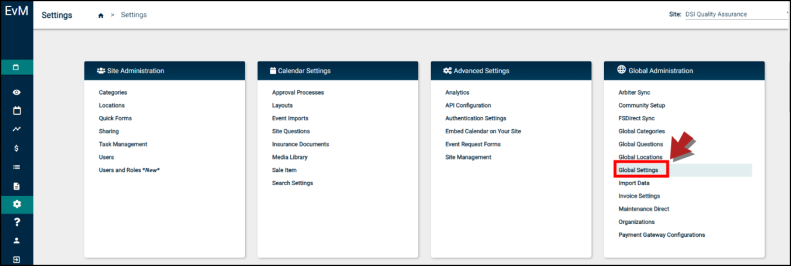
We've updated the Default Time Zone option in the Settings menu to Global Settings.
Before
After
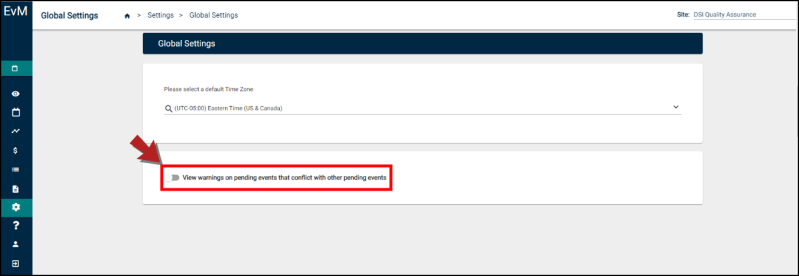
This update also came with a new setting that enables the users to view conflicts between pending events.
To enable this new option, go to Settings and navigate to Global Settings under the Global Administration section. Slide the toggle next to View warnings on pending events that conflict with other pending events.
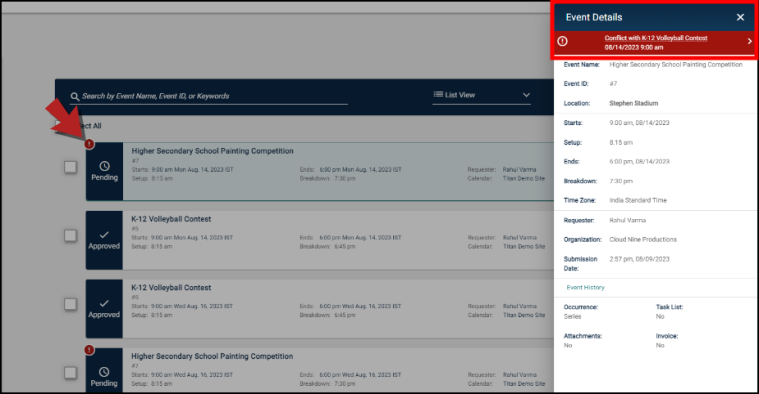
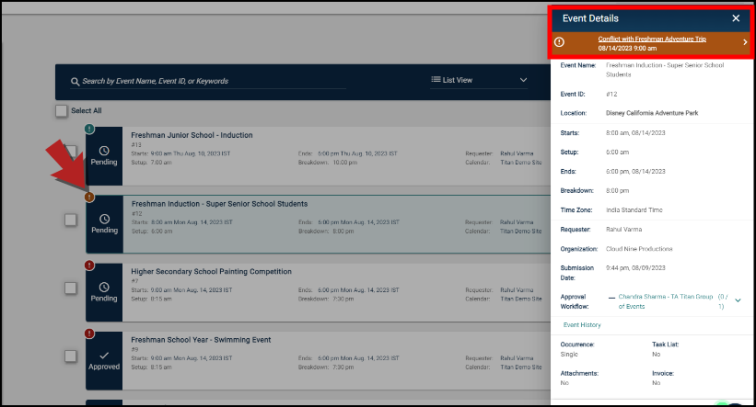
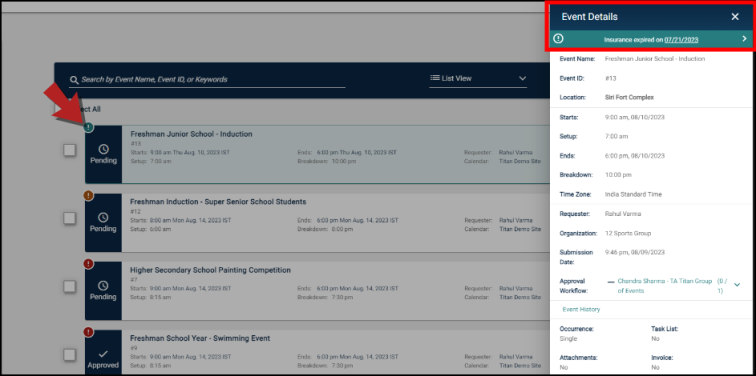
To view the conflicts, navigate to the Pending Events list. You'll see the existing conflicts represented by different colored exclamation marks.
-
Red indicates that a pending event conflicts with an approved event. Moreover, a pending event with expired insurance and a conflict with an approved event will also be displayed by the red exclamation mark.
-
Orange indicates that a conflict exists between two pending events.
-
Teal indicates that a conflict exists because a pending event or an approved event has an expired insurance.
Printable event form
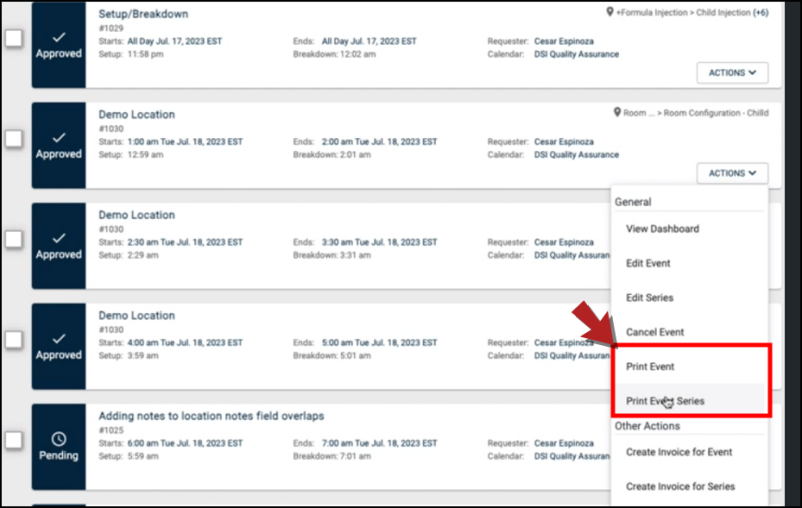
We've added the option to enable you to print a summary or detailed version of an event. You can use the Actions menu to print an event or event series.
To print an event, navigate to the Events List or Pending Events List. Then, click on the Actions menu to see the new Print Event and Print Event Series options. Select one of the print options. *Note: The tenant admins can print an event in any status. However, the requesters and other users can print Approved events only.
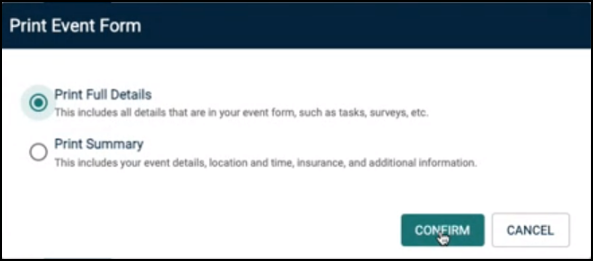
You'll see a dialogue box on screen prompting you to Print Full Details or Print Summary. Select one of these options and click Confirm.
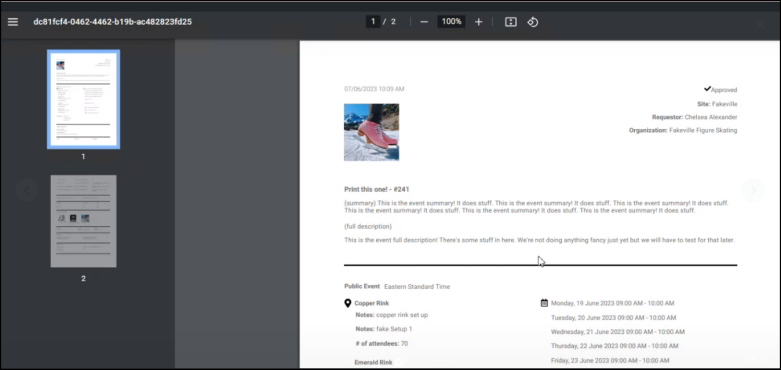
You'll see the report output in a new tab.
Updated events list with additional information
We have added new fields to the Events list and Event Details panel as part of the UI upgrade. Administrators with access to the events list can now view the following:
-
Remaining amount due
-
Submission and Approval Date
-
Day of the week within the Event card
View amount due
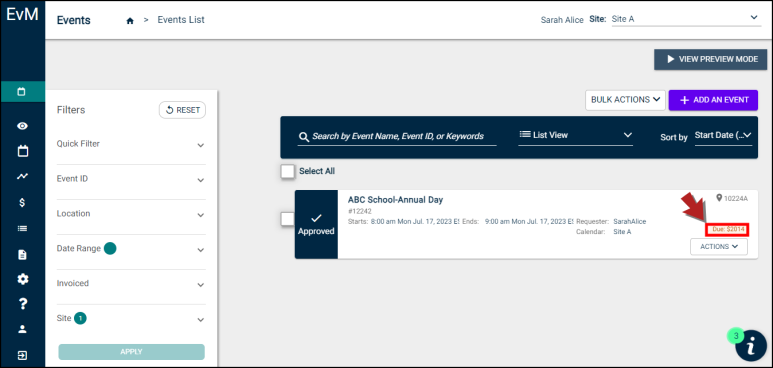
To view the amount due, go to the Events List or the Pending Events by clicking on Events in the left navigation panel. You will see the actual amount due next to the events with invoices associated with them.
View day of the week
We've added the ability for admins and users with permission to view the day of the week on the Event card. To do so, click on Events in the left navigation panel and navigate to Events List or Pending Events.
View approval and submission date
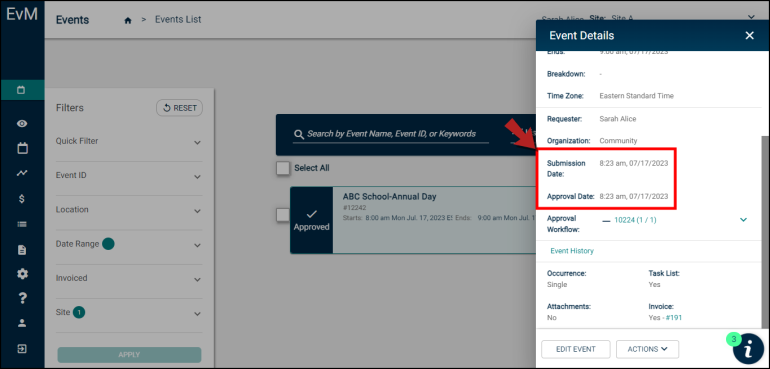
We've added the ability for admins and users with permission to view the approval and submission date on the Event Details panel.
Removed deactivated users from the workflow services list
We've made an update to exclude deactivated users from different sections on the EvM platform. This enables admins to see a list of only active users on pages where they can select users for various actions.
For example, when creating a new approval process for an event, you'll be able to select approvers from a list of active users only.
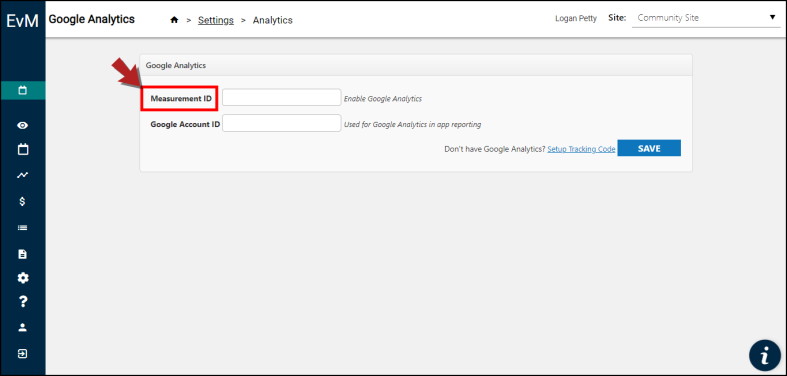
Renamed Google Tracking ID to Measurement ID as per GA4 upgrade
We've renamed the Google Tracking ID field to Measurement ID as part of the recent migration to Google Analytics 4. This change applies only to the name of the field while the functionality remains unchanged.
Updated the analytics tracking system
We've updated the analytics tracking system to Google Analytics version 4. This update will enable you to gain valuable insights regarding the EvM public calendar section, help you make informed decisions, and optimize your online presence.
To access the Analytics settings page, click on Settings in the left navigation panel and select Analytics under Advanced Settings.
Migrate to Google Analytics 4
Start migrating to GA4 by referring to this list of resources shared by Google:
-
Migrate your goals, users, audiences, and ads links from Universal Analytics
-
How to tell if your GA4 property is connected to a Universal Analytics property
-
Universal Analytics view-related features in Google Analytics 4 properties
Create a GA4 property
To create a GA4 property, log in to your Google Analytics account and click on Admin in the lower-left corner. Then click on Create Property in the Property column and select Web as the property type. Keep following prompts to complete the setup including entering your website's URL.
Update the tracking code
After creating the property, copy the Measurement ID that you receive. Then replace the Universal Analytics tracking code with the new Global Site Tag (gtag.js) snippet on all pages of your website. It is recommended to insert the snippet before the closing </head> tag. You'll start seeing real-time data in the GA4 interface ensuring the correct implementation of the snippet.
Update Measurement Id and Google account Id in EvM
After migrating from UA to GA4, you'll have access to the New Measurement Id and the Google Account Id. To update these values in your EvM account, navigate to Settings and select Analytics under Advanced Settings. Then, insert the Measurement Id in Google Tracking Id field and The Google Account Id in the Google Account Id field. Click on the Save button for the GA4 analytics to start reporting the data.

Additional settings
For additional settings, navigate to Admin in the GA4 interface and select your new GA4 Property. You can set up web data streams or enhanced measurements. You can customize data settings like enabling enhanced measurements and configuring event parameters.
Adding a new user
We've updated the ability for Tenant Admins and admins with users and roles management permissions to add a new user from the new Users and Roles page. This will enable you to assign multiple roles and permissions to a user without moving in between pages.
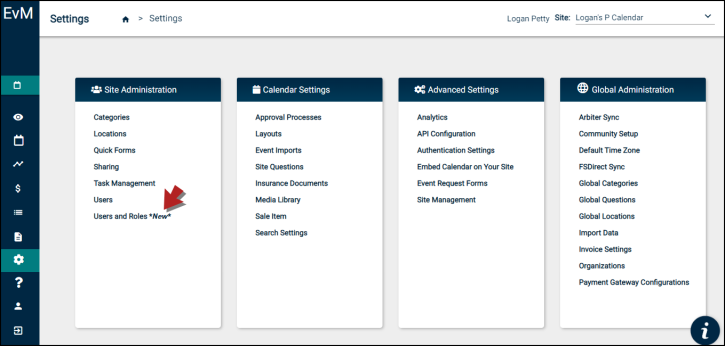
To add a new user, click on Settings in the left navigation panel. Then, click on Users and Roles *New* in the Site Administration section. Click on the Add User button on the top right side. The system will prompt you to add a valid email address for the user you want to add.
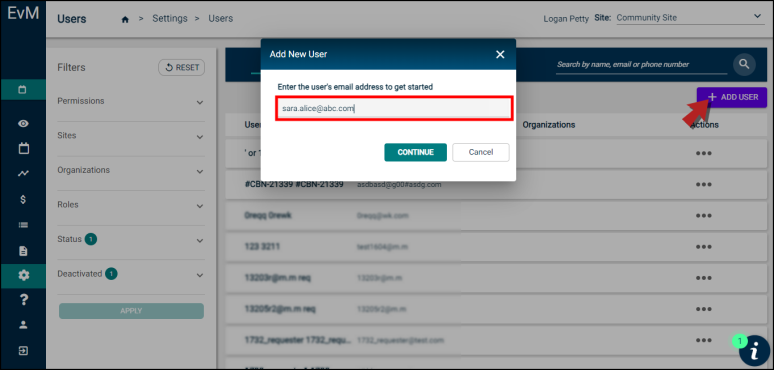
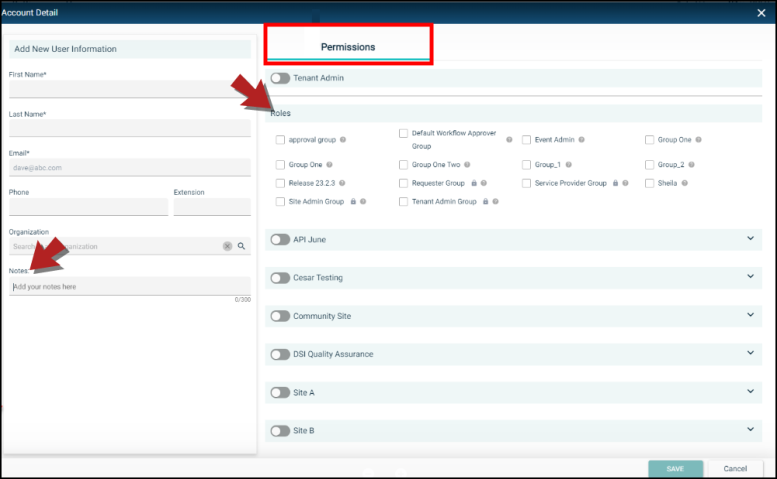
Once the system identifies the email address, you can move on to add user details and grant permissions based on their role. You can use the Notes field to add any additional information regarding the user. *Note: The information in the Notes field is for internal use and visible only to Tenant Admins and admins with users and roles management permissions .
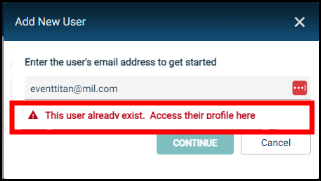
You will see an error on screen if you try to add a user that already exists in the system. You'll get a hyperlink to their existing profile which you can use to make changes, irrespective of their profile status.
Please take note of the following things in regards to adding a new user:
-
The email address you add must be complete and have a proper domain association.
-
The First Name and Last Name fields are mandatory to create a user profile.
-
The system will consider the user a visitor if you don't assign them any roles or permissions.
-
There are no changes to the Edit User functionality and it works the same as before.
Adding a new role
We've added the ability for Tenant Admins and admins with roles and management permissions to add a new role for a user from the new Users and Roles page.
To add a new role, click on Settings in the left navigation panel. Then, click on Users and Roles *New* in the Site Administration section. Switch to the Roles tab and click on the Add Role button on the top right side. You will see the Role Details screen.
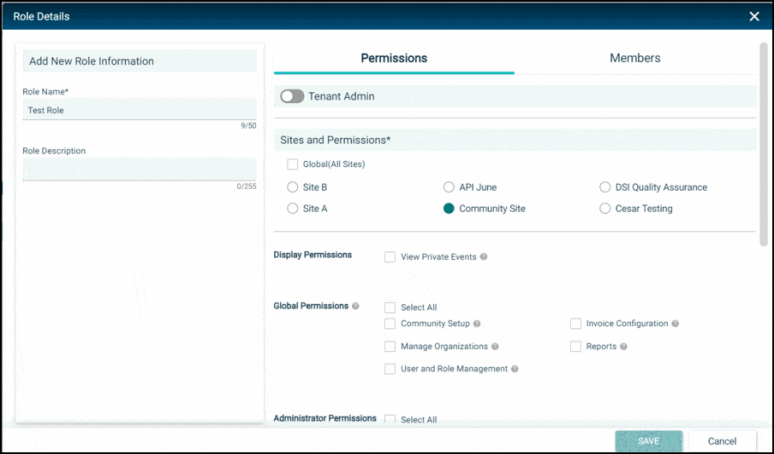
Follow the below-mentioned criteria to create and save a role.
Mandatory fields
You must fill out the Role Name field as it is mandatory to create a role.
Defining roles
You can define roles in the three ways mentioned below:
-
Enable Tenant Admin to allow complete access to all sites and grant all permissions.
-
Disable Tenant Admin, check the box next to Global, and go on to select permissions applicable on all sites.
-
Disable Tenant Admin and uncheck the box next to Global, and select at least one site and one permission to save this role.
Creating site-specific roles
If you're creating a site-specific role, you must select at least one permission from one of these sections:
-
Display Permissions
-
Global Permissions
-
Administrator Permissions
-
Requestor Permissions
-
Task Permissions
Editing a role
We've added the ability to edit an existing role custom-created by a Tenant Admin. To edit an existing role, click on Settings in the left navigation panel. Then, click on Users and Roles *New* in the Site Administration section. Switch to the Roles tab. On the Roles landing page, click on the horizontal ellipsis in the Actions column. Then click on View/Edit Role and you'll see the Role Details screen.
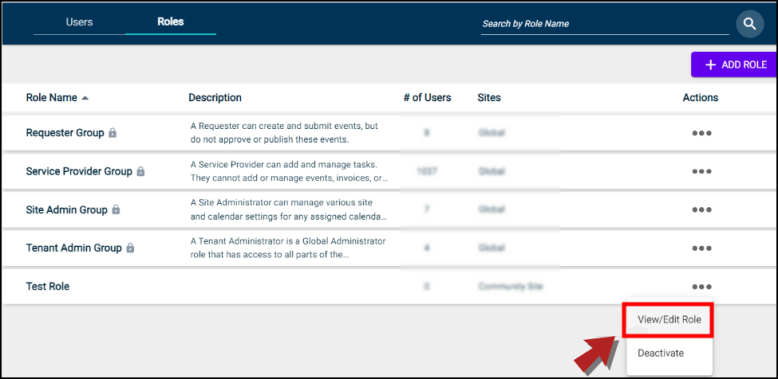
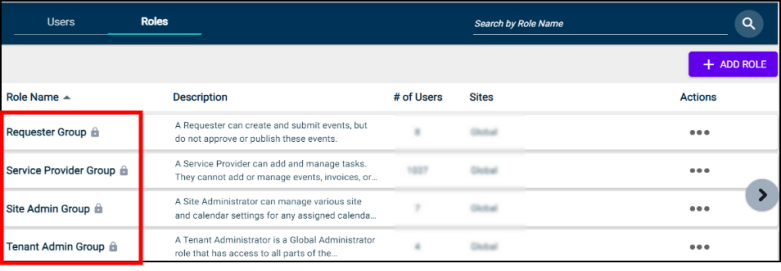
*Note: The Tenant or Site Admins cannot change or remove the system default roles indicated by a lock icon next to them.
Editing role: Role Information
Here you can edit information in the mandatory fields, Role Name and Role Description. Click on the Save button to save the changes.
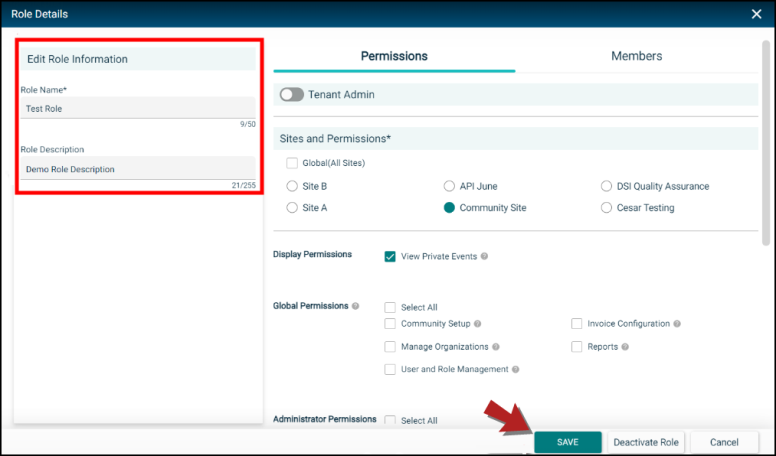
Editing role: Permissions
Select a site from the Sites and Permissions section to assign required permissions for that site to a user role. Alternatively, you can convert the role to Tenant Admin, enabling the user to have all permissions across all sites.

While editing permissions for a specific site, you must select at least one permission for that site. Otherwise, you won't be able to save the role.
Editing role: Members
On the Role Details screen, click on Members tab next to the Permissions tab. Type in the name of the user in the search box to add them as a member. When the required user's name appears on screen, click on the Add button next to it. Keep on adding members as required and click on Save when done.
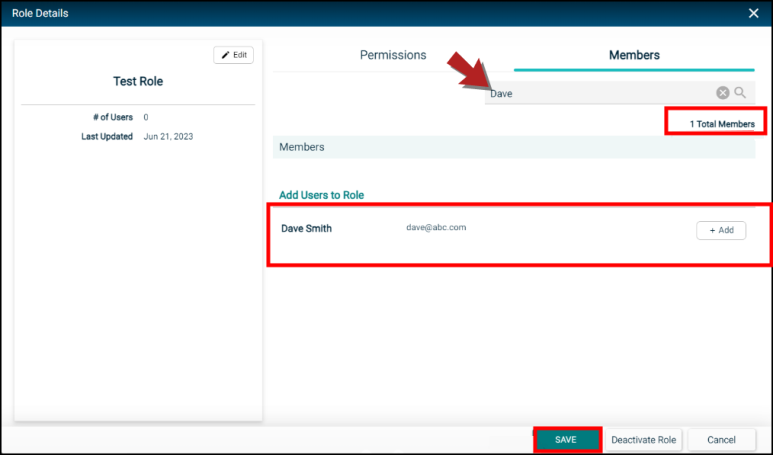
Keep in mind:
-
You can search for users by names, phone number, extension, and email addresses.
-
You can search for users based on the filters you apply.
-
You can search users by email domain names and special characters.
Editing role: Deactivate/Reactivate Role
To deactivate a role, click on the horizontal ellipsis in the Actions column on the Roles landing page and select Deactivate.
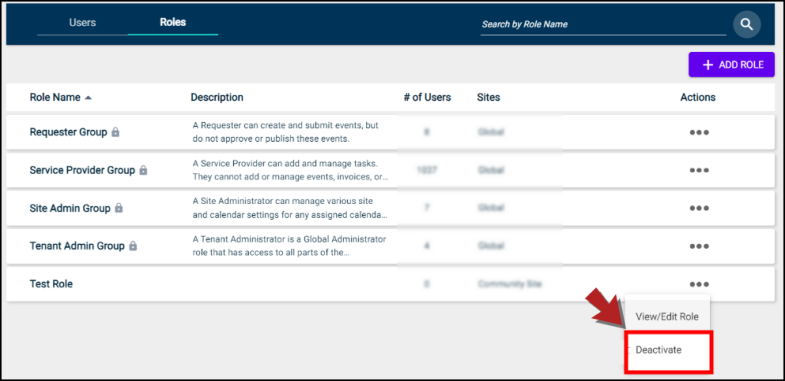
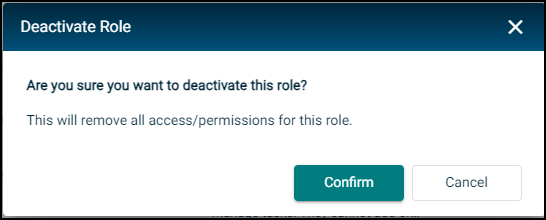
A dialogue box will open prompting you to proceed with deactivating this role. Click on Confirm to confirm the action or Cancel to go back.
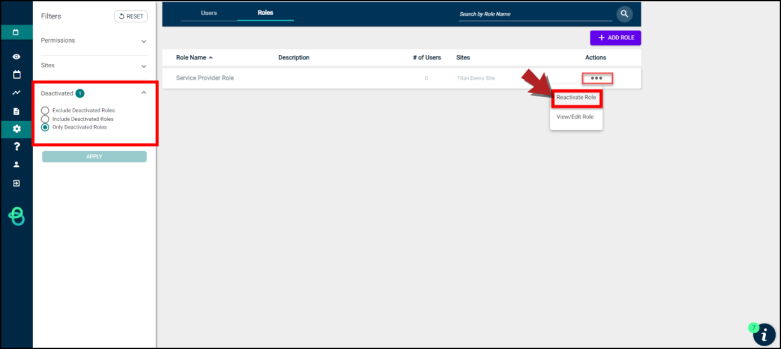
To reactivate a role, select the filter Only Deactivated Roles from the left side and view a list of deactivated roles.
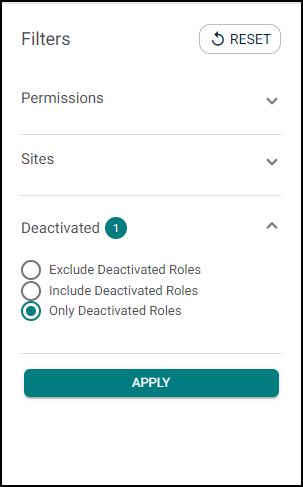
Then, click on horizontal ellipsis in the Actions column next to the role you want to reactivate. Select Reactivate and click Confirm in the dialogue box on screen to proceed with this action.
Send a password reset link
We’ve added the ability for Tenant Admins to send password reset links to the users who are unable to log into their accounts. You can do so by going to the new Users and Roles Management page.
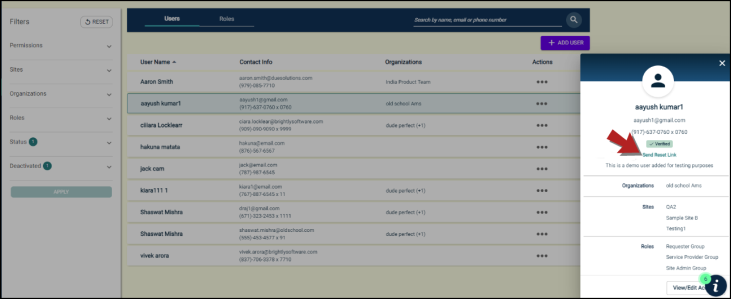
To send the reset link, go to Settings and click on Users and Roles in the Site Administration section. Click on the user name from the list of users to open the affected user's details, where you can find and use the Send Reset Link. Alternatively, you can click on the three-dot menu in the Actions column next to the user name and click on Send Reset Link.
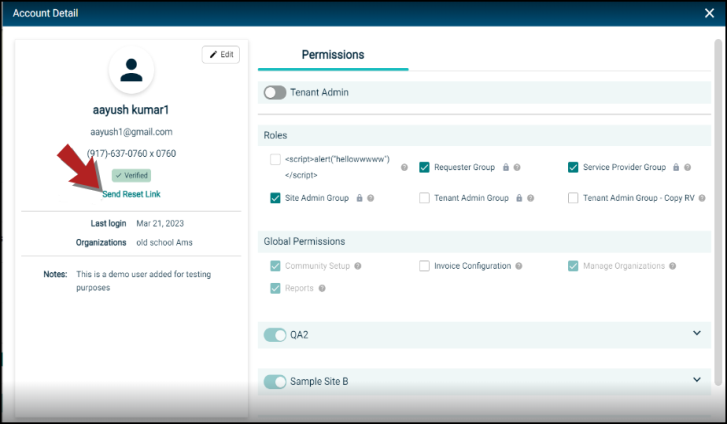
You can also click on the horizontal ellipsis next to the corresponding user's name, go to View/Edit Account, and click on Send Reset Link below the Verified button.
The user will receive an email with the reset password link.
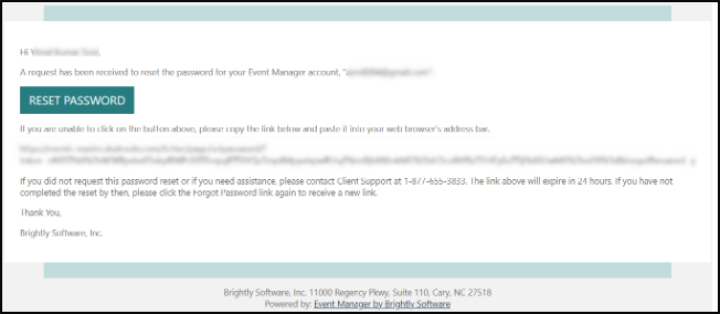
Please note that the reset link will remain valid for 48 hours, and only verified users can receive the reset link.
Invoice a pending event
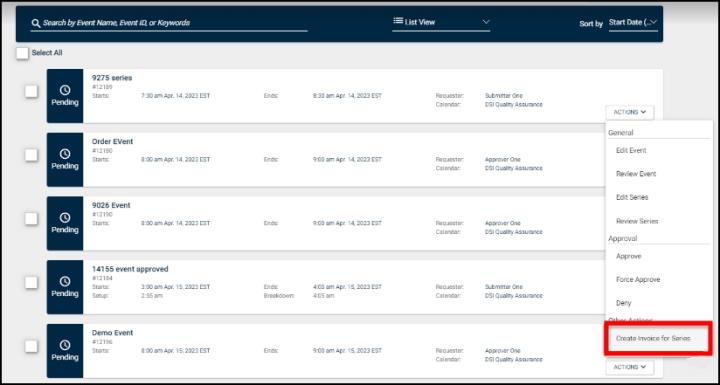
We lifted the requirement that an event must be approved before it can be invoiced. Now administrators can invoice requesters for payment prior to approving the event and publishing it to the school's public calendar. This update applies to both a single event and an event series.
You can navigate to the Pending Events list or Events List to view the details of an event. Then, click on the Actions dropdown to use the newly added Create Invoice for Event/Create Invoice for Series options to start invoicing a pending event.
Invoice number hyperlinks on Event Details
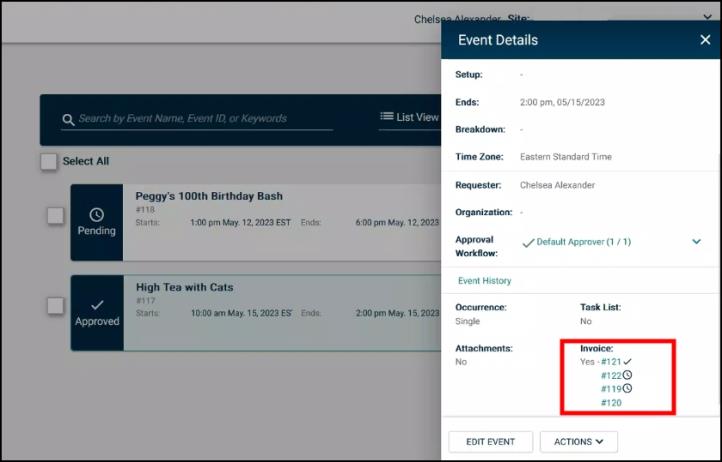
We added the invoice number as a hyperlink instead of just indicating "Yes" under the invoice header. Navigate to the Events list or the Pending Events list to view the details of an event that has been invoiced. If the event has one or more associated invoices and the user has permission to view invoices, the invoice number(s) will appear as hyperlinks:
-
Invoices with a zero balance display a checkmark.
-
Invoices that are partially paid display a clock.
-
Invoices that have not been paid do not show an icon.
Click the hyperlink on the invoice number to open a new tab with the invoice displayed.
Event Setup and Global Custom Fields are now Site Questions and Global Questions in Settings
We relabeled the site and global question fields. When you attempt to set up your event form, you will now see the updated labels for these fields for ease of access.
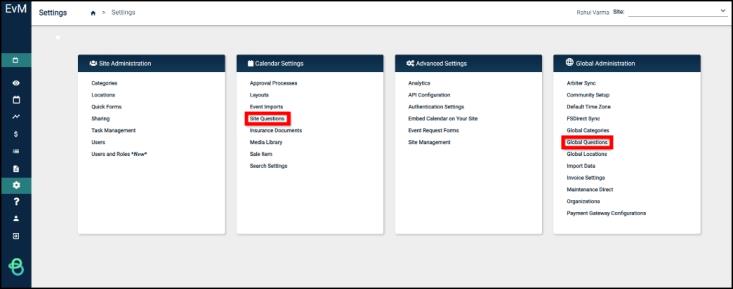
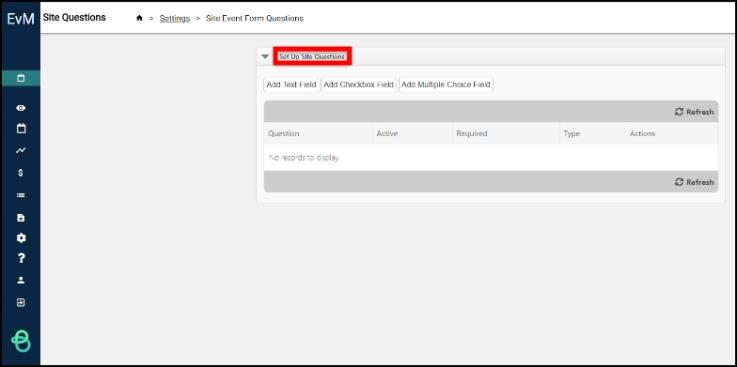
Navigate to Settings and find the Site Questions page under Calendar Settings. Additionally, when you navigate to the page, the header section is renamed to Set Up Site Questions from Setup Custom Event Fields, which was updated earlier.
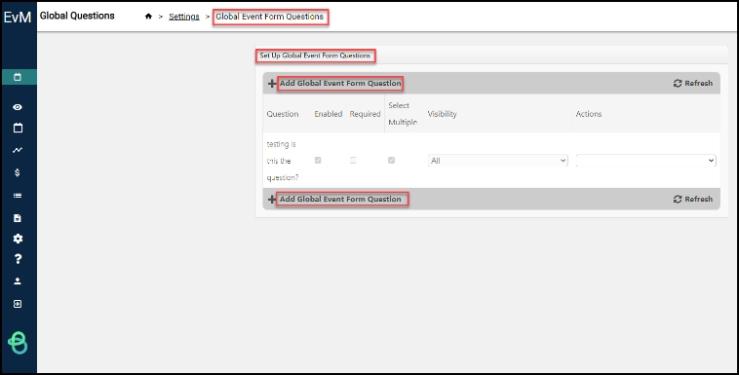
As for the Global Questions page, you can go to Settings and find it under Global Administration. Additionally, when you navigate to the page, the header section is renamed to Set Up Global Event Form Questions from Custom Event Field, which was updated earlier. We have also added another header text, Add Global Event Form Question, to make it easier for you to add custom questions.
Updated the new Users and Roles page
We corrected an error that occurred when filtering by the Tenant Admin permission on the Users list and Roles list pages. Now, only those users or roles with the Tenant Admin permission will be returned. Additionally, inactive roles will no longer display when viewing a user’s assigned roles or when viewing the Roles list default view. To view deactivated roles in the Roles list, use the Deactivated filter from the filters menu.
Calendar upgrade with improved printing capability
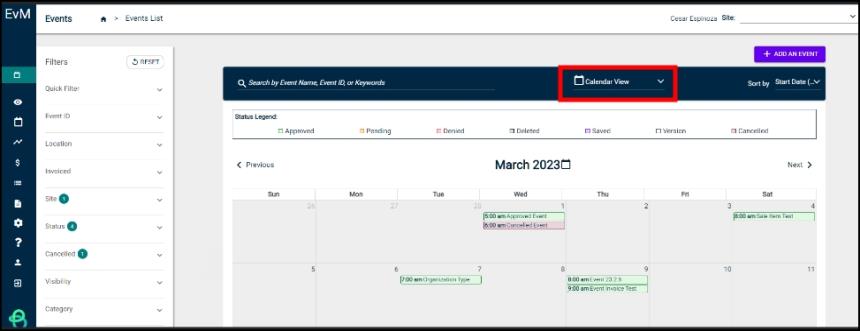
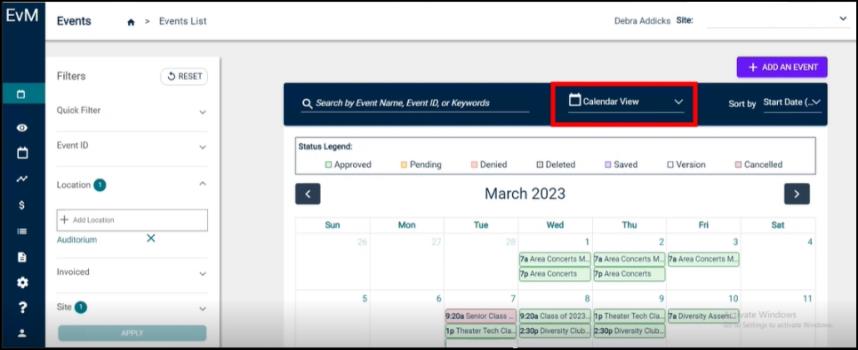
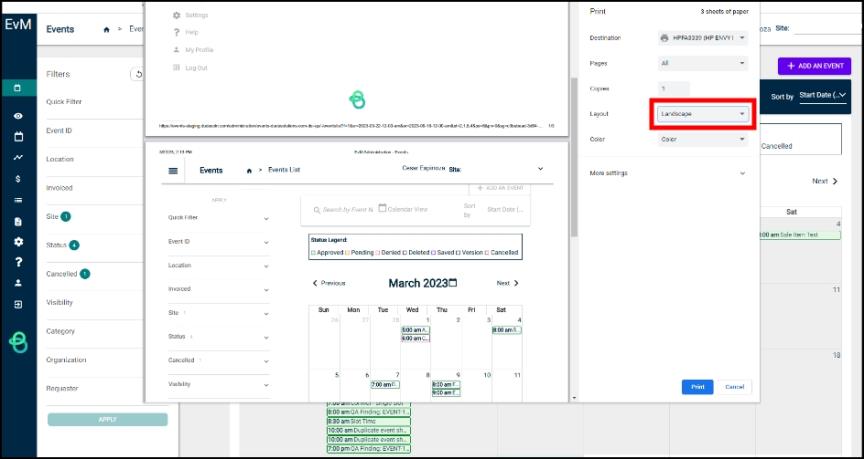
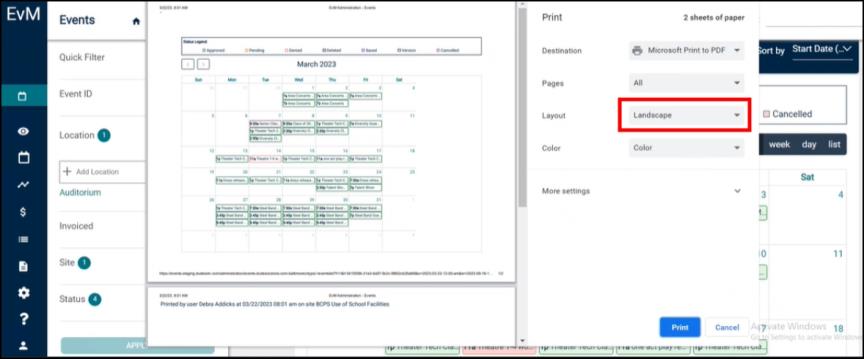
We applied an upgrade to our internal calendar. This upgrade also came with the ability to better print the Calendar View. Printing the calendar has been improved with a more user-friendly format.
To view, you can navigate to the event list or pending event list. Choose the Calendar View option from the drop-down menu. Then, click on the month to display the month selector to choose different months.
Before
After
When printing, the calendar formats best if you choose to print in landscape mode.
Before
After
Transformed legacy Users and Roles management screens
We have transformed legacy Users and Roles management screens to the modern user interface so that they are more user-friendly and intuitive. We also upgraded the underlying technology to the latest industry standards.

This transformation work aims to simplify user interaction and usability enhancements of the existing Users module, allowing us to offer a new page so that users can review information about users and roles on a single page.
This new module is only available to users who have access to Tenant and/or Site Administrators. You can now navigate to Settings and click the new Users and Roles option under Site Administration.
The Users tab
The first tab shows a list of all the users that have access to the system, regardless of their sites or permissions. The landing page of the Users tab displays important information such as User Name, Contact info like email and phone number, Organizations, and Actions. You may sort the User Name and Contact info columns, while the Organization column displays the number of organizations affiliated with the user; it will only show the first organization added, with the others appearing as a count in addition to the one shown.
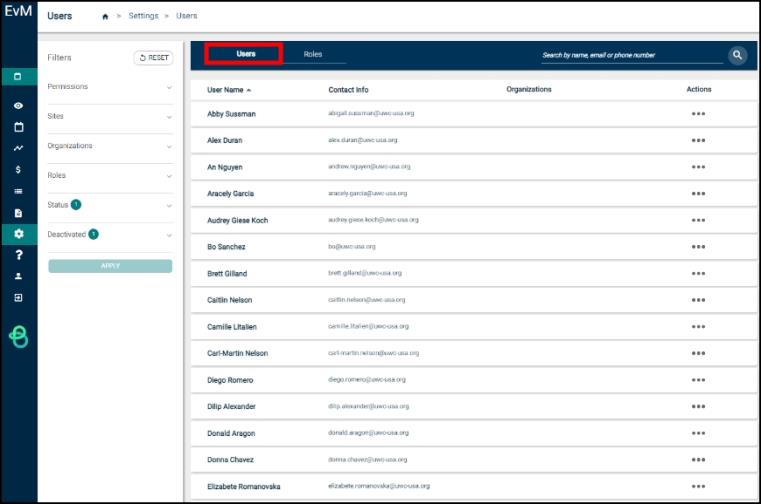
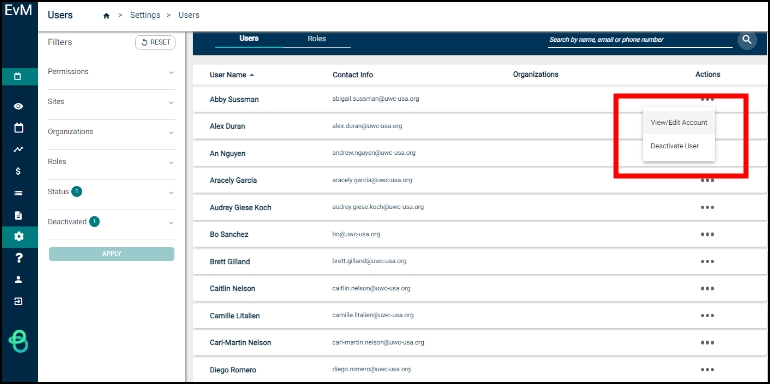
The administrators can edit the user information in two ways. First, click on the User tab to view the quick view panel. Here you can see the user's demographic information, such as their full name, email address, verification status, various organizations, and assigned sites and roles. Second, the administrator can change user information by clicking on the horizontal ellipsis and then on the View/Edit Account option. While editing user information, administrators should keep in mind that you are not allowed to change the first name, last name, or email address of a single sign-on user. However, you can still add or edit the user's phone number and extension under the Actions column.
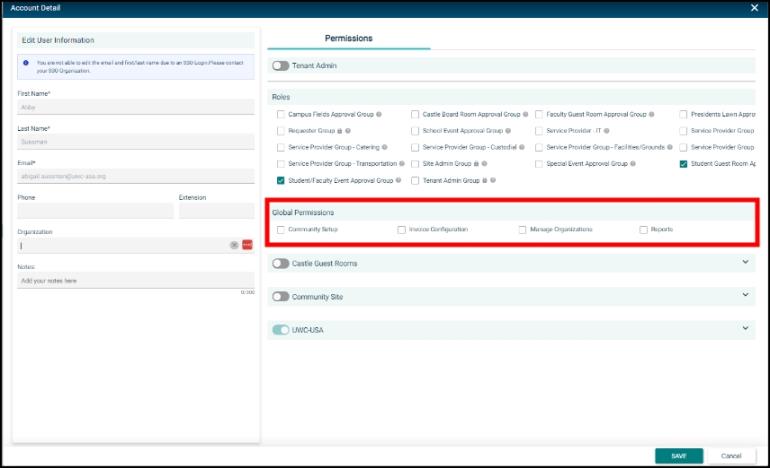
A new permissions option, Global Permissions, was included. If enabled, these permissions provide users access to that permission across all sites in the tenant. For example, if a user is given access to the reports, they will be able to access the reports on any site.
You can also use the filters in the new Filters section to sort information about users. The goal is to help you sort results to alleviate the administrators' efforts and refine the search. Administrators can filter the results by Permissions, Sites, Organizations, Roles, Status, and Deactivated.
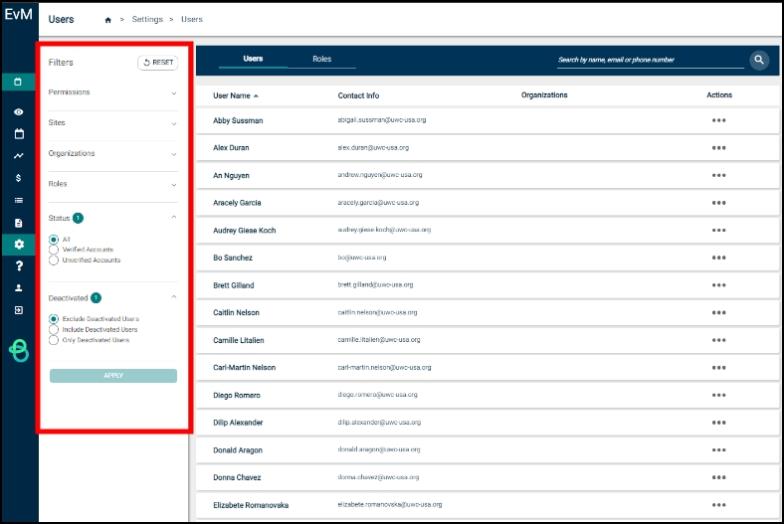
The Permissions filter lets users choose all permissions from the Global Permissions section and analyze the outcomes. We also added a new filter type to one of the Permissions filter options called No Permission so that administrators may see a list of users without any assigned privileges. On the other hand, the Sites, Organizations, and Roles filters will show all entities available inside the relevant areas in alphabetical order. Lastly, the Deactivated filter allows administrators to view the list of deactivated users. You can reactivate these activated users by clicking on the horizontal ellipsis from the Actions column, restoring the last saved roles, permissions, and access levels.
The Roles tab
We created the Roles tab so users can view and filter existing roles. Over the next few months, we will add another feature to the tab allowing users to create new roles and edit existing ones.
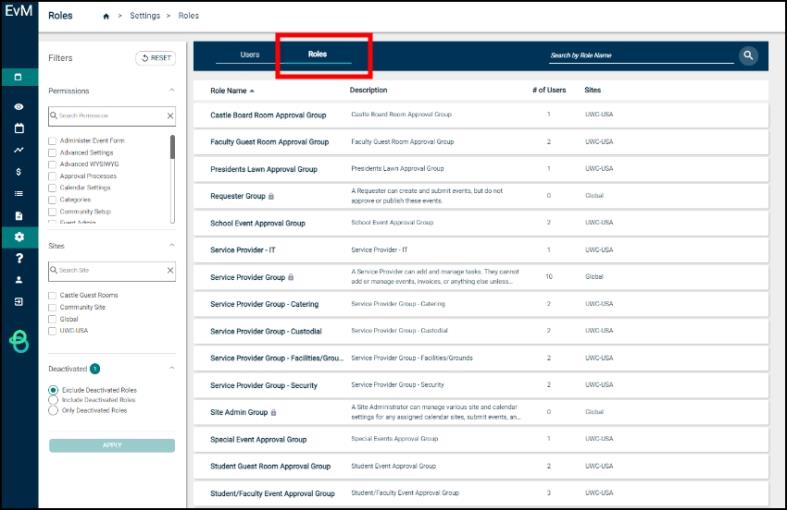
Like the Users landing page, the Roles landing page displays a list of roles added to the tenant. Here, users get to specifically see information such as the Role Name, Description, # of Users assigned to the role, and the Sites linked with the roles.
Also, the administrators can distinguish between system default roles and custom roles copied from the system default if the Sites column shows Global. This means that the role corresponding to it is either the system default or has been created to assign the role as a common pathway for all sites.
Please note that although the current capability for the Roles tab is for viewing only, administrators can filter the roles on the landing page by Permissions, Sites, Deactivated, or their Names.
FAQs
How do I find visitors?
The filtering for searching for visitors is still under development. Until it is available in the new screens, please use the original Users screens: Go to Settings >> Users >> Visitors (the original screens).
How do I add users and create/edit roles?
These features are still under development for the new screens. So until they are deployed, please use the original Users screens: Go to Settings >> Users (the original screens).
What value do the new screens provide that the old ones don't? Why didn't we wait until the Users and Roles work was completed?
Rather than wait, we wanted to give you access to some additional features as soon as they were ready. These features are new with the new screens:
-
The ability to deactivate users
-
The ability to view a user's permissions when viewing the user
-
The ability to edit the phone number, name, and email of non-SSO users
-
The ability to see what organization(s) a user belongs to faster without the need to navigate to the organization's page
Will there always be two options for Users and Users and Roles?
After we deploy the remaining functionality of Users and Roles, the Users option will be removed.
What features are not included in the new screens? When will the remaining features be available?
We are working on the completion of the following features, and we hope to have them available in production later this quarter:
-
Filtering visitors
-
Creating users
-
Creating and editing roles
Will the data I update in the new screens be reflected in the old screens and vice versa?
Yes
What are Global Permissions? Did users permissions change with this introduction?
A new permissions option, "Global Permissions," has been included in the new screens. If enabled, these permissions provide users access to that permission across all sites in the tenant. This does not change how it was set up previously; it is just re-categorized and made obvious that it is a global permission rather than a site-specific permission. For example, if a user is given access to the reports, they can access them on any site.
Please refer to our FAQs to learn more about this Beta Release.
Authorize.Net now a merchant provider to accept payments on invoices
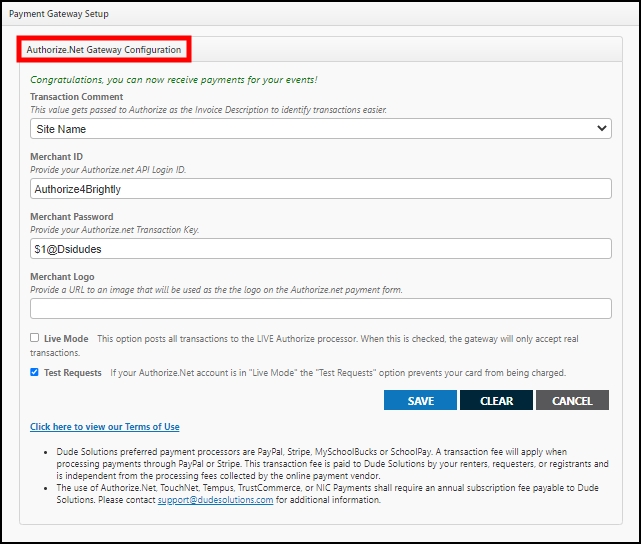
You can now enable Authorize.Net as a merchant provider in Payment Gateway Configuration in Settings to start accepting payments on invoices.
Authorize.Net is a well-known payment vendor that integrates with a variety of other payment vendors. It was initially only available in the Registration Gateway. By adding this ability to the Invoice Gateway, it enables us to offer more payment options for users and grow the use of invoicing in Event Manager.
Invoice title added to the Invoice List card
Previously, users had to click through and "edit" their invoices to view and verify specific events that had been invoiced. These laborious steps took more time and clicks for a simple task. Now, seeing the invoice title and the event ID of an event on the Invoice List card will help expedite finding the corresponding invoice.

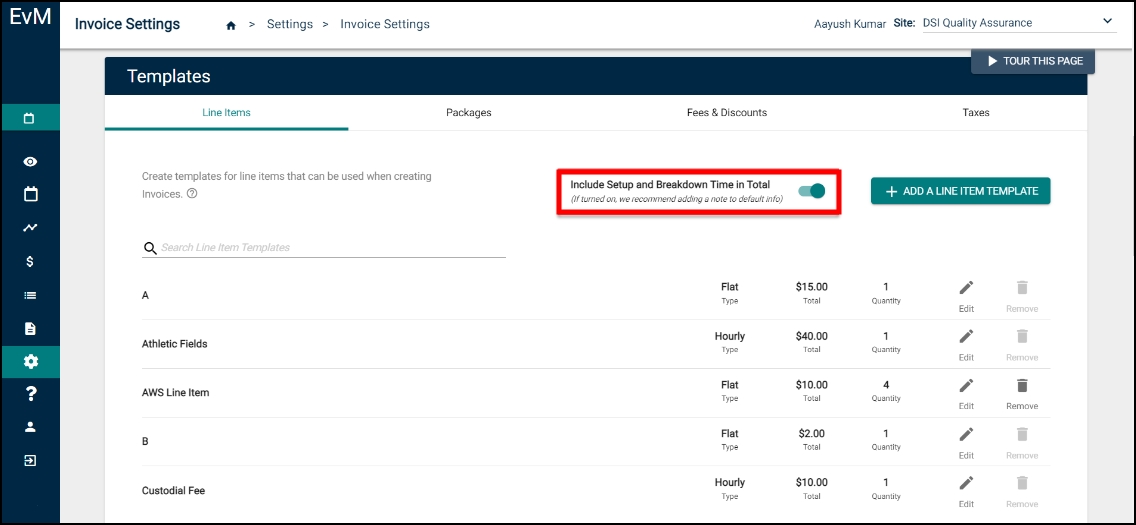
A new setting to include setup and breakdown times in an invoice
We added a new toggle in Invoice Settings to allow users to auto-populate an event's setup and breakdown times in an invoice. Previously, this process had to be done manually on each invoice for those charging for the setup and breakdown times. For other users who have yet to charge their events' setup and breakdown times, this new setting will give them a simplified option to generate additional revenue if and when they choose to use it.
More information added to task notifications
Our task notifications are now enhanced with more information to better inform users when a task is assigned until it has been completed. We updated all notifications around tasks, including Task Assigned, Task Reminder, Task Updated, Task Completed, and Task Denied. This new enhancement is time-efficient for Service Providers because of its quick access to task information that includes contact and setup details to address urgent "day of" event details.
The assignee will receive their notifications via email with the following added details when you add a task and assign it to a Service Provider:
-
Event organization
-
Event contact (requester/booked by)
-
Event contact phone number
-
Event setup time
-
Event breakdown time
-
Event location (complete path) and number of attendees
-
Task status
Version icon changes
We implemented a UX enhancement to reduce confusion. The version icon for event series that are edited and pending approval was updated to help users differentiate it from the icon for approved events.
![]()
More information added to the Asset Essentials work order description for the integration between Event Manager and Asset Essentials
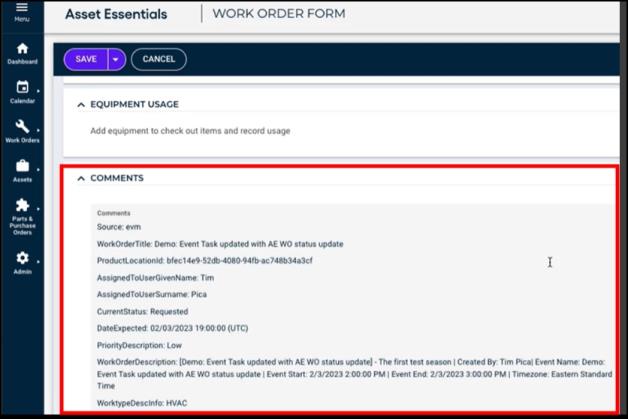
More information is now available in the Asset Essentials work order description to further help users identify what event the task in Event Manager is for. This new functionality will show added details when your Event Manager task generates an Asset Essentials work order.
In the Comments field in the work order in Asset Essentials:
In the Work Requested field in the work order in Asset Essentials:
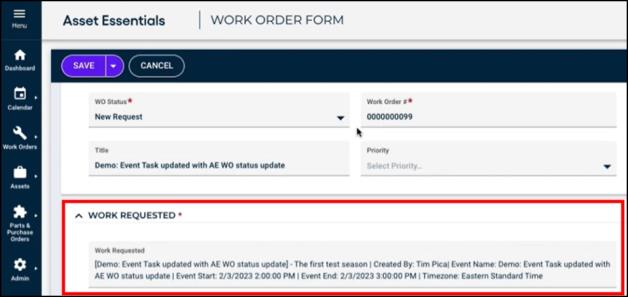
You will be able to see the following information when the integration license is enabled on your tenant:
-
Task Creator first and last names
-
Event Name
-
Event Start Date, Time, and Time Zone
-
Event End Date, Time, and Time Zone
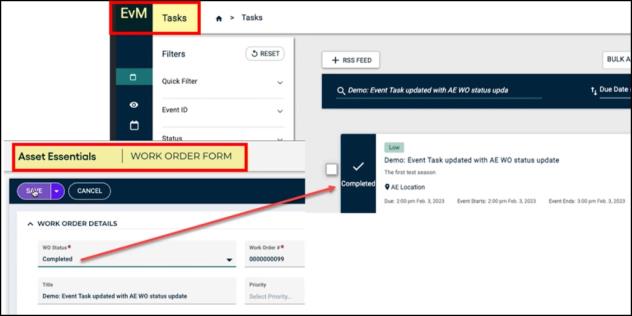
Now when the work order status in Asset Essentials is updated, it will sync with the current task status in Event Manager as it also gets updated to reflect the Asset Essentials work order status changes, making sure you get a more coherent product integration. Please note that this new addition however did not include Event Manager task status updates being pushed to Asset Essentials work orders.
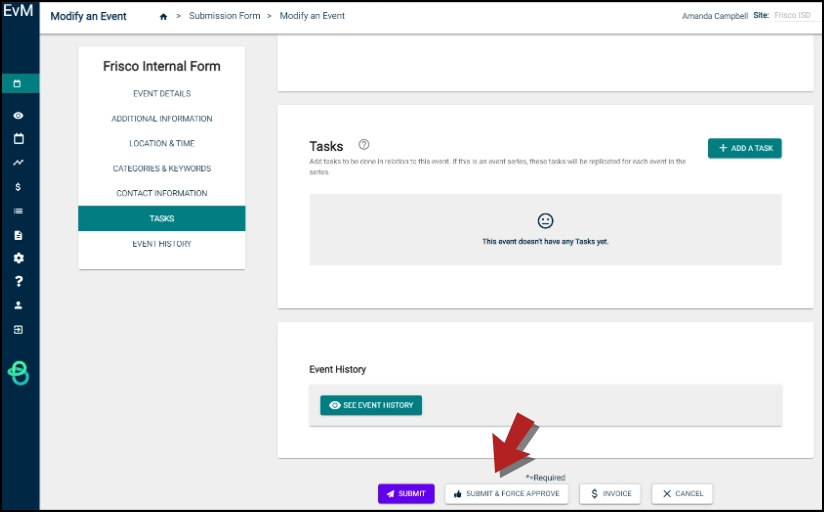
New ability for admin to force-approve immediately from the submit confirmation
We have added a new button for tenant admins to force-approve an event when editing from the event list. You will now see an option to Submit & Force Approve on the form itself, made available to tenant admins only. This new button is a time-saver for tenant admins that need to force-approve an event.
Increased number of custom site-specific questions
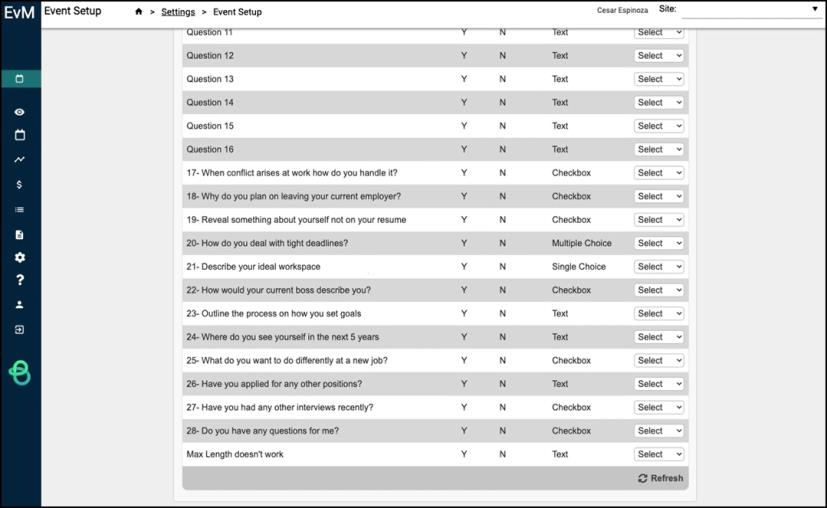
The allowed number of site-specific questions that can be configured on the event form has now been increased from 16 to 30.
