Back to Event Manager Main Menu
Adding a Location
Once you have configured your Location Settings, you can add Locations to your Event Manager account to represent the physical spaces that will be used for your events,
- Click on Settings from the navigation menu.
- Click on Locations under Site Administration or Global Locations under Global Administration.
- From the Locations page, click on the Add a Location button.
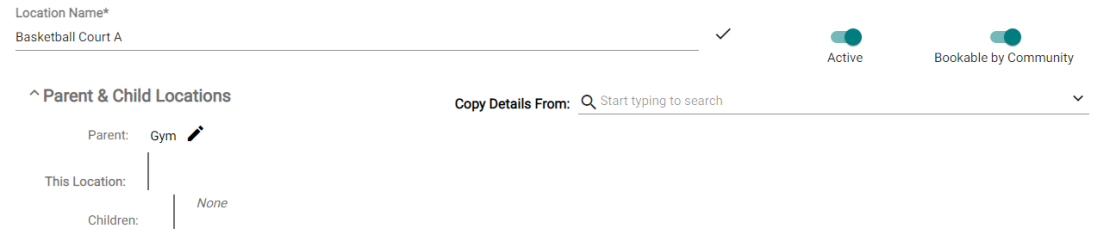
- Enter the Location Nameand click the check mark icon to save the name.
- Select the Active toggle if you would like this location to be available for booking throughout Event Manager.
- Select the Bookable by Community toggle if you would like this location to be available for booking by Community Portal Users. *Note: Activating this toggle with make the Description field, Types, and Usages required to save this location.
- Click the down arrow icon next to Parent & Child Locations to view or edit any Parent or Child relationships for this location.
- Start typing or click the down arrow icon next to Copy Details From if you would like to copy the details from another location. This is useful if you have multiple locations that are very similar and you don't want to enter the information for each location. *Note: This option will only display when adding a new location. It does not display when editing information for an existing location.
Enter all the relevant information about this Location in the tabs on the Details section. At the end of this section, a new map feature is introduced for showing the location. The location can also be fine tuned using the map.
Description & Address
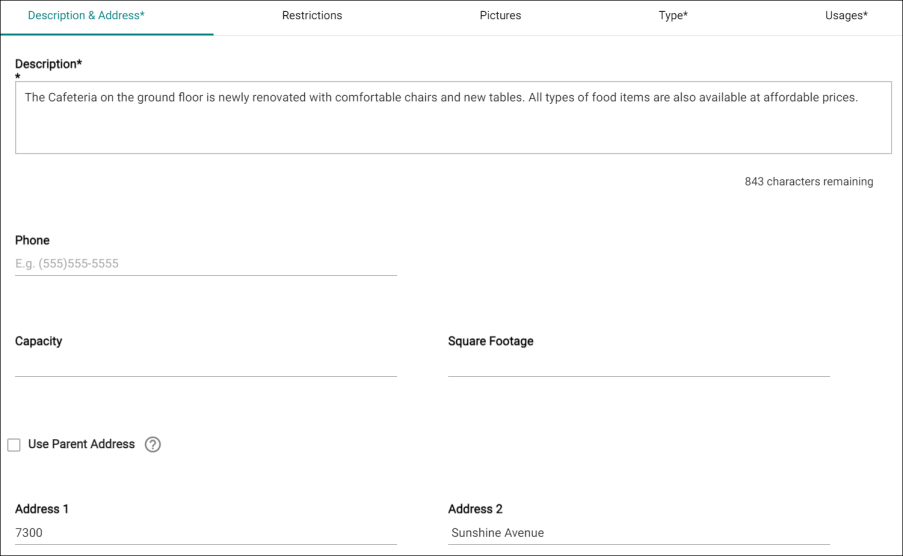
- Enter a Description for the location. This will display when a user searches for the location in Event Manager or from the Community Portal.
- Enter a Phone number for the location.
- Enter the Capacity for the location.
- Enter the Square Footage, if known.
- Enter the appropriate address for the location in all the Address fields. To use the address of the parent location, select the Use Parent address check box.
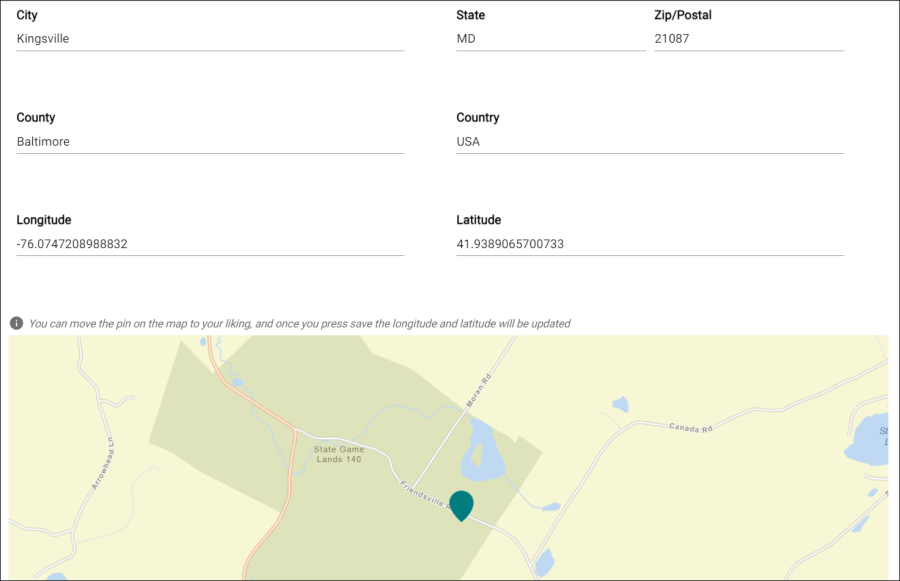
- When the Address Line, City, State, and Zip Code fields are updated, the Latitude and Longitude fields are automatically populated.
- The location is displayed on the map in this section and on the Community Portal when the Latitude and Longitude fields are populated.
- As an admin, you can adjust the location by clicking on the map. The latitude and longitude coordinates will be updated accordingly, but the address will remain unchanged.
NOTE This field is repositioned on the page.
Restrictions
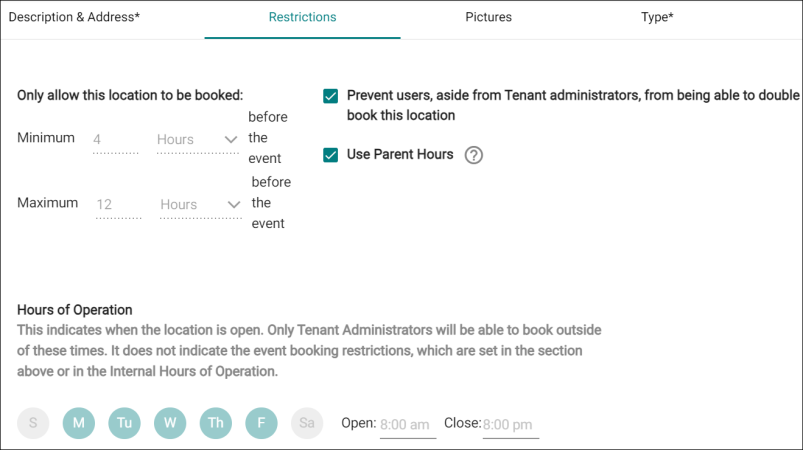
- Click on the Restrictions tab from the Details panel.
- If you would only like to allow this location to be booked within a certain time range, you can set a minimum and maximum number of days or hours in this window.
- Select Hours or Days from the drop-down menu next to the Minimum field and enter the appropriate number. *Note: This will restrict event requests from being entered for this location after the defined value. For example, if you have entered 7 days as the minimum, you will not be able to enter a request for this location if there are fewer than 7 days before the event.
- Select Hours or Days from the drop-down menu next to the Maximum field and enter the appropriate number. *Note: This will restrict event requests from being entered for this location before the defined value. For example, if you have entered 365 days as the maximum, you will not be able to enter a request for this location if there are more than 365 days before the event.
- Select the check box next to Prevent Double-booking to avoid more than one event from being scheduled at the same time for this location. *Note: Unchecking this box may result in double-bookings and can create schedule conflicts.
- Select the Use Parent Hours check box to use the same restrictions on the child location that are available on the Parent Location.
- The Use Parent Hours check box is displayed when any of the following conditions is true:
- Minimum and Maximum hours are specified under the Restrictions section on the parent location.
- Hours of operation are defined under the Restrictions section on the parent location.
- Exceptions are specified under the Restrictions section on the parent location.
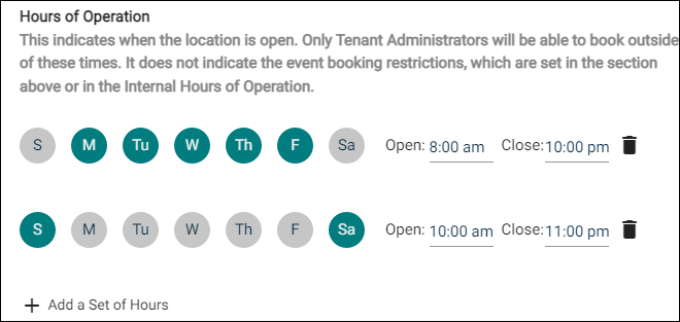
- Click Add a Set of Hours under the Hours of Operation heading if you would like to restrict the available hours for this location. *Note: Only Tenant Administrators will be able to book events outside of these hours.
- Select the applicable days of the week for this set of hours.
- Click on the Open field and select the start of the booking period.
- Click on the Close field and select the end of the booking period.
- Repeat this process if you need to add multiple sets of hours for this location.
Bright Idea:If you define Hours of Operation for one day, be sure to also define them for all days that you would like the facility to be available. Any days without defined hours will be unavailable for booking.
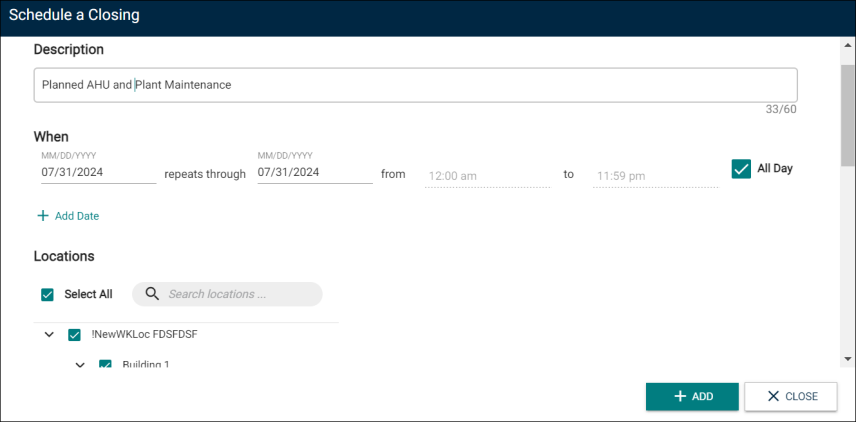
- Click the Add a Schedule Exception button to define specific days and times that this facility is closed.
In the Description text box, enter the reason for closing the facility.
Select the date range when this location is not available for booking.
- Select the start and end time for this location to be closed. Alternatively, select the All Day check box to close this location for the entire day.
- To define the date and time range more than once, click Add Date and enter the values.
- To apply this exception to all locations, click the Select Allcheck box.
- In the Search locations box, enter a phrase to quickly search the name of a location.
- Click Add to finalize your changes.
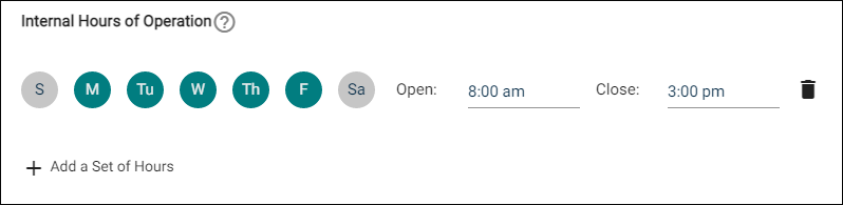
- Click Add a Set of Hours under the Internal Hours of Operation heading if you would like to define the days and times that a location should be reserved for internal booking. You can set a different set of available hours for the weekdays and weekends. *Note: Community Portal users will only be allowed to enter an event request for this location outside of any defined bookable hours set on this tab.
- Select the appropriate days of the week.
- Click on the Open field and select the start of the booking period.
- Click on the Close field and select the end of the booking period.
- Repeat this process if you need to add multiple sets of hours for this location.
Pictures
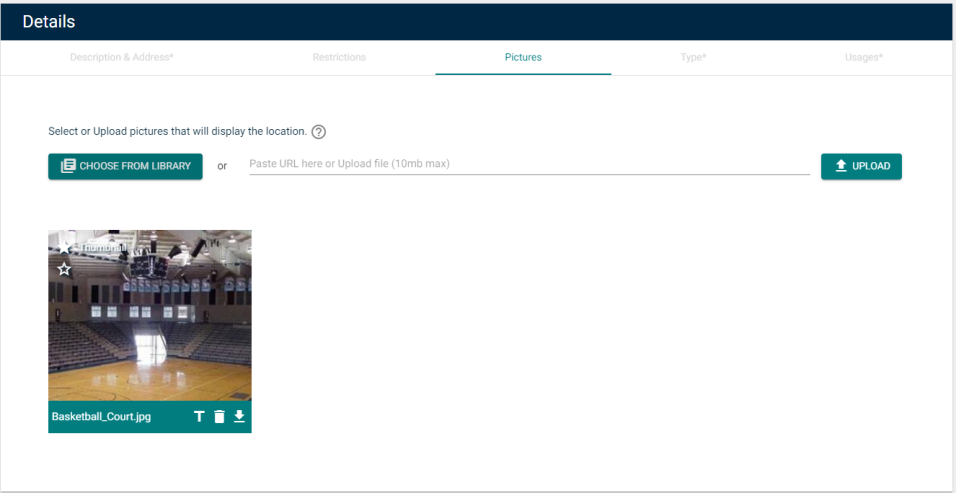
- Click on the Pictures tab from the Details panel.
- Here, you can Upload an image, link a URL from the internet, or Choose From Library to display on the location view. Once added, a preview of the image will display.*Note: The image should have a 1.4: 1 aspect ratio and will display as 350 x 250 pixels. The maximum file size is 10 MB.
- Click on the top Star icon to make a picture the Thumbnail image for this location. This will cause the picture to display on all list pages and the Community Portal.
- Click on the bottom Star icon to make a picture the Banner image for this location. This will cause this picture to display as the primary banner image when viewing the location from the Community Portal.
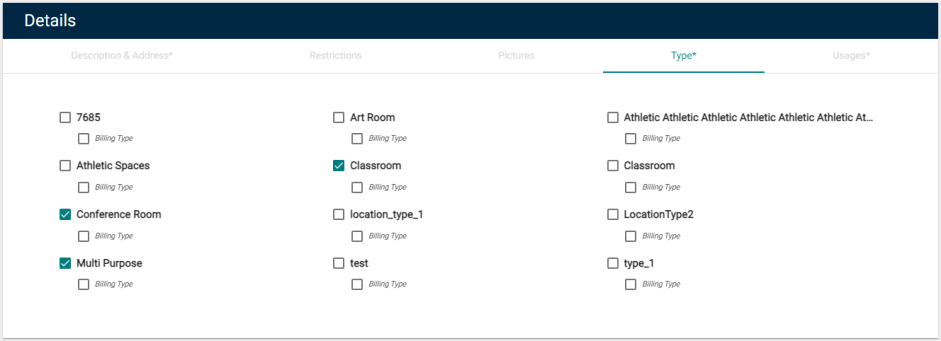
Type
Types are used to determine the physical characteristics of a location. For example, a gym might be better defined as an athletic facility than a classroom.
- Click on the Type tab from the Details panel.
- Check the box next to each applicable Type for this location. *Note: Once types are defined for this location, they can be used to search or filter for this location from a list in Event Manager.
- If applicable, select a primary Billing Type for this Location. *Note: This should be checked if a location has multiple Location Types, so that Event Manager knows how to invoice the location.
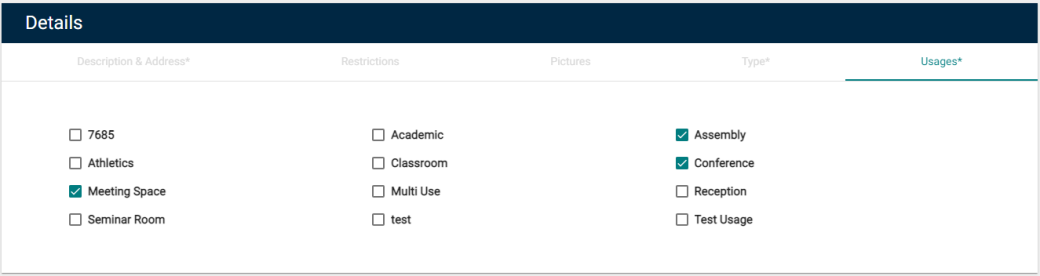
Usages
Usages are used to define what purpose a facility is best equipped to serve. For example, a theater might make a better facility for an assembly, concert, or performance, than for an athletic event.
- Click on the Usages tab from the Details panel.
- Check the box next to each applicable Usage for this location. *Note: Once usages are defined for this location, they can be used to search or filter for this location from a list in Event Manager.
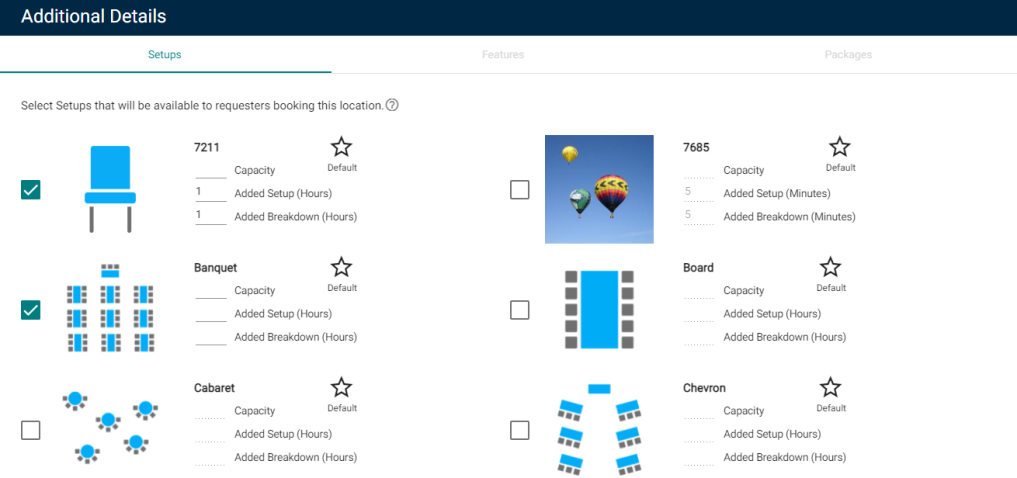
Setups
Room Setups can be associated with Locations to allow users to define how they need the location configured for their event. *Note: If you do not currently have access to this feature, please contact your Sales Representative or Client Services for more information.
- Check the box next to each Setup you'd like to associate to this location.
- The Capacity, Added Setup, and Added Breakdown for each selected setup may be auto-populated if a default was defined, but can be changed if needed.
- Click on the star icon (
 ) to mark a setup as the Default setup for this location.
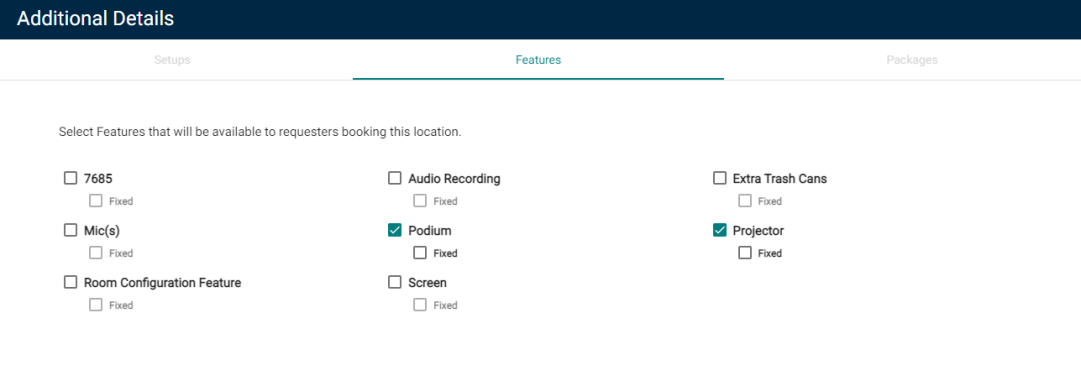
Features
Once added to Event Manager, Features can be associated with Locations to allow users to select certain items or attributes that are needed for an event. *Note: If you do not currently have access to this feature, please contact your Sales Representative or Client Services for more information.
- Click on the Features tab under the Additional Details panel.
- Check the box next to each feature that should be available for this location.
- If necessary, check the Fixed box for a feature if it is part of the location and cannot be removed.
Packages
Invoice Packages can be associated with Locations for the purpose of conditional pricing. This can be done on each individual package or from the Location Details page. *Note: If you do not currently have access to this feature, please contact your Sales Representative or Client Services for more information.
- Under the Additional Details panel, click into the search field and start typing to filter the list of Packages if necessary.
- Select a Package to add it to the list of associated packages for this location. *Note: Packages can be disassociated from a location at any time by clicking Remove next to the package name.

Once the required fields are populated, click Save Changes.
