Back to Event Manager Main Menu
Templates
There are many ways to customize invoice settings within Event Manager, all with the intention of making the process of invoicing easier and more efficient. Line Items, Fees & Discounts, and Taxes are all different types of charges on the invoice that are able to be set up as templates, and can be pulled into an invoice once they are defined. *Note: If you do not currently have access to this feature, please contact your Sales Representative or Client Services for more information.
- Click Settings from the side navigation menu.
- Click on the Invoice Settings tile under Global Administration.
Line Items
Line item templates represent the various standard charges that are used to bill for facility usage.
- Click on Add a Line Item Template.
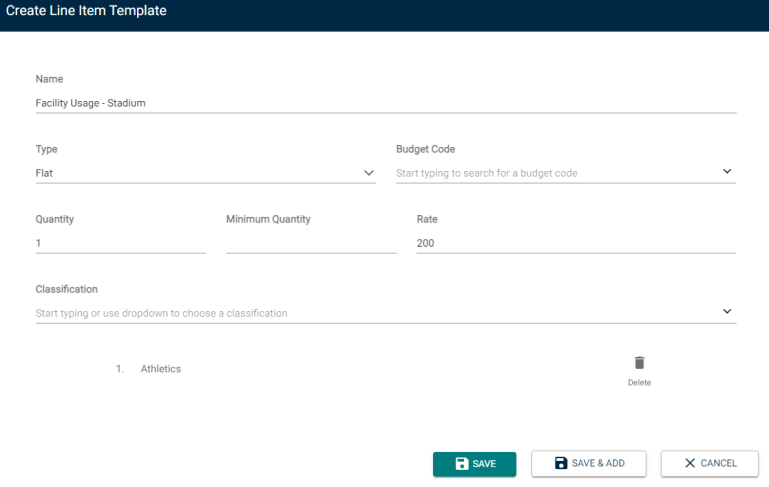
- In the pop up window, define the details:
- Enter a Name. *Note: The name will show as the description of the line item on the invoice form.
- Select a line item Type such as Flat or Hourly from the drop down menu.
- Select a Budget Code, if applicable.
- Enter a default Quantity of 1 or more. *Note: The quantity is multiplied by the rate to define the total amount for each line item.
- Enter a Minimum Quantity, if applicable. *Note: The value entered here will populate when this line item template is selected on an invoice if the event hours are less than the Minimum Quantity.
- Enter a default Rate.
- Select a Classification, such as Athletics, if applicable.
- Click Save to finalize the changes, or Save & Add to finalize the changes and continue adding line item templates.
- Once line item templates have been added, they can be edited at any time by clicking Edit from the template list. Templates can be deleted from the list by clicking Remove if they have not been used on an invoice.
Packages
Packages are bundles of line item templates and/or fee and discount templates that can be used to set up conditional pricing. They can also be used to add a standard set of line items to an invoice if the charges are always the same.
Watch the Video Tutorial
- Click on the Packages tab from the Templates panel.
- Click Add a Package. This will open the Create a Package window.
- Select whether this package is Always available, or if it is only available between Specific Dates. *Note: The package that most closely matches the invoice information will be the one that is added automatically to the invoice. For example, when there are two packages, each with the same location(s) and classification(s), the invoice will prioritize the package with matching Specific Dates over the package that is always available.
- Enter a Package Name.
Be sure to give the package a name that you will be able to recognize from the list. We recommend following a standard naming convention for all packages created, such as "Facility Name - Organization Type - Time Range". This standardization will make it easier to select the right package on an invoice and manage your package list.

Adding line item templates to the package
- Click Add a Line Item Template to add existing line items.
- Alternatively, click Create New Line Item Template to apply a new template to this package. *Note: Creating a new line item template will add it to your existing list of line item templates for future use.
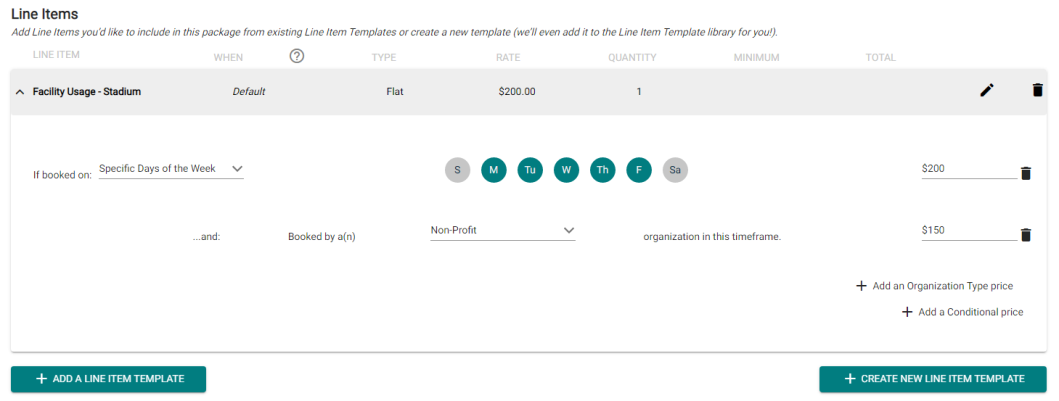
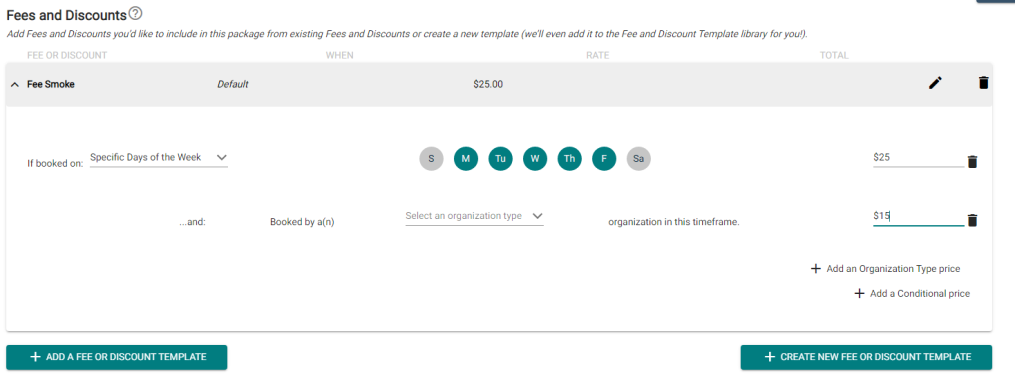
- Once a line item template has been added to the package, click Add a Conditional Price, if necessary.
- Select whether the price for this package is based on Specific Days of the Week or Specific Date(s) from the drop down menu.
- If you selected Specific Days of the Week, click on the days of the week that are applicable for this conditional pricing.
- If you selected Specific Date(s), select the date or date range that is applicable for this conditional pricing.
- Enter the price for this condition.
- If necessary, click Add an Organization Type Price to define conditional pricing for a specific type of Organization within the time frame selected.
- Select the Organization Type from the drop down menu.
- Enter the price for this type of organization within the time frame.
- Click Add a Fee or Discount Template to add fees or discounts.
- Alternatively, click Create New Fee or Discount Template to apply a new template to this package. *Note: Creating a new Fee or Discount Template will add it to your existing list of templates for future use.
- Once a Fee or Discount Template has been added to the package, click Add a Conditional Price, if necessary.
- Select whether the price for this package is based on Specific Days of the Week or Specific Date(s) from the drop down menu.
- If you selected Specific Days of the Week, click on the days of the week that are applicable for this conditional pricing.
- If you selected Specific Date(s), select the date or date range that is applicable for this conditional pricing.
- Enter the price for this condition.
- If necessary, click Add an Organization Type Price to define conditional pricing for a specific type of Organization within the time frame selected.
- Select the Organization Type from the drop down menu.
- Enter the price for this type of organization within the time frame.
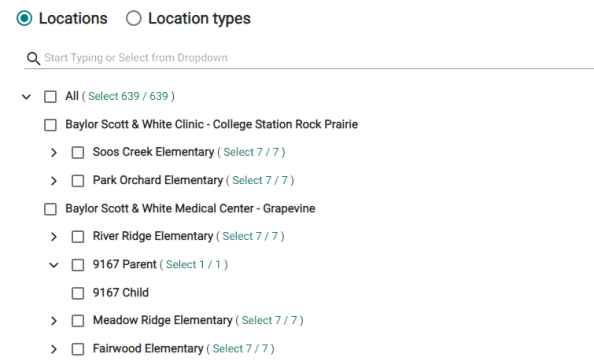
- If applicable, select either the Location or Location Types radio button.
- Select from the drop down menu or check the box next to a location or location type to associate it to this package. *Note: You can associate a package with multiple locations or types if necessary.
- If applicable, select a Classification from the drop down menu to associate it to this package. *Note: You can associate a package with multiple classifications if necessary.

Finalizing the package
- Click Save to finalize the changes or Save & Add to finalize the changes and add another package.
- Once Packages have been added, there are a few options for managing them from the list:
- Edit: This will allow you to make changes to a previously created package.
- Remove: This will allow you to delete a previously created package.
- Copy: This will allow you to create a clone of a previously created package, which can be useful if you need multiple packages that are similar.
Fees and discounts
Fee and discount templates represent consistently used charges that are calculated against the pre-tax invoice balance.
- Click on the Fees & Discounts tab from the Templates panel.
- Click Add a Fee or Discount.
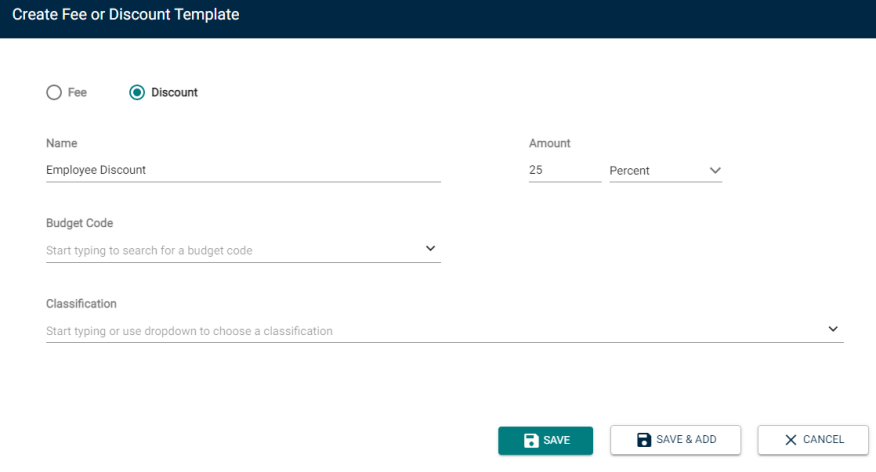
- Select whether this template is for a Fee or a Discount.
- Enter a Name for this template. *Note: This will display as the description of the fee or discount on the invoice form.
- Select whether this is a Percent or a Flat rate.
- Enter the Amount.
- Select a Budget Code, if applicable.
- Select a Classification, such as Athletics, if applicable.
- Click Save to finalize the changes, or Save & Add to finalize the changes and continue adding Fee or Discount templates.
- Once Fee and Discount Templates have been added, they can be edited at any time by clicking Edit from the template list. Fee or Discount Templates can only be deleted from the list by clicking Remove if they have not been used on an invoice.
Taxes
Tax Templates can be used to add standardized tax rates to the invoice. They are calculated after all other charges have been added.
- Click on the Taxes tab from the Templates panel.
- Click Add a Tax.
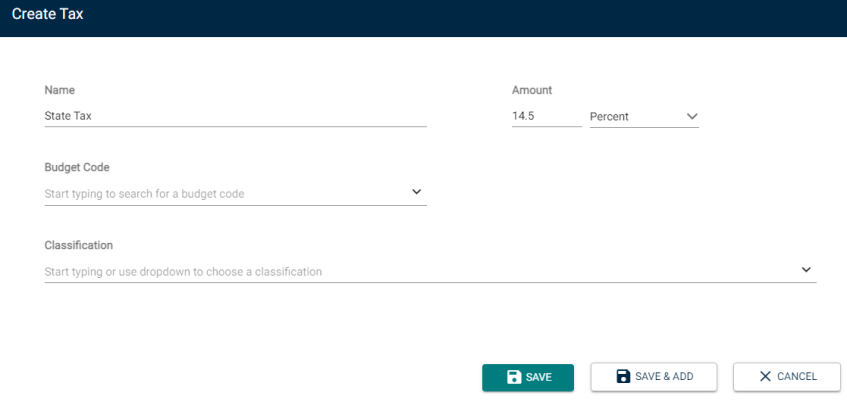
- Give the Tax template a Name, such as State Tax. *Note: This will display as the Tax description on the invoice form.
- Select whether this is a Percent or a Flat rate.
- Enter the Amount.
- Select a Budget Code, if applicable.
- Select a Classification, such as Athletics, if applicable.
- Click Save to finalize the changes, or Save & Add to finalize the changes and continue adding Tax templates.
- Once Tax Templates have been added, they can be edited at any time by clicking Edit from the template list. Tax Templates can be deleted from the list by clicking Remove.