Back to Event Manager Main Menu
Creating Custom Questions
Navigation: Settings > Site Questions > Site Event Form Questions
The Site Event Form Questions page enables you to create custom site questions that appear in the Additional Information section of the Event Submission Form. Adding custom site questions enables you to collect additional information from event authors about the event. These custom questions can be set up as free text field, Yes/No field, single-choice field, or multiple-choice field questions.
To create custom site questions:
- On the Dashboard, click Settings in the left pane.
- On the Calendar Settings tile, click Site Questions.
Adding a Text Field
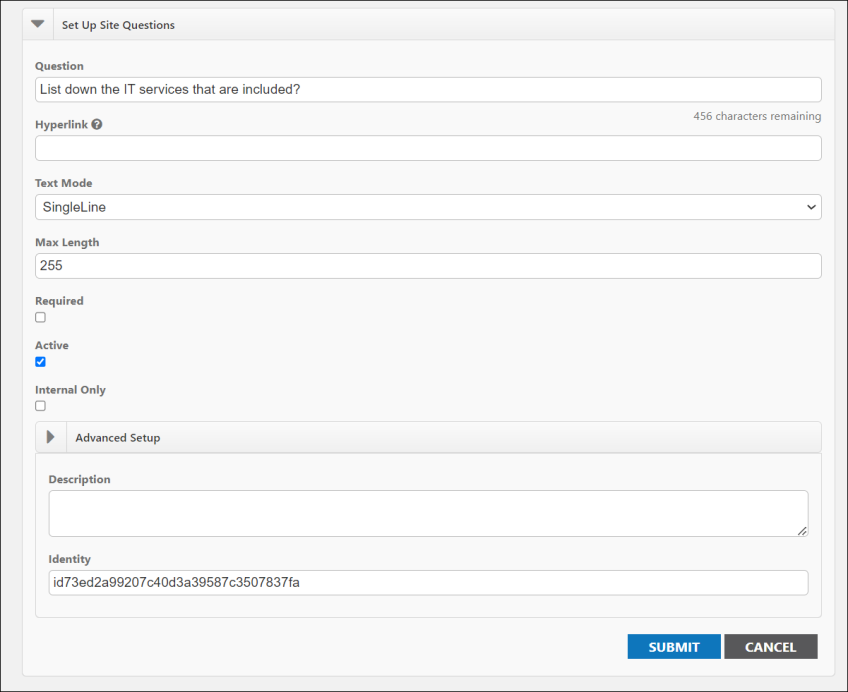
- Click the Add Text Field button to add a free text field.
- Enter a Question. This question will appear as the title of the field in the Additional Information section.
-
Enter a URL in the Hyperlink field, if needed. This step will turn the Question text into a hyperlink that the user can click to access more information when filling out the event request form.
-
Select a Text Mode: either SingleLine or MultiLine. The mode controls the field's height on the event creation form, whether just high enough for a single line of text or dynamically resizing for multiple wrapped lines.
- Enter the Max Length you would like to set for their free text response. The maximum length allowed in the system is 255 characters.
- Select whether or not this field will be Required.
- When you are ready to display this field on the event creation form, select Active. If needed, you can create the field before you would like it to show on the event creation form and return later to change it to Active.
- Selecting Internal Only will only show the field on the event creation form; it will not show on the event details page from the Calendar view.
- Advanced Setup:
- Description - You can enter a description of the field here for internal use.
- Identity - This is a unique system identifier for displaying this content in your front-end layout, used when creating custom layouts.
- Click Submit to save this custom text field.
NOTE In the Question field, you can enter a maximum of 500 characters. Therefore, you can type questions which are lengthy and also provided supporting information.
Adding a Checkbox Field
- Click on the Add Checkbox Field button to add a checkbox field.
- Enter a Question. This question will appear as the title of the field in the Additional Information section. The user filling out the form will have the option to check a single box next to this field. For example, "Will your event require custodial services"?
- Enter a URL in the Hyperlink field, if needed. This step will turn the Question text into a hyperlink that the user can click to access more information when filling out the event request form.
- Select whether or not this field will be Required.
- When you are ready for this field to show on the event creation form, select Active. If needed, you can create the field before you would like it to show on the event creation form and return later to change it to Active.
- Selecting Internal Only will only show the field on the event creation form; it will not show on the event details page from the Calendar view.
- Advanced Setup:
- Description - You can enter a description of the field here for internal use.
- Identity - This is a unique system identifier for displaying this content in your front-end layout, used when creating custom layouts.
- Click Submit to save this custom check box field.

NOTE In the Question field, you can enter a maximum of 500 characters. Therefore, you can type questions which are lengthy and also provided supporting information.
Adding a Single/Multiple-Choice Field
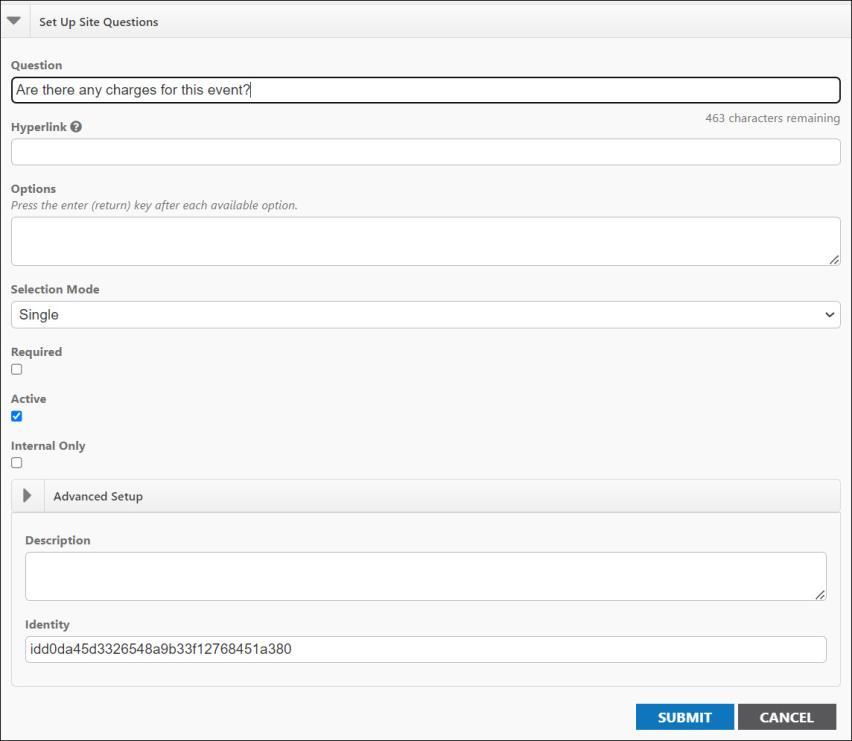
- To add a multiple-choice field, click on the Add Multiple Choice Field button.
- Enter a Question. This question will appear as the title of the field in the Additional Information section.
- Enter a URL in the Hyperlink field, if needed. This step will turn the Question text into a hyperlink that the user can click to access more information when filling out the event request form.
- In the Options section, type the various choices the user will be able to select. Hit the Enter key after each option to list it on a new line.
- Selection Mode gives you the option between Single and Multiple: This determines how many of the above-listed options the user will be able to select.
- Select whether or not this field will be Required.
- When you are ready for this field to show on the event creation form, select Active. If needed, you can create the field before you would like it to show on the event creation form and return later to change it to Active.
- Selecting Internal Only will only show the field on the event creation form; it will not show on the event details page from the Calendar view.
- Advanced Setup:
- Description - You can enter a description of the field here for internal use.
- Identity - This is a unique system identifier for displaying this content in your front-end layout, used when creating custom layouts.
- Click Submit to save this custom single/multiple-choice field.
NOTE In the Question field, you can enter a maximum of 500 characters. Therefore, you can type questions which are lengthy and also provided supporting information.
NOTE For a Yes/No question, enter Yes and No as separately listed options and select a single selection mode.
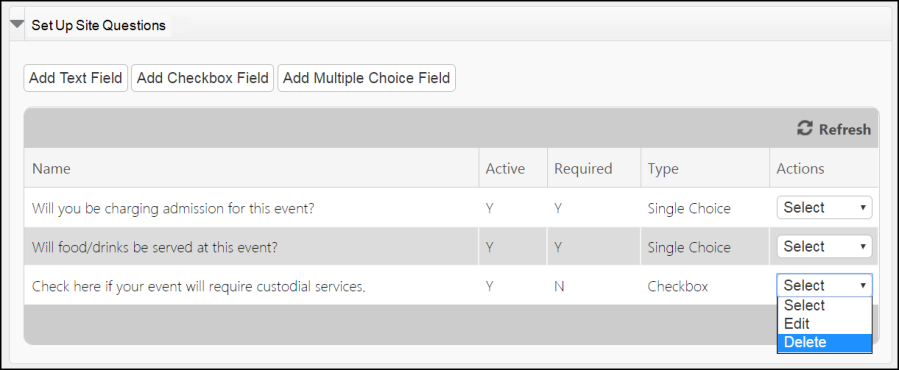
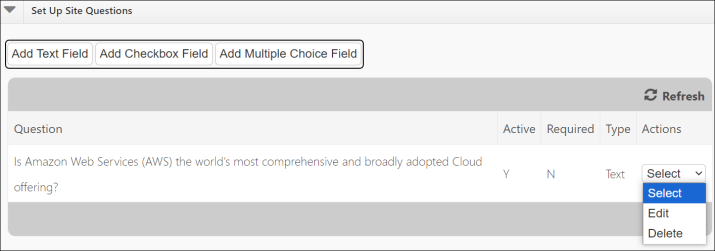
Modifying and Deleting Custom Site Questions
To modify or delete a custom site question:
- From the list of Site Questions, click on the Actions dropdown next to the Field you would like to make changes to and select Edit or Delete.
- Make the necessary changes to the custom site question information.
- Click Submit to save your changes.