Back to CrisisManager Main Menu
Uploading a File
Once the CSV file has been created for use and exported from an HRIS, Active Directory, or other company data source, administrators have three options in order to perform a file upload to the CrisisManager Online Portal. Administrators may choose to upload the file directly through the Online Portal, upload through the Secure Web Service, or schedule an automated task with scripts to upload the file on a daily or weekly basis. Approach 3 is the recommended approach and is considered a best practice for CrisisManager clients.
Approach 1: Through the Online Portal
- Once the Data Administrator user is logged into the Portal, click on the Contacts tab and then click on Contacts Administration.
- Click Upload CSV file.

- Choose the file to upload and click Upload File.
-
A status will be displayed after import noting successful or rejected upload. If the upload is a success, the status will display the numbers of columns and rows contained in the file.

Approach 2: Through the Web Service
To bypass logging into the Online Portal to upload the file:
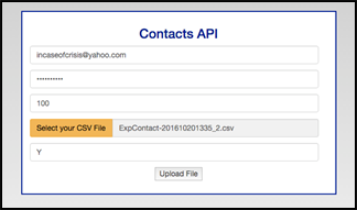
- Navigate to the following URL: https://crisismanager.schooldude.com/MyPlans/ContactAPI/ *Note: To log in successfully using this URL, the user must be given the Data Administrator permission.
- Log in using credentials for the CrisisManager Online Portal.
- Enter the Org ID number for your account. *Note: The Org ID can be found on the Plan Info page of an existing plan within the Online Portal.
- Choose to automatically update existing plans within your account after successfully uploading a contacts CSV file. Type Y for yes, N for No. This will update and republish existing plans based on the information from the file upload.
- Select a CSV file.
- Click Upload File.

Approach 3: Automated Script
We recommend that administrators test ContactSync with a manual upload before setting up an automated script. Use Approach 1 or Approach 2 to manually upload a file before working with internal resources to set up the automated feed.
Users can write a script (using such tools as Powershell, Unix shell, Perl, etc.) to download the information needed to build the CSV file from company HRIS, Active Directory, LDAP, or similar system. This enables easy automation and eliminates the need for the file upload be done manually using Approach 1 or 2.
Once the CSV file has been built, users can then use tools that support HTTPS client interface (cURL, PowerShell, web browsers, etc.) to submit the CSV file into the portal as a multipart form POST request.
When using this method, we recommend opting Y for Yes to automatically republish plans when a CSV file has been uploaded with the same signature.
The following fields are needed to submit via the cURL method:
capiEmail: Email address of the Online Portal Administrator with Data Administrator permissions
capiPassword: Online Portal Administrator’s password
capiOrgID: ID number of the organization to which the user is uploading
capiRepublish: Would you like to auto-republish plans if a new file is uploaded? Y for yes; N for No
capiFile: The file that you are uploading, for example: @contacts.csv
URL: https://crisismanager.schooldude.com/MyPlans/ContactAPI/
Here is an example of cURL script to upload the file to the portal:
curl -F “capiEmail=crisismanager@yahoo.com” -F
“capiPassword=********” -F “capiOrgID=000” -F “capiRepublish=Y” -F
“capiFile=@contacts.csv”
https://crisismanager.schooldude.com/MyPlans/ContactAPI/
