Back to Asset Essentials Main Menu
Exporting and importing data
The Asset Essentials Connector Tool allows you to import and export your data to and from a CSV file. You can use this tool to add additional records to your account or update existing records.*Note: The Connector Tool feature is available to Asset Essentials clients for an additional cost. Please contact your Sales Representative or Client Services if you are interested in purchasing this feature.
Importing best practices
- In order to ensure that all of your data is accounted for in the appropriate format when importing new or updated data, we recommend starting by exporting a few records of existing data. Be sure to export all columns and use this as your template. You can add on, take away, or update your data from the template that you export and then import that same template back into Asset Essentials by following the Importing steps below.
- If you are importing a large number of records into Asset Essentials, start by importing only a few records first to make sure the import is accomplishing what you expected before importing the rest of the data.
- We recommend following the CSV Editing with Excel help guide in order to avoid auto-formatting issues when working with CSV files in Microsoft Excel.
- Each item that gets imported into Asset Essentials is mapped by a unique identifier. The Id field that is generated by our system on the back end is used as the unique identifier. You should not alter this field on the template in order to preserve the ability of our system to map the data back to that exact item. If you are adding a new item to the system, leave this field blank and the system will generate the Id automatically once the item has successfully been imported.
- When editing existing data for certain fields, the system may require you to edit the data in more than one column on the import template. For example, If you need to edit the Status of the item, you will also need to edit the StatusName, StatusNO, and StatusID in order for the import to be successful. *Note: If you only know the data for one of the fields you can enter the data in that column, but be sure to remove the other two columns completely in order for the import to be successful.
Exporting data
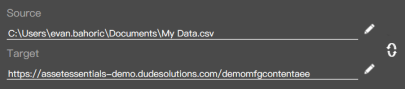
- In the Connector Tool, be sure your Asset Essentials web URL is displayed in the Source field. If your URL is not displayed, check out the information on linking your account to the Connector Tool.
- Click on the pencil icon (
 ) next to the Target field.
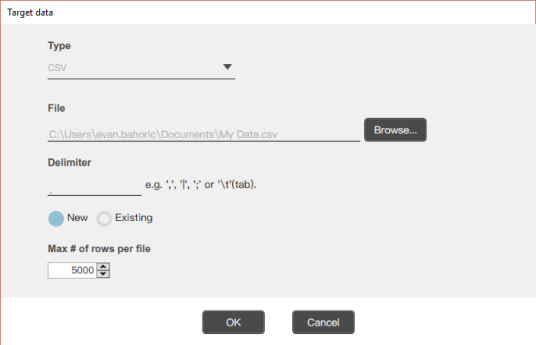
 - In the Target data window, be sure CSV is selected in the Type drop down.
- Click the Browse button and select a CSV file you created on your computer or you can create a new CSV file by typing in the File Name and clicking Open.
- If necessary choose a Delimiter.
- Select New if you are exporting your data to a blank workbook with no column headers.
- Select Existing if you are exporting to a CSV file with existing column headers. This is useful if you use an Enterprise Resource Planning tool with specific field names.
- Select the Max# of rows per file if needed.
- Click OK.
- You should now see the file path in the Target field. *Note: If you used a CSV file with existing column headers, those field names will automatically populate in the list under the Target Table field.
- In the Source table drop down, select the data you would like to export from your account.
- Upon making a selection, the fields associated with your selection will appear in the list below the Source table field.
- Select a field you want to export into the CSV file.
- If you are exporting to a CSV file with existing column headers, select the Source field and the matching Target field. This essentially tells the Connector Tool: The data in this field (source) should go here (target) in my CSV file.
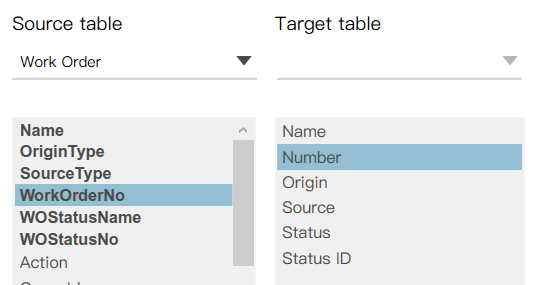
- Click the right arrow button (
 ) to add the field to mapping section. *Note: You must add any fields shown in bold.
 - To quickly add all fields, click the double arrow button (
 ).
). - If you accidentally add a field you do not want, click the trashcan icon (
 ) to remove the field.
 - Before running the Connector Tool, click here to learn about applying a Mapping Filter and changing the Mapping Format for the data you are exporting.
- Click the Run button.
- To export the data in the selected fields to your CSV file, click the Start button. If any errors occur during the process, a description of the error will appear in the blue section at the bottom of the Connector Tool.

If this is an export that you will perform again, you have the option to save a file with your export settings to use in the future.
- Click File, then Save As.
- Name the file and select a location for the file on your computer.
- You can now open this file to restore your export settings the next time you need to run this job.
Importing data
You can import data into your Asset Essentials account using the Connector Tool. If you have recently exported data, made changes, and wish to import your changes back into your Asset Essentials account, you can simply click the Source/Target Switch button to switch the connector tool from pulling data from your Asset Essentials account (exporting) to putting data into your account (importing).

|
|
- To begin importing your data, click the pencil icon (
 ) next to the Source field.
 - In the Source data window, be sure CSV is selected in the Type drop down.
- Click the Browse button and select the CSV file on your computer.
- If necessary choose a Delimiter.
- Click OK. The text box below the Source table field will automatically populate with the fields that are found in the CSV file.
- Be sure your Asset Essentials web URL is displayed in the Target field. If your URL is not displayed, check out the information on linking your account to the Connector Tool.
- In the Target table drop down, select the data associated with the data found in the CSV file.
- Select the Source field and the matching Target field. This essentially tells the Connector Tool: The data in this field (source) should go here (target) in Asset Essentials.
![]()
- Click the right arrow button (
 ) to add the field to mapping section. *Note: You must add any fields shown in bold.
 - If you accidentally add a field you do not want, click the trashcan icon () to remove the field.
- Before running the Connector Tool, click here to learn about applying a Mapping Filter and changing the Mapping Format for the data you are importing.
- Click the Run button.
- To import the data in the selected fields to your account, click the Start button. If any errors occur during the process, a description of the error will appear in the blue section at the bottom of the Connector Tool.

If this is an import that you will perform again, you have the option to save a file with your import settings to use in the future.
- Click File, then Save As.
- Name the file and select a location for the file on your computer.
- You can now open this file to restore your import settings the next time you need to run this job.
