New Work Order Form
Work orders are documents that describe work to be done, the labor needed to accomplish the work, and other data about the work, such as it's priority, the cause of the work, and Location, Asset, or Site. Your organization may have a different name for work orders, such as job ticket or task assignment.
Watch the video tutorial:
How to create a work order
- Click on the Work Orders menu icon, select Work Orders, and then click the New button. *Note: A work order can be generated from various sources within Asset Essentials (ex. Location, Asset) by right-clicking on the source, and selecting Create WO.
- The new work order form is broken up into several sections that can be expanded or collapsed by clicking on the title of the section. *Note: Depending on your account's configuration, some sections may not be visible, various fields may be pre-populated with information, and additional fields may be required.
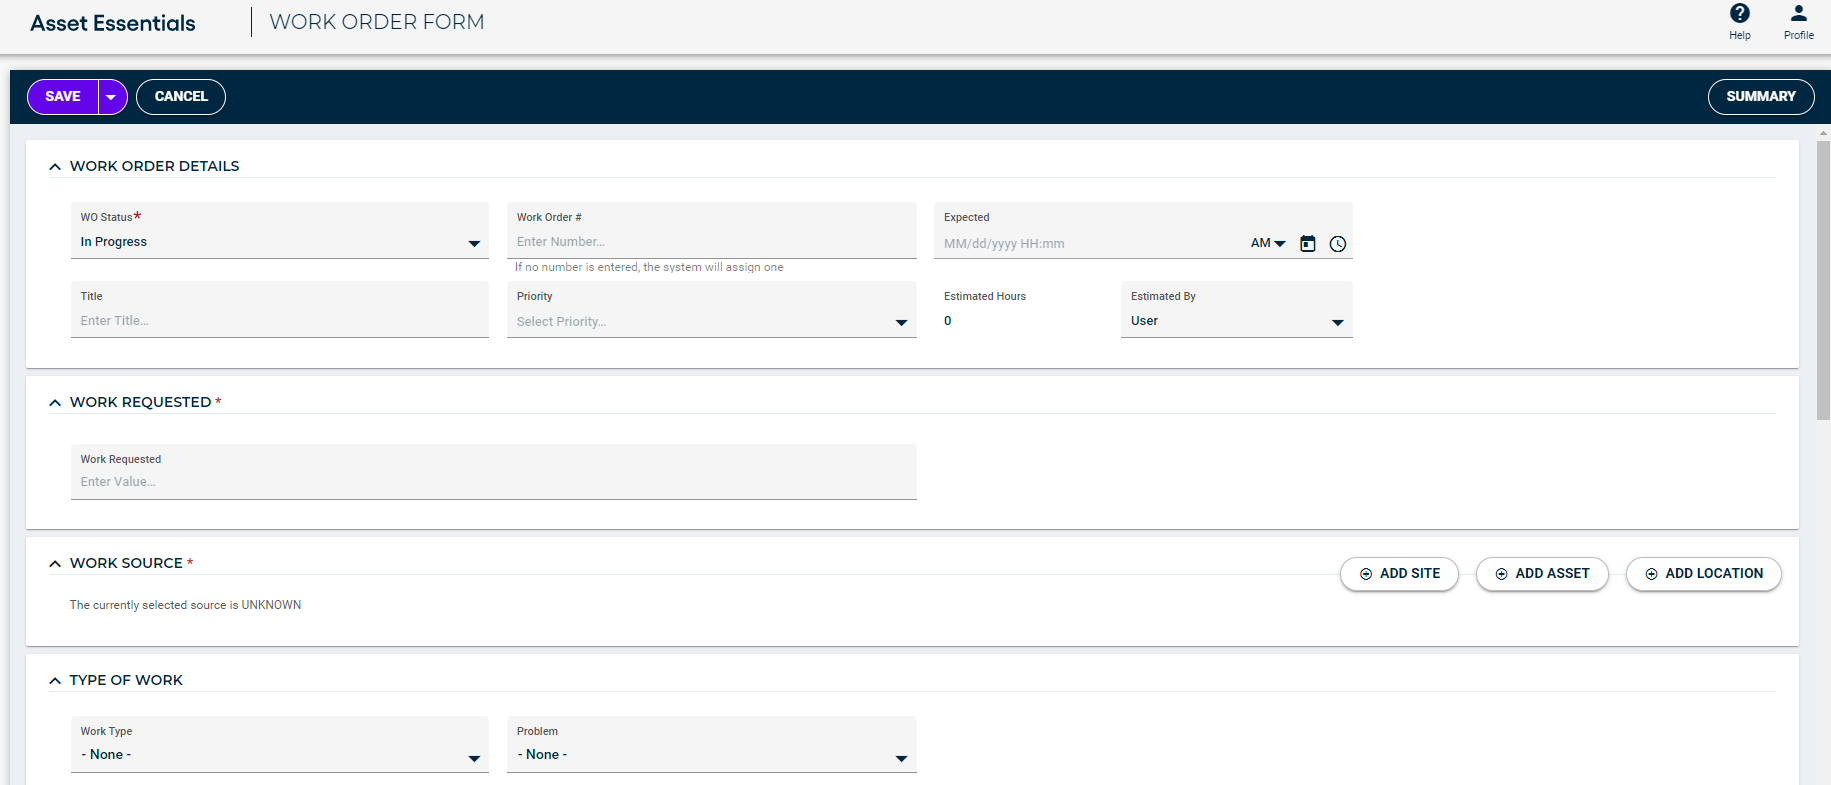
In the Work Order Details section of the New Work Order page, there are three required fields: WO Status, Title, and Work Order #.
- Select the appropriate WO Status.
- Enter a Work Order #. *Note: If you want the work order number to automatically generate, leave the box next to Auto Generate checked. If this field is locked and not editable, the work order number will automatically be system generated.
- Choose a Priority.
- Enter a Title.
- Use the date and time picker buttons (
 ) to select an Expected date and time.

- Provide a detailed description of what needs to be done in the Work Requested section.

- Click the drop down arrow next to Add Asset and select Site, Asset, or Location to associate the work order with a source type of either Site, Asset, or Location. *Note: You can only associate one source type to the work order.

- In the pop-up window that follows, select the specific Site(s), Asset(s), or Location(s) to define your work source.
- Once you have selected the work source, you will now see its details in the grid view. You can add additional Site(s), Asset(s), or Location(s) as needed by clicking on the Add button.
- Click a Site, Asset, or Location in the list to see additional options.
Adding a meter reading
If you have added one or more Assets to the work order, you can easily add meter readings for any of the associated assets.
- To add a meter reading for a specific asset, click the Add Meter Reading button in the Actions column. If you would like to add meter readings for multiple assets on this work order, click the Add Meter Reading button in the top right corner of the Work Source section.
- In the Meter Reading window, enter the New Meter Reading for any of the asset's meter titles.
- Click Save. The meter reading will display in the Meter Reading section on the work order form.
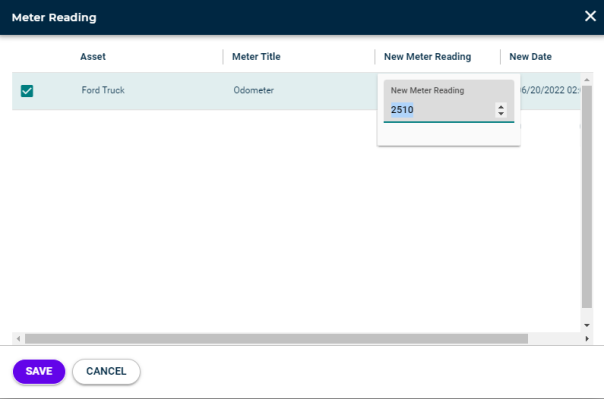
This section will display any meter readings created for the work order. *Note: Meter readings are recorded in the Work Source section of the work order form.

Select a Work Type, Work Category, Problem, and Cause, if known. *Note: Depending on your account's configuration, certain Work Categories may trigger Custom Fields to appear on the work order form.
-
Work Type - The Work Type can be used to indicate why the work is being performed, such as Corrective Maintenance or Storm Damage.
-
Work Category - The Work Category is the trade or skill associated with the work being performed. *Note: Depending on your account's Work Category Assignment configurations, your list of work categories may be limited. You can still document work that needs to be done outside of your Work Category Assignment by submitting a work request through the request form.
-
Problem - The Problem field indicates the kind of issue that needs to be addressed. *Note: Problem types can be associated with specific Work Categories depending on your organization's configurations.
-
Cause - The Cause is used to indicate why the problem occurred. *Note: Causes can be associated with specific Problems depending on your organization's configurations.

- The Originator field is automatically populated with your name. If you need to select another user as the Originator, click on the plus sign (
 ).
). - To modify the Created or Assigned dates, click on the date and time picker buttons (
 ).
). - Click the Contact User button to view the Originator's contact information if this information has been filled out in their profile.

- If necessary, enter the Address information for where the work is taking place.

Asset Essentials allows you to create a list of tasks for the worker to follow. You have the option to either create a new task by clicking the Add Task button or you can select an existing task from the Tasks Library. *Note: The Tasks section will not show on the work order form until the work order is saved.
Adding a task from the tasks library
- Click on Select from Library.
- Check the box next to any task you would like included on the work order.
- Click the Copy button to transfer the tasks to the work order.
Adding a single task
- Click on Add Task to create a new task on the work order.
- In the Task window, select the User responsible for the task from the drop down menu or click the user icon (
 ) to select a user from the list.
 - Enter the Name of the task as well as the Description.
- Select the Task Type.
- Instruction - used for generic step-by-step tasks
- Collect Reading - used when meter readings need to be recorded for an asset. *Note: You must also select an Asset and a Meter Title with this task type.
- Pass/Fail - used for inspection-like tasks that require a determination that an asset passed a review, failed a review, or failed the review but was able to be fixed. If the task is marked as failed, you have the option to generate a new follow-up work order right from the task.*Note: You must also select an Asset with this task type.
- If you need to attach a document to the task, click the image icon (
 ) and select a document from either your Document Library or upload a file from your computer.
 - Repeat these steps to add as many tasks as needed.
- If necessary, you can reorder the steps by clicking the rearrange icon (
 ) and dragging the task to its new location in the list.

- Enter Downtime and a Completed date and time after the work is finished.
- Enter Action Taken notes to describe what was done to complete the work order after the work is finished or click Select Solution to select a pre-populated action.

- If you want to assign the work order to yourself, click on the Add Me button.
- If you want to assign the work order to other users, click on the Add User button and then choose the user(s) from the Select User pop up window.
- To remove an assigned user, click the Remove button in the Actions column.
- To see an assigned user's labor transactions for the work order, click the Labor Entries button in the Actions column.
- To change the order of the users in the list, click and drag the double line icon (
 ) in the index column to the appropriate position.

The Labor section allows you to create labor transactions for your employees as well as external workers. *Note: The Labor section will not show on the work order form until the work order is saved.
Adding employee labor
- Click the Add Employee Labor button.
- The Add-Edit Labor form will appear in a pop-up.
- Select the User you are entering labor for by clicking the Select User icon (
 ) and choosing the user from the select user window or click the Select Me icon (
 ) to automatically select yourself.
 - Record when the labor began in the Start Date field.
- The End Date will automatically be populated with the current date and time, but can be adjusted as needed.
- The Hours field will calculate based on the start and end dates entered.
- Choose the type of labor in the Reg/OT field.
- The Sub total($) field will calculate based on the Hours field and the Wage that was entered in the user's profile.
- Enter a Description if necessary.
- Click Save to record the labor entry.
- Once added, you can click the labor transaction to either Edit or Delete the labor entry.
Adding external labor
- Click the Add External Labor button.
- The Add-Edit External Labor form will appear in a pop-up.
- Enter the appropriate information into the Company Name, Job Title, First Name, and Last Name fields.
- Record when the labor began in the Start Date field.
- The End Date will automatically be populated with the current date and time, but can be adjusted as needed.
- The Hours field will calculate based on the start and end dates entered.
- Enter the Wage. The total cost of the labor will automatically calculate once the record has been saved.
- Type a Description if necessary.
- Click Save to record the labor entry.
- Once added, you can click the labor transaction to either Edit or Delete the labor entry.

The Parts section shows any part transactions associated with this work order, and allows you to add purchases. Purchases added here will be stored as non-inventory transactions. *Note: The Parts section will not show on the work order form until the work order is saved.

Adding a part
- Click the Add Parts button.
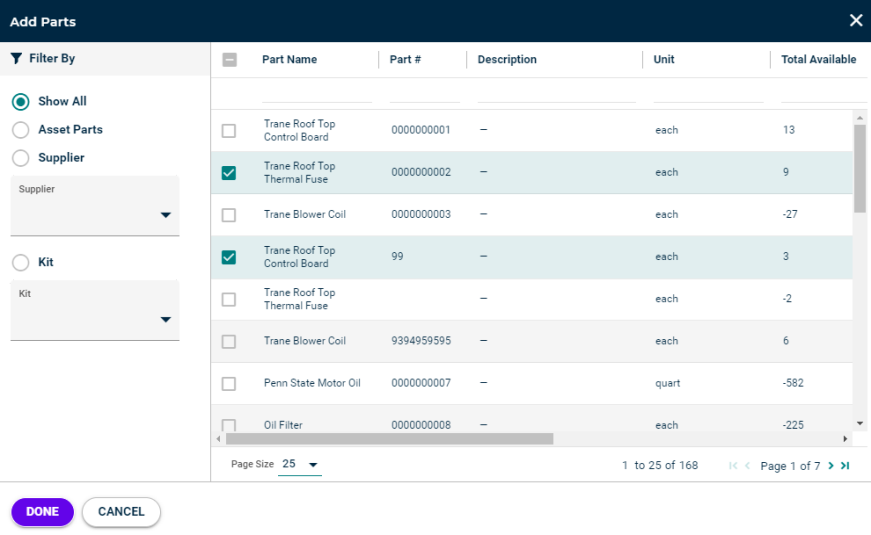
- In the window that displays, filter and sort the part list to find the item(s) you need to add to the work order.
- Check the box next to the item(s).
- Click Done.
- The part will be added under the Inventory Parts header in this section.
- The Quantity field will default to 1, but you can edit this by clicking on the value and changing the amount, if necessary.
- Some fields will display a pencil icon (
 ) to the right of the value. This indicates that this value can be edited by clicking into the field and changing the value.
- If you need to remove a part transaction, click the Remove button in the Actions column.
Adding a purchase
- Click the Add Purchase button.
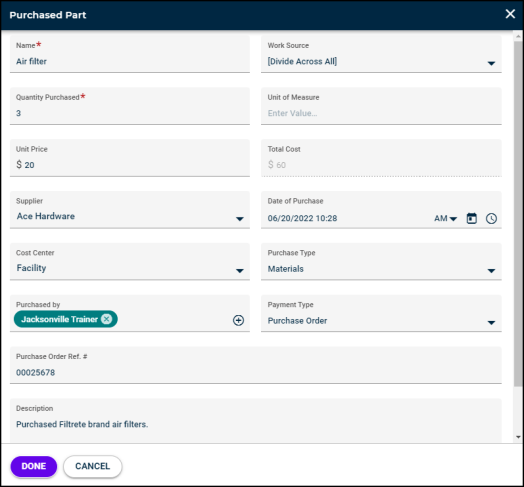
- Enter the Name and Quantity Purchased for the purchased part.
- Enter the Unit Price and Unit of Measure for the purchased part.
- The Total Cost field will automatically calculate based on the values in the Quantity Purchased and Unit Price fields.
- Begin typing the Supplier and select the correct option from the drop-down menu.
- Adjust the Date of Purchase and select a Cost Center, if necessary.
- Select a Purchase Type from the drop-down menu. *Note: This list is pre-defined and cannot be configured.
- The Purchased by field will default to the user who is logged in. To change the user, click the plus sign icon (
 ) and select a new user.
 - Select a Payment Type from the drop-down menu. *Note: This list is pre-defined and cannot be configured.
- If you selected Invoice or Purchase Order in the Payment Type field, enter the reference number that aligns with your selection. *Note: This field is intended for documenting external reference numbers only and will not link to any other areas in Asset Essentials.
- Enter a Description, if necessary.
- Click the Done button.
- The purchase will be added under the Purchased Parts header in the Parts section.
- Some fields will display a pencil icon (
 ) to the right of the value. This indicates that it can be edited by clicking into the field and changing the value, or by clicking the Edit button in the actions column.
Equipment usage for an asset can be recorded directly on the work order form. This can help determine the operating costs for your assets. *Note: The Equipment Usage section will not show on the work order form until the work order is saved.
Adding an equipment usage transaction
- Click Add Transaction.
- In the Add / Edit Transaction window, click the Select Asset icon (
 ).
). - In the Select Asset window, check the box next to the Asset(s) that require an equipment transaction. *Note: Only Assets with an Equipment Rate will appear.
- Click the Select button.
- In the Apply to selected items section, enter the Start Date, # of Units, and Description.
- Click the Apply button, to add the information to each of the selected pieces of equipment.
- Click Done to add the Equipment Usage Transaction(s) to the work order.

- Enter any additional comments in the Comments section.
- If your account is using custom fields, fill out any information in this section.

- Enter a Project if applicable, and the Estimated Cost of the work order.
- Select a Cost Center if applicable.

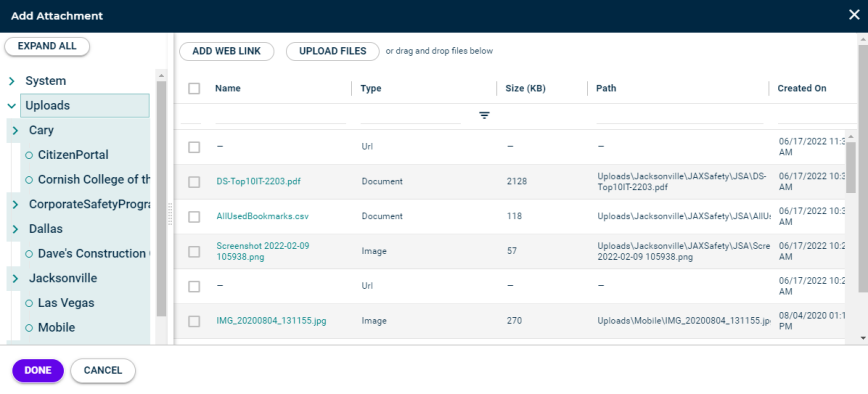
Use this section to attach documents, images, or URLs related to your Work Order.
- Click on the Add button.
- In the pop-up window you can do the following:
- Add Attachment from the Library: Check the box next to an image, document, or URL from the list of library items and then click Done.
- Add Web Link: Click Add Web Link and enter a valid URL and Name. Click Add and then click Done.
- Upload Files: Click Upload Files to select an image or document from your computer and then click Done.
-
Once you have completed all of the required fields, click the Save button at the top of the page.
