Using the Esri map on mobile
In the Asset Essentials mobile app, you can use the Esri map to view your GIS layers and work order information while on the go. *Note: The Esri Map features will replace the standard Mapping ( ) features previously accessible on the main menu and work order form. Contact Client Services to have the Esri map activated in your account.
To access the map on mobile:
- Tap the menu icon (
 ) in the top left of your screen to open the menu options.
 - Select Esri GIS Map from the list.
Using filters
Tap the Filter icon ( ) to open the available filter options. These filters will help narrow down the work orders you see on the map.
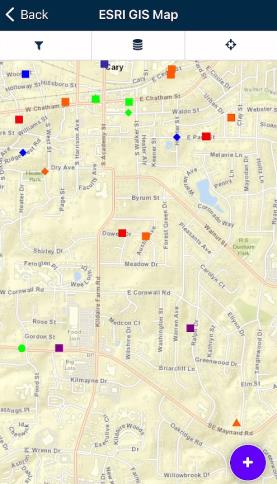
Viewing work order point shapes and colors
Each work order point on the map will have a shape and color associated to it. The shape will indicate the status of the work order. The color will indicate either the work category or priority of the work order.
- Each work order point will have a default shape based on the status category of each status in your account:
- Triangle
- Status categories: None, Request, Request Pending
- Diamond
- Status category: Assigned
- Cross
- Status categories: Denied, Request Denied
- Square
- Status categories: Completed, Complete Pending Approval
- Circle
- Status categories: Archived, Deferred
- Triangle
- Each work order point's color will depend on the configurations set for each priority or work category in your account.
- Reach out to an administrator in your account to get more information about the configurations set for the colors and shapes of work order points on the map.
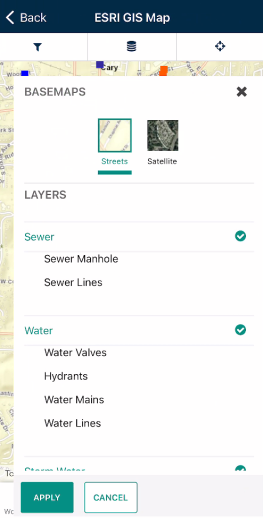
Viewing layers
Note: Layers are a feature of the GIS asset management module. To access this feature, please contact your Sales Representative.
- Tap the Layers button (
 ) to view a list of the available layers in your account.
 - In the Basemaps section, select whether you want to view the map in Streets or Satellite view.
- If you want to turn layers on or off, tap the layer name to add or remove the check mark. *Note: You can turn off a group of layers by tapping the main layer name.
- Be sure to tap Apply to save your changes. *Note: If you do not see the layer on the map, you may need to zoom in further.
- The layer(s) you select will remain selected on the Esri map until you manually change them.
Zooming in and out
- To zoom in on mobile, place two fingers on the screen and move them apart.
- To zoom out on mobile, place two fingers on the screen and pinch them together.
- You can move the map in whichever direction needed by tapping on the screen and moving your finger.
Center on your location
- Tap the Center on Location (
 ) icon.
 - The map will automatically adjust to place your current location in the center of the map.
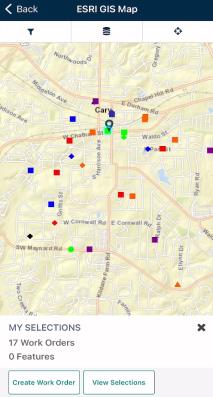
Selecting and viewing work orders and features
- To select a work order or a feature, zoom in to the appropriate area and tap it on the map.
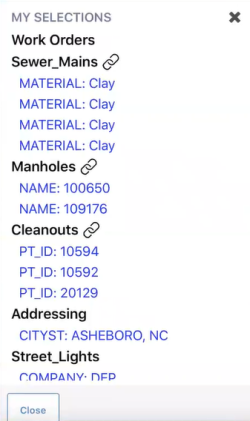
- A pop-up will appear at the bottom of your screen. Tap View Selections to view the selected work order(s) and feature(s).
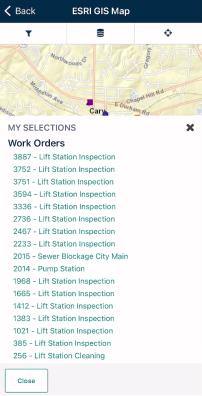
- Tap on a specific work order from the list to view more specific details.
- Tap on a feature from the list to view the GIS details.
Editing work orders
- Tap a work order on the map to bring up the My Selections menu.
- Tap the View Selections button.
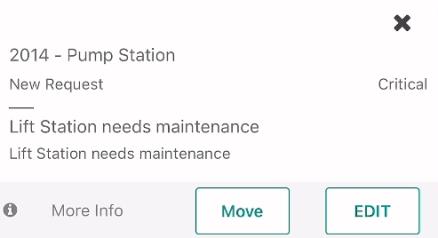
- Select the Work Order ID under the Work Orders section.
- An informational card will display with the basic details of the work order.
- Tap the Edit button to be taken to the work order form. Be sure to tap Save if any edits are made.
- Tap the Move button if you need to change the location of the work order.
- Select a new location for the work order on the map by tapping the desired location.
- Tap Confirm to move the work order to the new location.
Creating a work order
Creating a work order using the Esri Mapping feature is as easy as tapping the map and dropping a pin, searching for an address, or tapping a button.
Dropping a pin on the map
- Tap on the area of the map the work order should be associated with. A pin (
 ) will appear on the map.
 - Tap the Create Work Order button.
- Fill out the work order form, then click Save to create the work order.
Creating a work order at your location
- Tap the add button (
 ) in the bottom corner of the map, then tap the My Location button (
 )
) - The map will automatically drop a pin on your current location.
- Tap the Create Work Order button.
- Fill out the work order form, then click Save to create the work order.
Creating a work order based on address
- Tap the add button () in the bottom corner of the map, then tap the Search Addresses button (
 ).
). - Enter the address information in the Enter Address form. *Note: City, State, and Zip Code are required fields.
- Tap Done.
- On the next screen you will see a list of addresses relating to your search.
- Tap the appropriate result to drop a pin on the address.
- Tap the Create Work Order button.
- Fill out the work order form, then click Save to create the work order.

Creating a work order from a GIS asset
Note: Creating a Work Order from a GIS Asset is a feature of the GIS asset management module. To access this feature, please contact your Sales Representative.- Tap on the area of the map where the GIS feature is located. A pin () will appear on the map.
- In the My Selections pop-up window, tap on View Selections.
- Tap on the appropriate GIS Asset below the layer name to bring up the GIS features detail screen. *Note: GIS layers for which Assets have been created will have a small link icon (
 ) next to the layer name.
- Tap Create Work Order.
- If this is a linked GIS Asset, the work order will automatically include:
- Asset as the Source Type
- The coordinates of the Asset
- The linked GIS Asset information in the Assets section
- Fill out any additional fields on the work order form, then click Save to create the work order.
Quick work orders button
The Quick Work Orders button allows you to create a work order based on a Work Category at the tap of a button. You can also set the Quick Work Orders menu page as your default screen when you launch the app. Note: Quick Work Orders Button is a feature of the GIS asset management module. To access this feature, please contact your Sales Representative.
- Tap the main menu icon () and select Esri GIS Map.
- Tap the add button () in the bottom corner of the map, then tap the Quick Work Orders button (
 ).
). If your account is assigned multiple Mobile Profiles, a Select Site screen will appear.
- If you would like to make your Site selection the default Site, tap the circle icon next to the Site name.
- Tap the Site Name to select the Site.
- If you need to change the Site selection, click the additional options icon (
 ) to be taken back to the Site selection screen.
- The Quick Work Orders menu of options will appear. *Note: Your account administrator will have customized this menu to be specific for your organization.
- If you would like to be taken directly to the Quick Work Orders Menu when you launch the app, click the main menu icon ().
- Toggle the Quick Work Order Menu to on. *Note: You must fully close the app, then launch the app again for this setting to take effect.
- If you would like to be taken directly to the Quick Work Orders Menu when you launch the app, click the main menu icon (
- Tapping a menu option with the (
 ) icon will open a sub menu of additional options.
 - Tapping a menu option with the (
 ) icon will create a work order with the shown work category.
 - Depending on how your menu was configured, a work order will either be instantly created or you may be asked for additional details.
You may be asked to validate an address for the work order. A list of addresses will appear based on your GPS location. Select the best address from the list, or tap the Enter Manually button to type in the address. If the work order does not require an address, tap the No Address button.
- If you are asked to select or take a picture, follow the instructions on your device to attach an image to the work order. *Note: You may be prompted to allow Asset Essentials access to your device's camera and media. This is required in order to attach images to work orders using the Asset Essentials mobile app.
- If you are shown the work order form, fill out the details of the work order and click Save.
