Processing POs
*Note: The Parts & POs feature is available to Asset Essentials clients for an additional cost. Please contact your Sales Representative or Client Services if you are interested in purchasing this feature.
Processing purchase orders
Processing purchase orders in Asset Essentials may vary depending on how your organization has set up your account. Once you have created and finished adding line items to your purchase order, use the PO Status field to begin processing the purchase order.
Watch the video tutorial:
- Click on the Parts & Purchase Orders menu icon and select Purchase Orders.
- On the PO Summary page, right-click the PO you need to process and click Edit.
Requisition processing
If the PO Status was set as New Requisition when it was saved, the status will first need to be updated to indicate the requisition was approved.
- Once the Requisition has been approved, change the PO status to Requisition Finalized. This status indicates the requisition has been approved and the PO can be sent to the vendor.
PO processing
- Change the PO Status to PO Issued. This status means the PO has been sent to the vendor/supplier.
- When the items listed on the PO arrive, change the PO Status to PO Arrived. This status is used to indicate that the items on the PO are being counted and checked before being stored in your inventory.
- If all items on the PO were received and ready to be stored in your inventory, change the PO Status to PO Received. This will update the quantities of those items in Asset Essentials. *Note: If any line items have the Item Type of Asset, a new Asset record will be created.
- If you need to update any of the quantities on the PO, right-click the PO on the PO summary page and click Show Line Items.
- Click the Edit button at the top of the page.
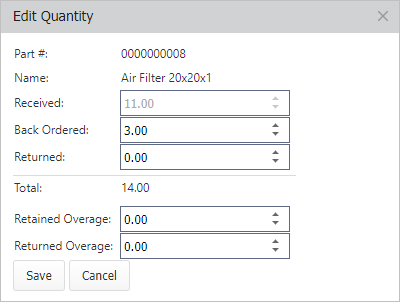
- Click the Edit Qty icon (
 ) next to the line item(s) you need to edit.
 - In the Edit Quantity window, you can enter how much was Back Ordered or Returned. If the vendor/supplier sent an overage of the item, you can enter whether the overage was kept in the Retained Overage field, or how much was returned in the Returned Overage field.
- Click Save. Additional line items will be created for back orders, returned items, retained overages, or returned overages.
- To update the on hand quantities of any line items with the Item Status of Received, click the Dispatch button at the top of the page. This will update your inventory counts and change the Item Status from Received to Dispatched.
- When line items that were back ordered arrive, update the Item Status to Received.
- If you have resolved all line items that are back ordered, change the PO Status to PO Received, click the Save button and choose your Save option. This will change the Item Status from Received to Dispatched and update your inventory counts for those items.
- If there are still back ordered line items on the PO, click the Dispatch button to update your inventory counts with the items you received.
- Change the PO Status to PO Complete once all line items are reconciled.
Emailing POs
- Click on the Parts & Purchase Orders menu icon and select Purchase Orders.
- On the PO summary page, check the box next to the POs you will be emailing.
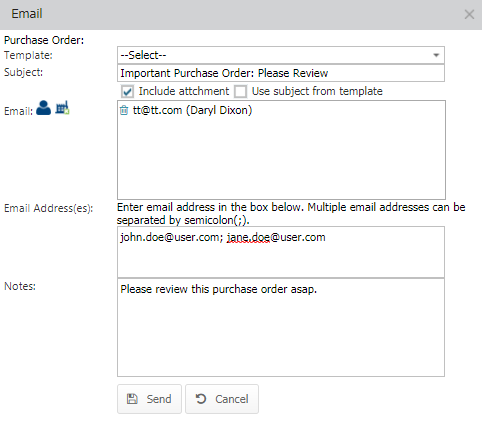
- Click on the More button and select Email.
- If you have already created an Email template select your Template in the drop down.
- Enter a Subject for the email.
- Select any Users (
 ) or Suppliers (
 ) that should receive the email by clicking the respective icons.
 - To send the PO to users that are not listed in Asset Essentials, enter any emails separated by a semicolon in the Email Address(es) box.
- Provide any additional Notes.
- To send the email, click Send.
Duplicating POs
Creating a copy of one of your Purchase Orders is easy in Asset Essentials.
- Click on the Parts & Purchase Orders menu icon and select Purchase Orders.
- Right-click on the PO that you will be duplicating and select Duplicate.
- The Add Purchase Order page will load with the majority of the information copied over from the selected PO.
- Make any necessary changes to the duplicate PO and click Save.
Deleting POs
- Click on the Parts & Purchase Orders menu icon and select Purchase Orders.
- Right-click on the PO that you will be deleting and select Delete.
- You will be prompted to confirm deleting the PO. Click OK to delete.
