Adding a PO
Purchase Orders (POs) are a fundamental operating component of many organizations. They identify the thing(s) to be purchased, the unit cost of each item, the extended cost, and any discounts that may apply. Purchase Orders identify the vendor or manufacturer from whom the items will be bought, the terms of delivery, and the shipping fees that may apply. *Note: The Parts & POs feature is available to Asset Essentials clients for an additional cost. Please contact your Sales Representative or Client Services if you are interested in purchasing this feature.
Watch the video tutorial:
How to add a purchase order
- Click on the Parts & Purchase Orders menu icon and select Purchase Orders.
- Click on the New button.
- Fill in the appropriate information in the following sections.
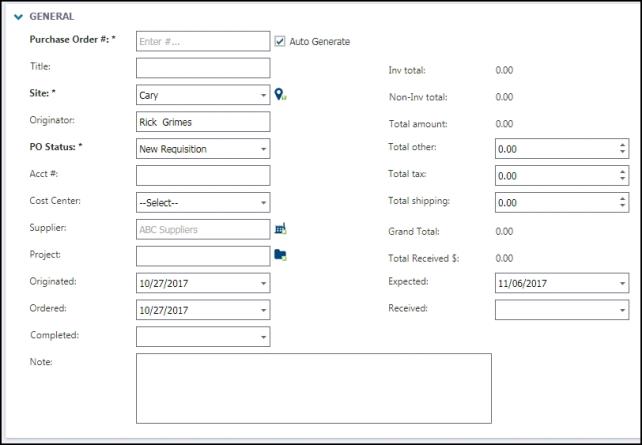
General
The General section contains the most detailed information for your Purchase Order. Enter any applicable information you can here, including Purchase Order #, Title, Site, Originator, PO Status, Account Number, Cost Center, Supplier, Project, Dates associated with the Purchase Order, Costs associated with the Purchase Order, and any additional Notes.
Assigned to
Use this section to indicate who is responsible for the Purchase Order. Use the Select User or Select Me icons at the top to either select yourself or another user whose information is already populated in Asset Essentials.
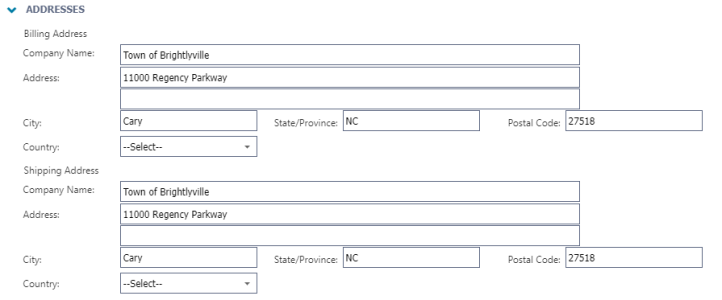
Addresses
Use this section to enter the Billing Address and Shipping Address for the Purchase Order.
Documents
Use this section to attach documents related to your Purchase Order. Click on the Select Document icon (
) to either select a document from the Documents Library, or add a document from your computer.
- Click the Save button to add the Purchase Order to Asset Essentials.
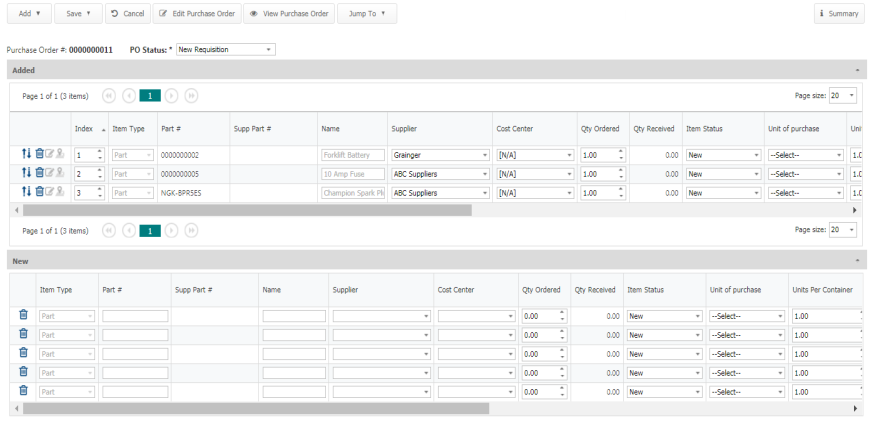
Creating line items
- Click on the Parts & Purchase Orders menu icon and select Purchase Orders.
- Right-click the PO and select Create Line Items.
Adding line items for parts
- The New section at the bottom of the page will have 5 blank rows for adding line items representing Parts to the PO. *Note: You are not required to use all five rows.
- To add additional blank rows for line items representing parts, click on the Add button, then click on Quick Part Entries.
- Enter the Part #. Information related to the part, such as the Name and Supplier, will automatically fill in on the line item.
- If you do not know the part number, click the Add button at the top of the page, and select Parts. *Note: By default, the parts will be filtered by the supplier that was selected on the purchase order, and only parts that require reorder will show in the Select Part window. To see all parts, first uncheck the Reorder Required box. Then, click the supplier icon, and click the Clear/Select All button.
- Check the box next to the parts that need to be included on the PO and click the Select button.
- Fill out any additional fields on the line item and click Save. *Note: The Qty Ordered field will automatically populate with a default value based on the Reorder Method tied to that Part.
- The line items will now appear in the Added section.
Adding line items for work order parts
- If you need to add line items for Work Order Parts, click on the Add button, then click on Work Order Parts.
- Any Parts that have been added to a WO with the Usage Type of "Order" will appear in the Work Order Parts window.
- Check the box next to the Work Order # and click Select to add the part as a line item on the PO.
- Fill out any additional fields on the line item and click Save. The line items will now appear in the Added section. *Note: The Qty Ordered field will automatically populate with the value from the related work order.
Adding line items for non-inventory items
- To add line items for non-inventory items, click on the Add button, then click on Non-Inv Items.
- Five rows will be added to the New section of the PO.
- Select Part, Asset, or Other as the Item Type.
- Fill out any additional fields on the line item and click Save. The line items will now appear in the Added section. *Note: The Qty Ordered field will automatically populate with a default value of 1 once the Name and Supplier fields are filled in.