Back to MaintenanceDirect Main Menu
Work Orders Created from Event Manager Tasks
The Event Manager and MaintenanceDirect integration will allow Event Manager tasks to be submitted as MaintenanceDirect work orders. This creates a seamless communication experience between your departments which allows for work to be completed quickly and efficiently. A task must be created from within Event Manager before it can be submitted as a work order in MaintenanceDirect. *Note: Only certain clients are eligible for this integration. To learn if you are eligible, contact Client Services.
How to Locate a Work Order Created from a Task
- Be sure you are logged in to MaintenanceDirect before managing work orders created from tasks in Event Manager.
- There are a few ways to locate the work order you are trying to process:
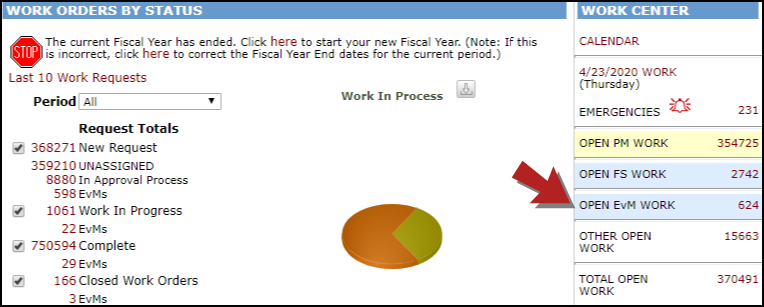
- In the Work Center section of your MaintenanceDirect homepage, click on the number beside Open EvM Work.
- Use the work order number provided on the task in Event Manager to locate the work order, then select it from the list.
- Check the Assigned Work section of your MaintenanceDirect homepage. If the work order is assigned to you, it will display in this section and you can select it from the list.
- In the Work Center section of your MaintenanceDirect homepage, click on the number beside Open EvM Work.
How to Process a Work Order Created from a Task
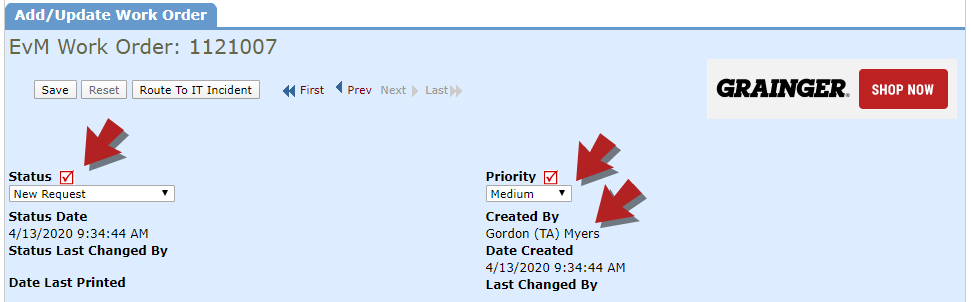
When the Work Order is created from the Event Manager task:
- The Status will be set to New Request.
- The Priority will be set to Medium.
- The Date Created will be set to the date and time that the work order was created.
- The Created By field will contain the name of the Event Manager user that submitted the task as a work order, if that user exists in MaintenanceDirect. *Note: If the user does not exist in MaintenanceDirect, their name and email address will still be recorded in a journal note on the work order.
If the Event Manager user that the task is assigned to is also a user in MaintenanceDirect, the Assigned To field of the work order will contain the name of that user.
If the Event Manager user that the task is assigned to is not a user in MaintenanceDirect, the work order will remain unassigned, even if there are work order routes configured. You must manually assign the work order to the appropriate user. We recommend using the MaintenanceDirect Sync option to add them as a user in Event Manager for future work order management.
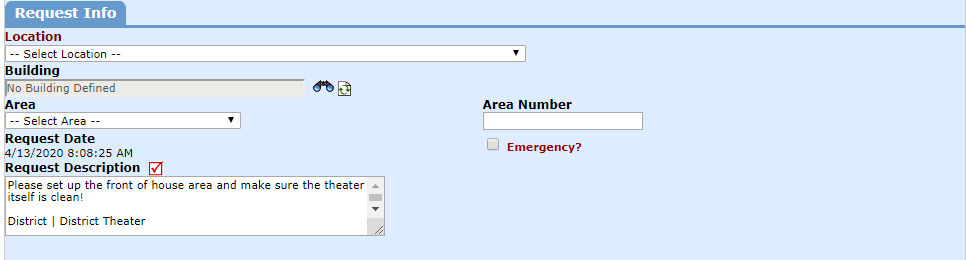
- The Task Description from Event Manager will display in the Request Description field on the work order, along with the Location from Event Manager, if the task was associated with one. *Note: If the task does not have a description, the Task Name will display in the Request Description field instead.
- A Journal Note will be added that displays the name and email address of the Event Manager user that sent the task to MaintenanceDirect as a work order, along with a date and time stamp.
- If an image was added to the task in Event Manager, it will be added as a file attachment on the work order.
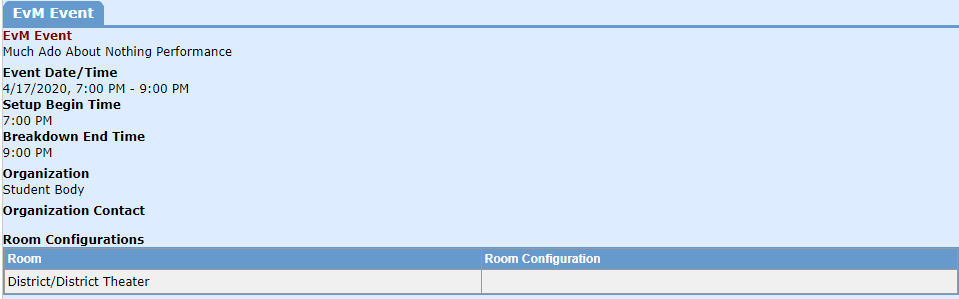
- If the Event Manager task is associated with an event, there will be an EvM Event section on the work order in MaintenanceDirect that displays certain event fields. *Note: These fields will only display data if this information was entered on the event in Event Manager.
- Event Name
- Event Date/Time
- Setup Begin Time
- Breakdown End Time
- Organization
- Organization Contact
- Room(s)
- Room Configurations
- Complete any required fields on the work order, or any fields that should be completed according to your workflow. For example, we recommend populating the Location, Building, Area, Area Number, and Craft fields, depending on the setup of your MaintenanceDirect account.
- Select the user that this work order should be Assigned To, if the assignee is not already populated.
- Process the work order as usual, based on your workflow. As the work order moves from a new request to a completed work order, changes made to the work order status will automatically update the status of the task in Event Manager.
| MaintenanceDirect Work Order Status | Event Manager Task Status |
| New Request | New |
| Work In Progress | In Progress |
| Complete | Completed |
| Closed Work Orders | Closed |
| Declined, Duplicate Request | Denied |
| Parts On Order, On Hold, Open Extended, Pending, Waiting Funding, Deferred, Forwarded | Waiting For Info |
| Void | Cancelled |
How to Report on Work Orders Created From Tasks
You can run reports in MaintenanceDirect to check on the status of work orders that were created from Event Manager tasks. One of the most useful reports you can use for this purpose is the Work Order Summary 2 Report.
- To access the report criteria screen, click on the Report link in the Actions menu.
- In the window that appears, click Work Order.
-
Select your Reporting Period. You can select a predefined period from the drop-down menu (Last Week, This Month, Fiscal Year, etc.) or you can type your own date range into the Custom Begin and Custom End fields.
- Select the Type of Reporting Date. This selection will affect how the system views the previously entered date range. For example, if you select Request Date, the system will look for work orders requested within the selected date range . But if you choose Completion Date, the system will only report on work orders completed within the date range, regardless of when it was requested.
- Continue to enter the filtering criteria for your report. The more information you select, the more specific your returned results will be.
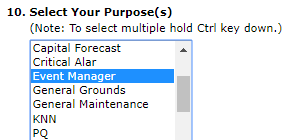
- If you need to highlight more than one item in a selection box, click on your first item, then hold down the Ctrl key when selecting the others.
- Since this report will be used specifically for work orders created from Event Manager tasks, be sure to select the Event Manager Purpose code that was defined under your Account Information. This will filter the report to only display work orders with this Purpose code on them.
- At the bottom of each report screen, you will be asked to choose the Report Type for Viewing. This usually includes a Summary Report and a Detail Report (there may be other options on some reports). Each report type includes varying degrees of detail and different formatting.
- For this report, select Summary Report 2.
- Choose a Report Format, either PDF or Excel Spreadsheet.
- Click Print This at the bottom of the page to view a print preview of your report. You can then send it to your printer.
- The Save and Print This! option at the bottom of the page means this report can be used as a Saved Action.
- You can enter a Report Title and click Save to make it available on the Saved Action screen.
