Permitting: Contacts tab
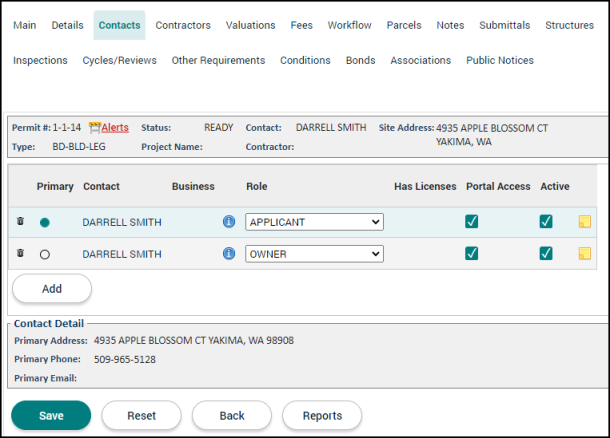
The Contacts tab allows you to list anyone associated with this Permit, such as owners or contractors. Contacts can be added from your existing database or you can add them as new contacts. On this tab, you can identify each contact's role and designate one contact as the primary contact for the permit.
Adding an existing contact
- Click the Add button. An additional row will appear.
- Begin typing or click the magnifying glass icon (
 ) to select the Contact name.
 - Select the Role this contact will have for this permit application.
- The Portal Access box is checked by default. This allows the contact to view the permit, pay for fees, request inspections, and upload documents to this permit from the Citizen Portal, depending on the jurisdiction's configuration. Uncheck this box if necessary.
- The Active box will be checked for the applicant by default. Each permit application can only have one applicant. In the event the applicant changes, make sure the Active box is checked for the new applicant. This will automatically uncheck the box for the previous applicant.
- Click Save.
Adding a new contact
Before creating a new contact, search the existing contact list to ensure they have not already been added to SmartGov. Utilize the wildcard search feature to help you thoroughly search the contact list.
- Click the Add button. An additional row will appear.
- Click the magnifying glass icon () in the newly created row.
- Click the Create New button in the Select Contact window.
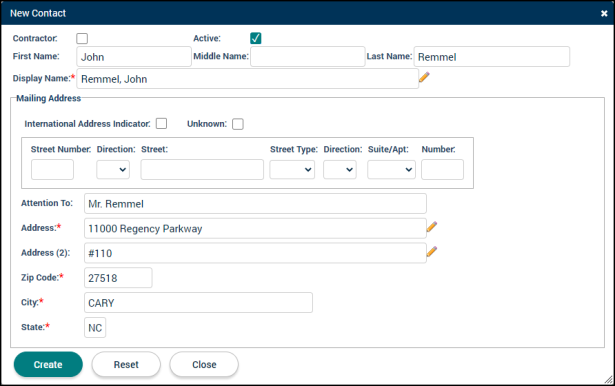
- If this contact is a contractor, check the Contractor box. This will add an additional section for entering the contractor's license.
- Enter the contact's information. *Note: If the contact has an international address, click the International checkbox to provide additional international mailing address information. If the address is Unknown, check the box to auto-populate the required address information with placeholders.
- Click the Create button. Additional tabs will appear for the contact record. *Note: This will also add the contact to the Global Contact list.
- Add any additional details such as phone numbers and email addresses, then click Save.
- Close the New Contact window to return to the Contacts tab.
- Click the Save button to add the contact to the permit.
Managing contacts
- Selecting a Primary Contact: Select which contact in the list should be the Primary Contact for this permit. The applicant is designated as the primary contact by default.
- Editing a Contact: Click the information icon (
 ) next to the contact record to make any changes to the contact's information.
 - Has Licenses: Click the licenses icon (
 ) to view any associated licenses or contractor licenses. *Note: This icon will only appear if the contact has licenses or contractor licenses associated with their account.
 - Adding a Note: Click the sticky note icon (
 ) to add notes to the contact. These notes can include links and attachments, such as documents, pictures, or spreadsheets.
 - Removing a Contact: Click the trash can icon (
 ) next to the contact record. The contact will appear with a strike-through mark.
 - Click Save at the bottom of the page after performing any of these actions.
