Processing code enforcement cases in the SmartGov mobile app
The SmartGov mobile app gives you the ability to quickly process code enforcement cases from your mobile device.
Viewing a code enforcement case
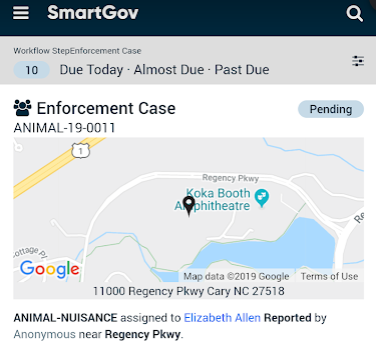
When viewing a code enforcement case from your home screen, you will see information including the case type, current status, address information, assignee information, and who reported the case. The case is divided into different sections, similar to the tabs on code enforcement cases within SmartGov. *Note: Ensure that your Assignment Filters are set to show code enforcement cases and workflow steps, if necessary, in order to view these records on your home screen.
- If a workflow step is assigned to you, the assigned step displays as a separate record on your home screen. This lists the assigned worfklow step name and the corresponding worklist. Tap the record to process the workflow step.
- Tap on the map image to view the location of and directions to the code enforcement case in your device's mapping app. *Note: If the device has multiple mapping apps available, you will be prompted to select the app you would like to use.
- Tap the Enforcement Case title on your home screen to view and edit the record.
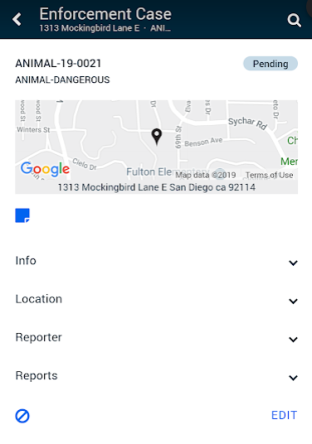
The top section of the code enforcement case lists the case number as well as the current status.
- Notes: Tap the note icon (
 ) to add, view, or edit any notes associated with this code enforcement case.
 - Info: This drop-down allows you to view information related to the case. This lists who the case is assigned to, pertinent dates, any parent cases, and the case description.
- Tap the Request Number to view the code enforcement request related to this code enforcement case. *Note: Click the back arrow in the top left corner of the screen to return to the code enforcement case.
- Location: This drop-down allows you to view the general location of the case as well as the primary parcel.
- Click the Primary Parcel link to view the parcel information. *Note: If there are multiple parcels, this will only list the Primary parcel.
- Reporter: This drop-down allows you to view contact information for the user that reported the issue. To edit this information, click Edit Reporter.
- Reports: This drop-down displays mobile printing options which allow you to print, publish, and email code enforcement reports associated with this case.
- Tap Edit to update information including the Status, Assignee, and Description.
- Tap the Cancel icon (
 ) to cancel the case you are currently working in.
- Select the Note Type, Note Code, and enter the Note Text.
- Tap Save in the top right corner of the screen.
You can preview, publish, and email any code enforcement report from the SmartGov mobile app as long as the Mobile Report option has been turned on from the Reports tab while configuring the associated case type.
- Tap Reports.
- Tap Run Report beside the desired report.
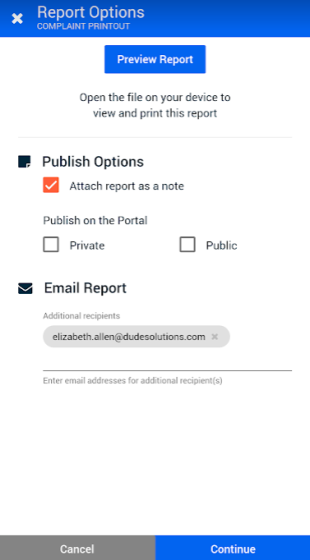
- To view the report on your mobile device, tap Preview Report. You can save the report to your mobile device or print the report if your device is connected to a printer.
- To publish the report on SmartGov and/or the Citizen Portal, select the appropriate Publish Options.
- Check Attach Report as a Note to include this report on the Notes tab of the code enforcement case.
- Check Private if this report should be made available to users with access to the Citizen Portal that are listed as contacts on the code enforcement case.
- Check Public if this report should be made available to any user on the Citizen Portal.
- To email the report, list any Additional Recipients this report should be sent to.
- Tap Continue to publish and email the report according to your selections.
Any contact or contractor tied to this code enforcement case through the Contacts tab or from within the mobile app will show in this section. The primary contact will be listed with a primary tag ( ) to the right of the contact name. You can add, edit, and remove contacts from the case as well as add notes to any contact.
Adding an existing contact
- Tap the Contact section of the code enforcement case.
- Tap Add in the top right corner of the screen.
- Tap the magnifying glass icon (
 ) to view the list of existing contacts.
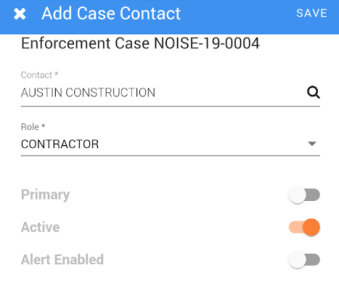
 - Begin typing in the Search Contacts to narrow down the list and tap the contact you wish to add to the case. *Note: If the contact does not exist in SmartGov, you will need to Create a Contact.
- An asterisk (*) allows you to use the wildcard search feature.
- Select the appropriate Role in the drop-down menu.
- Tap the Primary toggle (
 ) if this contact should be the primary contact for the code enforcement case. *Note: There can only be one primary contact on a case.
 - Tap the Active toggle to ensure this contact is displayed on the case.
- Tap the Alert Enabled toggle to generate an alert on a record that is associated with this specific contact.
- Tap Save in the top right corner of the screen.
Managing contacts
- Tap the note icon () to add, view, or edit any notes associated with the contact.
- Tap the pencil icon (
 ) to edit the role, select the contact as the Primary, ensure the contact is Active, and enable Alerts for the contact.
 - Tap the trash can icon (
 ) to remove the contact from the code enforcement case.
 - Tap any Contact in the list to view more information related to the contact.

Any workflow steps associated with the code enforcement case will be listed in this section along with hours logged on the step. You also have the ability to add additional workflow steps to the case.
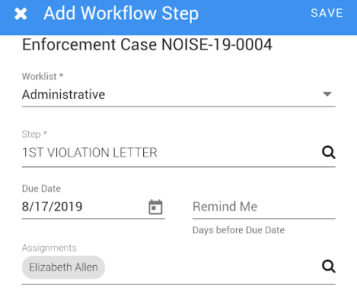
Adding a workflow step
- Tap Add Step.
- Select the Administrative, Review, or Final worklist in the drop-down menu.
- Tap the magnifying glass icon (
- Begin typing or tap the calendar icon (
) to add a Due Date for this workflow step.
- Enter how many days prior to the due date you would like the assignees to be reminded of the upcoming workflow step in the Remind Me field.
- Tap the magnifying glass icon (
- Tap Save in the top right corner of the screen.
Managing workflow steps
- Tap the expand arrow (
) or the Workflow Steps title to display the steps.
- Tap Administrative, Review, or Final to view the corresponding worklist and associated workflow steps.
- This view will display a summary of the workflow step(s) including the Step Status, the Assignee, and the Due Date.
- Tap the trash can icon (
- Tap the notes icon (
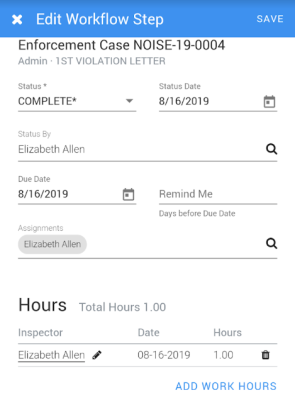
- Tap Edit to edit information related to the workflow step. *Note: Some of these fields may already be filled in depending on the information input through SmartGov.
- Status: Use the drop-down menu to select the current status of the workflow step.
- Status Date: This will default to the current date if you change the status. Begin typing or tap the calendar icon (
- Status By: This will default to the user that is signed in if you change the status. Tap the magnifying glass icon (
- Due Date: Begin typing or tap the calendar icon (
- Remind Me: Enter how many days prior to the due date you would like the assignees to be reminded of the upcoming workflow step.
- Assignments: Tap the magnifying glass icon (
- Actions:
- Use the Status drop-down menu to select the current status of the workflow step action. This will automatically fill in the Status Date with the current date and list your name in the Status By field.
- Begin typing or tap the calendar icon (
- Tap the magnifying glass icon (
- Check the Mark All Complete box to bulk update all action statuses to complete.
- Hours:
- Tap Add Work Hours.
- The Inspector will default to the user that is signed in. Tap the Inspector field to search and select a different inspector, if necessary.
- Enter the Date the work was performed on.
- Enter the number of Hours spent on the inspection.
- Tap Add in the top right corner of the screen.
- Tap the trash can icon (
- Tap Save in the top right corner of the screen.
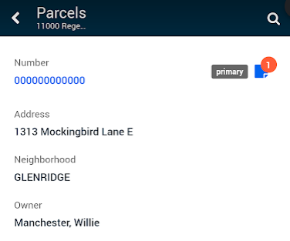
Any Parcels associated with the code enforcement case will be listed in this section. The primary parcel will be listed with a primary tag ().
- Tap the Parcels section to view an expanded list of any parcels associated with the code enforcement case.
- Tap the notes icon () to add, view or edit notes associated with the parcel.
- Tap the Parcel Number to view the parcel within the SmartGov mobile app. *Note: Tap the back arrow in the top left corner of the screen to return to the parcels view of the code enforcement case.
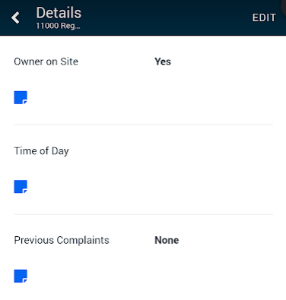
Any custom attributes associated with the code enforcement case will be listed in this section.
- Tap the Details section to view the custom attributes with their corresponding values.
- Tap the notes icon () to add, view, or edit notes associated with the custom attribute.
- Tap Edit to change any value listed. The custom attribute name will be listed as the label for each field.
Any items associated with the code enforcement case will be listed in this section along with the status and status date of the item.
- Tap the Items section to view an expanded list of any items associated with the code enforcement case.
- Tap Add to add an item to the code enforcement case. *Note: Any field marked with an asterisk (*) is required.
- Tap the Name drop-down menu to select the item type.
- Edit the Description, if necessary.
- Tap the drop-down menu to edit the Status of the item type.
- Begin typing or tap the calendar icon () to manually input the Status Date.
- Fill in any Values listed.
- Tap Save.
- Tap the notes icon () to add, view, or edit any notes associated with the item.
- Tap the pencil icon () to change the Description, Status and Status Date of the item.
- Tap the trash can icon () to remove the item from the code enforcement case.
- Tap the expand icon () to view any values listed for the item. *Note: If no values are listed for the item, this option will not display.
![]()
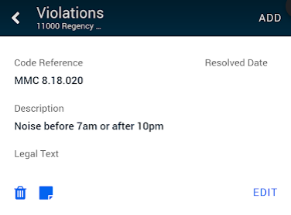
Any violations associated with the code enforcement case will be listed in this section. The resolved date will also be listed if the violation has been resolved.
- Tap the Violations section to view an expanded list of any violations associated with the code enforcement case.
- Tap Add to add a violation to the code enforcement case.
- Begin typing or tap the list icon (
 ) to view and select the Code Reference.
 - Edit the Description, if necessary.
- Use the Legal Text field to enter any legal text that corresponds with the code.
- Begin typing or tap the calendar icon () to adjust the Resolved date, if necessary.
- Tap Save.
- Begin typing or tap the list icon (
- Tap Edit to change the Description, Legal Text, and Resolved Date for the violation. Tap Save if any changes are made.
- Tap the notes icon () to add, view, or edit any notes associated with the violation.
- Tap the trash can icon () to remove the violation from the code enforcement case.
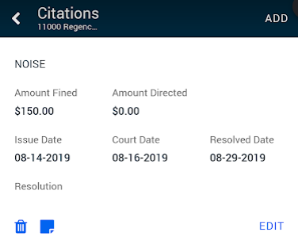
Any citations associated with the code enforcement case will be listed in this section.
- Tap the Citations section to view an expanded list of any citations associated with the code enforcement case.
- Tap Add to add a citation to the code enforcement case.
- Begin typing or tap the magnifying glass icon () to view and select the Citation Type.
- Enter the Citation Number.
- Use the Fined Amount field to enter the fee associated with the citation before a court hearing.
- Use the Directed Amount field to enter the fee associated with the citation after the court hearing.
- Begin typing or tap the calendar icon () to adjust the Issue Date, Court Date, and Resolution Date.
- Enter the Resolution for the citation.
- Tap Save.
- Begin typing or tap the magnifying glass icon (
- Tap Edit to make changes to the citation including associated Fines and the Resolution. Tap Save if any changes are made.
- Tap the notes icon () to add, view, or edit any notes associated with the citation.
- Tap the trash can icon () to remove the citation from the code enforcement case.
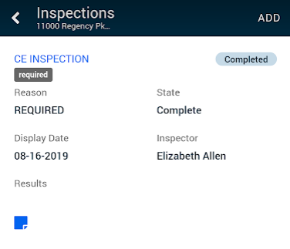
Any inspections that have been associated with the code enforcement case will be listed in this section. You will also be able to view the Inspection Status, Reason, and Inspector for the inspection. *Note: If a reinspection has been requested, only the most recent inspection will be listed in this section.
- Tap the Inspections section to view an expanded list of the most recent versions of any inspections associated with the code enforcement case.
- Tap Add to add an inspection to the code enforcement case.
- Begin typing or tap the magnifying glass icon () to view and select the Inspection Type.
- Tap the Required toggle to make this inspection required to close the code enforcement case.
- Tap the Deferred toggle to defer the inspection until the case needs to be closed.
- Tap Save.
- Begin typing or tap the magnifying glass icon (
- Tap Request Inspection to create an inspection associated with this code enforcement case.
- Tap the Inspection Type to view and process the inspection.
- If you need to request a reinspection for the inspection you are viewing, tap Request Reinspection in the expanded view of the request section.
- Tap the notes icon () to add, view, or edit any notes associated with the inspection.
Any Licenses, Permits, and Enforcement Cases that have been associated with the Code Enforcement Case will be listed in this section.
- Tap the Associations section to view an expanded list of the records associated with the code enforcement case.
Licenses
In addition to the information displayed in the Associations section of the Code Enforcement Case, the expanded view of the license will list the Effective Date, Expiration Date, and Primary Contact.
- Tap the plus sign icon (
) to associate a license to the code enforcement case.
- Begin typing and select the License from the list of available licenses.
- Tap the License # to view the license record.
- Tap the notes icon (
- Tap the trash can icon (
Permits
In addition to the information displayed in the Associations section of the Code Enforcement Case, the expanded view of the permit will list the Submission Date, Issue Date, and Primary Contact.
- Tap the plus sign icon (
- Begin typing and select the Permit from the list of available permits.
- Tap the Permit # to view the permit record.
- Tap the notes icon (
- Tap the trash can icon (
Code enforcement cases
In addition to the information displayed in the Associations section of the Code Enforcement Case, the expanded view of the code enforcement case will list the Submission Date, Closed Date, and Primary Contact.
- Tap the plus sign icon (
- Begin typing and select the Code Enforcement Case from the list of available cases.
- Tap the Code Enforcement Case # to view the case record.
- Tap the notes icon (
- Tap the trash can icon (

