Creating a receipt extract job
The Receipt Extract Job in SmartGov allows you to export receipt data from your account. The job is designed to facilitate the creation of general ledger entries in your financial system by providing a file formatted for compatibility with the import feature of your financial management system.
- Click Administration in the navigation menu, then click Job Setup.
- Select View/Run Jobs List. From this list, you have the ability to view, run, or delete a job.
- Click Start Job at the bottom of the page.
How to create a receipt extract job
- In the window that appears, click Receipt Extract.
- Select the appropriate Schedule option:
- If you would like the job to run now, select the first option to Run Immediately.
- If you would like the job to run at a specific date and time, select the second option to Run On a specific date and time.
- Begin typing or click the calendar icon (
 ) to select the date for the job to run.
 - Use the drop-down menus to select the time of day to run the job.
- Begin typing or click the calendar icon (
- Enter the Extract Date. This will determine the receipt information that is extracted by the job. The job will extract all receipt information up to and including the date entered that has not already been extracted.
- Enter a File Delimiter. This will determine how the job separates the receipt data being extracted.
- Enter a File Name.
- Click Run Job. If you have set the job to run immediately, the job will begin to process. Otherwise, the job will run on the date and time you specified previously.
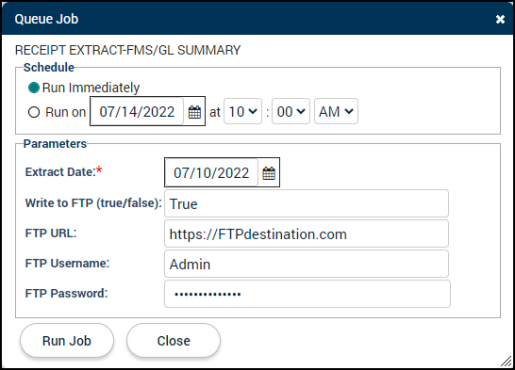
How to create a receipt extract-FMS/GL summary job
This job is similar to the Receipt Extract job, except the data in the file will be summarized by each Fund and General Ledger (GL) Account. This option will exclude all transactional details and will provide a total revenue amount with each Fund and GL Account Number in the extracted receipt data.
- In the window that appears, click Receipt Extract-FMS/GL Summary.
- Select the appropriate Schedule option:
- If you would like the job to run now, select the first option to Run Immediately.
- If you would like the job to run at a specific date and time, select the second option to Run On a specific date and time.
- Begin typing or click the calendar icon () to select the date for the job to run.
- Use the drop-down menus to select the time of day to run the job.
- Begin typing or click the calendar icon (
- Enter the Extract Date. This will determine the receipt information that is extracted by the job. The job will extract all receipt information up to and including the date entered that has not already been extracted.
- Enter either true or false in the Write to FTP field. A value of true will allow you to send this job directly to the FTP URL you provide, as long as you enter the correct FTP Username and Password.
- Enter the FTP URL.
- Enter the FTP Username.
- Enter the FTP Password.
- Click Run Job.
How to configure and run a header/detail receipt extract
The Header/Detail receipt extract will allow you to extract receipt information from SmartGov in a Header/Detail format compatible with some third party financial systems. *Note: Receipt number configuration cannot exceed 12 characters for jurisdictions with the Header/Detail receipt extract enabled.
Enable the header/detail extract
Contact client services to enable the job.
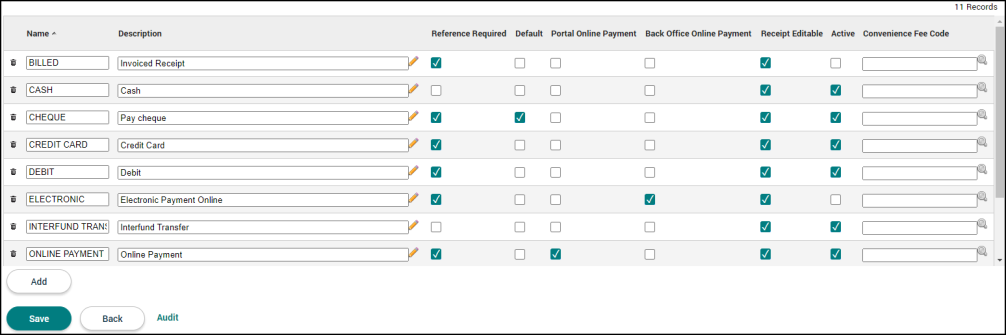
Configure payment type codes
-
Click on Administration from the navigation menu.
-
Click on Jurisdiction Setup and then select Lookup Values.
- Click on Payment Type.
- Enter values into the fields under External Payment Method that correspond to the Short Description fields as shown below. *Note: All reference payment methods can be used with the exception of option 9 - Multiple.
Configure fee codes/ external charge codes
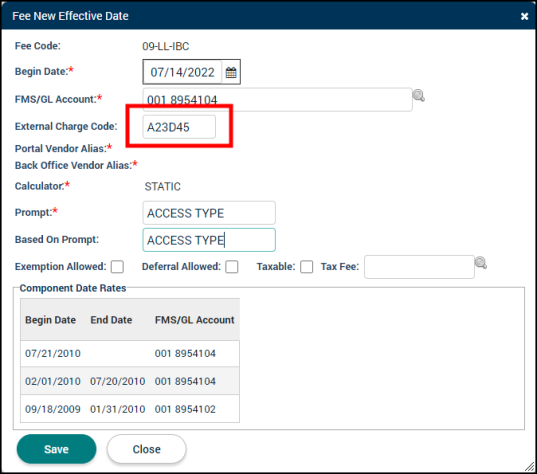
The extract builds rows that require a charge code in order to successfully import the data into the third party financial system. This charge code corresponds to the SmartGov fee code 1:1 in most cases, but not all cases. The External Charge Code is an optional field on a SmartGov fee code. It is alphanumeric and must be 6 characters in length. The fee code must be given a new effective date in order to add an external charge code. Using the External Charge Code field will allow a jurisdiction to provide a charge code for the extract while retaining the actual FMS/GL Account number in the FMS/GL Account field on the Fee. *Note: The extract Job will error if SmartGov GL Account numbers exceed 6 characters and no external charge codes are configured. For more information about charge codes, reference your financial system or contact your financial system administrator.
For clients who currently have their FMS/GL accounts configured with Charge codes:
If you wish to update your FMS/GL Account numbers to truly reflect your Accounts rather than your charge codes you must proceed with the steps below:
-
Click on Administration from the navigation menu.
-
Click on Financial Setup and then select Fee Codes
-
Click on the fee code you would like to update.
-
Click on New Effective Date.
-
In the window that appears, enter the new Begin Date.
-
Enter the appropriate third party charge code in the External Charge Code field. *Note: You will need to obtain these codes from your financial system.
-
Click Save.
-
Click Save at the bottom of the page to finalize any changes you have made to the fee code.
-
Run the Header Detail extract job (to post all receipts currently using the previous fee code version.)
-
Update your FMS/GL Account numbers (they can now exceed the 6 character limit)
Extract behavior: The Charge Code in the extract file will be mapped to the External Charge Code on the SmartGov Fee Code when data is present. If the user does not have an External Charge Code configured on the fee code, the extract will use the Fund/GL account associated with the fee will be used as the charge code.
-
Click on Administration from the navigation menu.
-
Click on Financial Setup and then select Fee Codes.
-
Click on the fee code you would like to update.
-
Click on New Effective Date.
-
In the window that appears, enter the new Begin Date.
-
Enter the appropriate third party charge code in the External Charge Code field. *Note: You will need to obtain these codes from your financial system.
-
Click Save.
-
Click Save at the bottom of the page to finalize any changes you have made to the fee code.
Add customer ID to receipts
When creating receipts, you now have the option to add a customer ID to the SmartGov receipt. This field will only be visible to jurisdictions that are using the Header/Detail Receipt Extract. When the ID is provided, the Customer ID will be extracted as part of the Header and Payment Method Detail rows. The Customer ID must be 10 characters long.

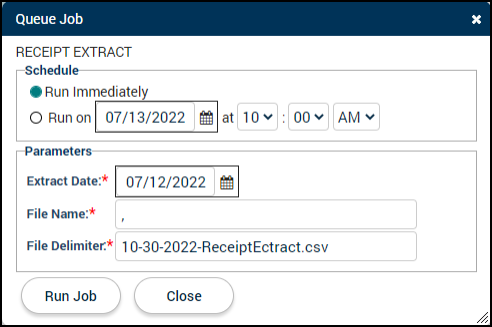
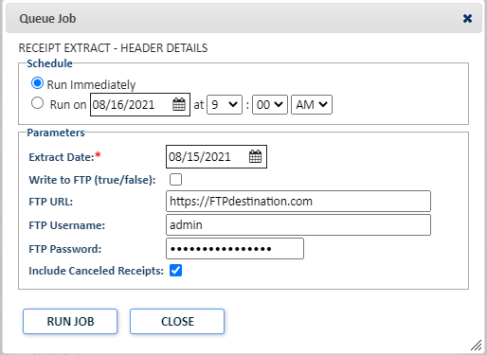
Run or schedule the Job
You can run the job on demand or schedule the job. *Note: In order to run or schedule a job, you must be a member of a security group that has been associated with the job under the Job Security section when configuring the job.
Run job on demand
-
Click on Administration from the navigation menu.
-
Click on Job Setup and then select View/Run Jobs List.
-
Click Start Job at the bottom of the page.
-
Select Receipt Extract - Header Details
-
Enter an Extract Date. All unposted receipts on or before the date will be extracted.
-
Enter FTP information, if applicable.
-
Click Run Job.
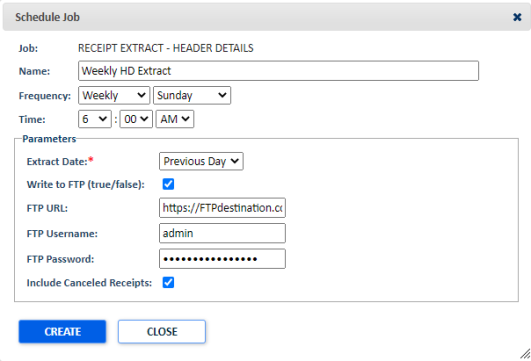
Schedule the job
-
Click on Administration from the navigation menu.
-
Click on Job Setup and then select View/Run Jobs List.
-
Click Add under the Scheduled Jobs section.
-
Enter a Name for the scheduled job.
-
Define the Frequency and Time for the scheduled job to run.
-
Enter an Extract Date. All unposted receipts on or before the date will be extracted.
-
Current Day: All unposted receipts including those from the current day will be extracted
-
Previous Day: All unposted receipts excluding those from the current day will be extracted
-
-
Enter FTP information if applicable.
-
Click Create.