Back to Event Manager Main Menu
Sale Item Settings
You can set up and manage information for items that will be added to events, such as registrations, tickets, and purchasable items.
How to Configure Sale Item Settings
On the Sale Item Settings page, you can set:
- Templates - allows for the creation of pre-configured items with set quantities, names, and information collection settings.
- Questions - allows you to create a library of questions to collect information when a user purchases a product assigned to an event.
- Categories - allows you to organize and categorize items you add to events.
To access the Sale Item Settings page:
- Click on Settings in the side navigation menu.
- Click on Sale Item under Calendar Settings.
Templates
Templates allow you to create pre-configured sale items with set quantities, names, and information collection settings. Sale Item Templates can be used by any user creating events. Creating a template is the same process as creating a sale item, except you only enter the information that will be consistent across all items that should use this template.
Watch the Video Tutorial
To create a new template:
- Click on Add A Template.
Details
- Enter an Template Name.
- If you would like sale items made from this template to include ticketing so attendance can be tracked, check the box next to This is a registration. The tickets will be emailed to the user, and will include a QR code so the ticket can be scanned.
- Enter a Template Description. This should provide more detail than the Template Name.
- Enter the Quantity Available for this item.
- If there is a Cost associated with this item, enter the amount. If you would prefer to accept donations, check the Donation box.
- Enter any applicable minimum and/or maximum donation amount.
When accepting donations as payment for a sale item, a minimum donation amount may help ensure that event costs are covered, and a maximum donation amount may help avoid donation limits for a non-profit organization and reduce the risk of accidentally large donations.
- By default, the sale item will be Available as long as the event is published. If you would prefer, select Specific Availability to determine a time period prior to the start of the event that you would like this item to be available.
- If that is all the information you would like to enter for this template, click the Save button. Otherwise, move on to the next section.

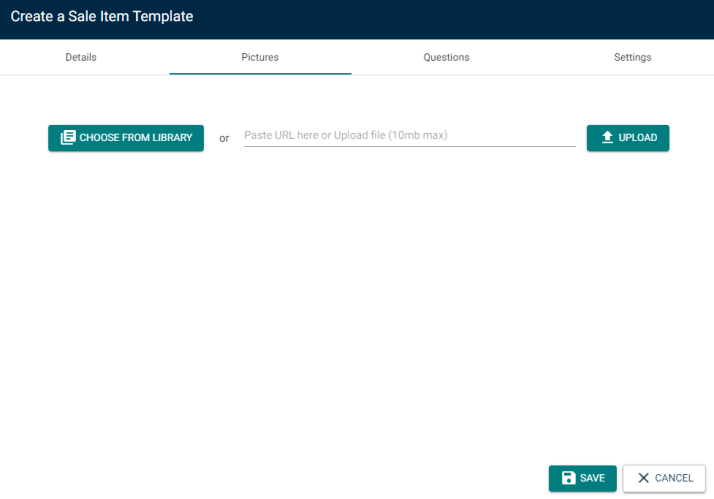
Pictures
- Click on the Pictures tab.
- Upload a picture by locating the file on your computer, or pasting the image URL in the text field.
- Click Choose From Library to find an image that has been added to the Event Publisher media library.
- If that is all the information you would like to enter for this template, click the Save button. Otherwise, move on to the next section.
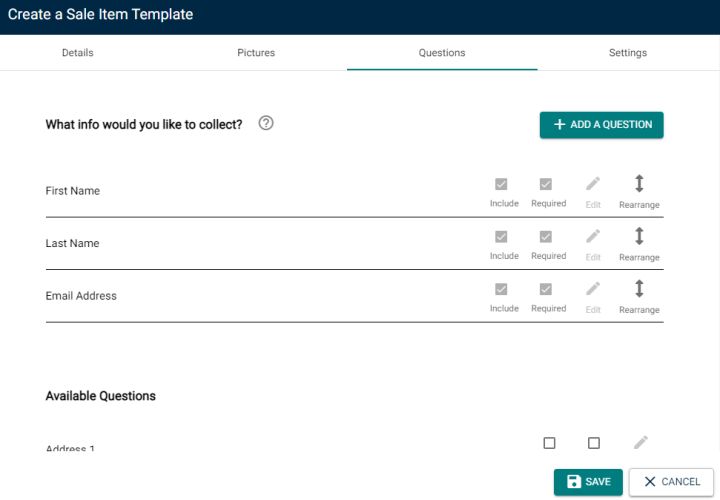
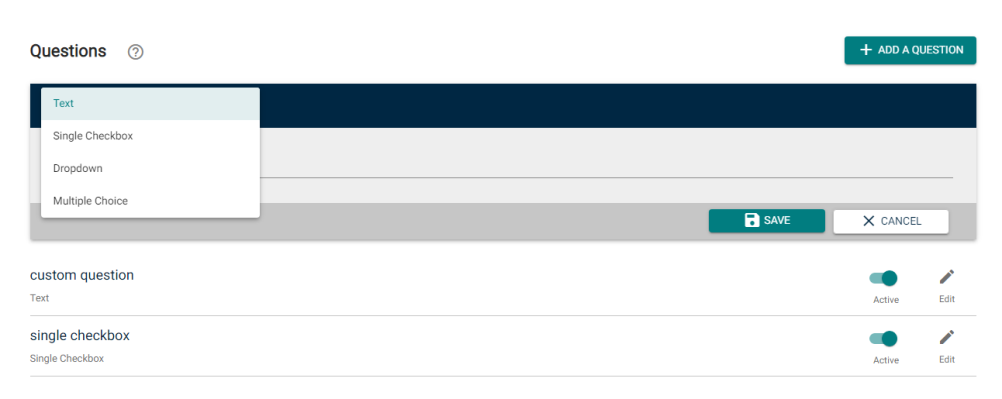
Questions
- Click on the Questions tab.
- If this template is a Registration, then First Name, Last Name and Email Address will be required questions by default.
- Check the Include box next to any other questions you would like the user to answer from the list of Available Questions.
- Click the Add a Question button to create a question that is not yet in the list.
- Select the question type from the drop down menu, then type the Question text. *Note: Only questions that have been added this way are able to be edited.
- If that is all the information you would like to enter for this template, click the Save button. Otherwise, move on to the next section.
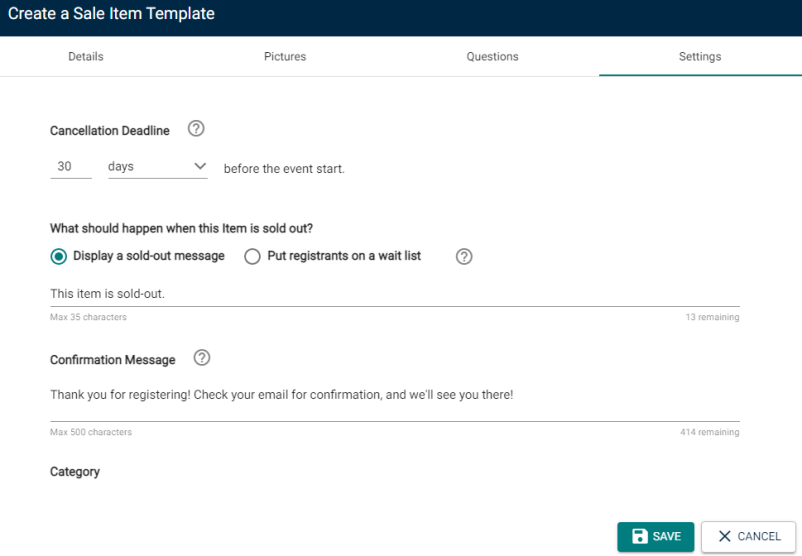
Settings
- Click on the Settings tab.
-
Enter the amount of time prior to the start of the event that will serve as the Cancellation Deadline. By default, this will be 24 hours prior to the start of the event, but can be set up with units of minutes, hours, days, or weeks.
- By default, when an item is sold out, the system will Display a sold-out message. Enter your desired sold-out message in the text field.
- If you would prefer, you can choose to Put registrants on a waitlist. Choosing this option means that there will be no Sold-Out message, but instead a user will be able to add themselves to the waitlist. This list can be managed from the event’s registration Dashboard, where an administrator can process a wait-listed user’s registration manually if a spot becomes available.
- Enter a Category for the sale items that will be created from this template.
- Once you have entered all necessary information for this template, click Save.
Questions
Questions offer a means of collecting additional information for items. A user is prompted to provide this information when they register for an event or add an item to their cart. It is important to note that questions can be used for any item added to an event. Additionally, questions are made available to all calendar sites in your Event Publisher account. Adding questions here will add them the library of Available Questions on a sale item added to an event.
To create a new question:
- Click on Add A Question.
- Choose the question type from the drop down menu.
- Text: Selecting this question type will allow the user to type a text input response. This type is best suited when the response(s) that will be submitted will vary greatly and predefined responses may not be appropriate.
- Single Checkbox: Selecting this question type will allow the user to check the box next to your Question text as a way of saying "yes" to that question text.
- Dropdown: Selecting this question type will offer the user a list of predefined responses in a drop down list. The user can select the appropriate response from the list. You must type the responses that will appear in the drop down list.
- Multiple Choice: Selecting this question type will offer the user a list of predefined responses, each with a checkbox. The user can check as many checkboxes as is appropriate to indicate their response. This question type is best used when a user may have multiple responses to a question. You must type the responses that will appear in the list.
- Click the Save button to create the new question.
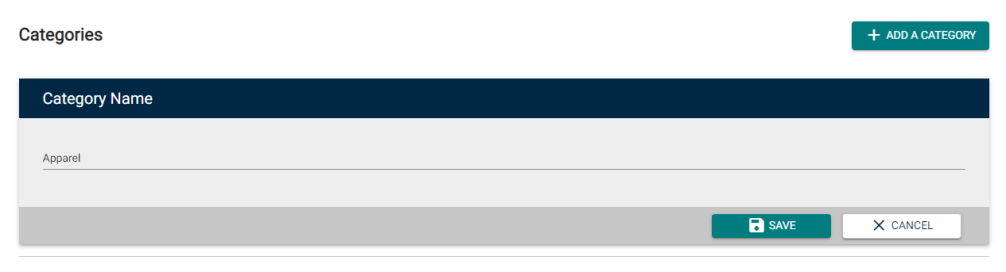
Categories
Categories allow you to create a organized structure for items you add to events. You can add as many sale item categories as you like.
To add a sale item category:
- Click on Add A Category.
- Enter the Category Name.
- Click Save.
- Click on the Active toggle to make this category available for use.