Back to Event Manager Main Menu
Other invoice settings
There are many ways to customize invoice settings within Event Manager, all with the intention of making the process of invoicing easier and more efficient. *Note: If you do not currently have access to this feature, please contact your Sales Representative or Client Services for more information.
- Click Settings from the side navigation menu.
- Click on the Invoice Settings tile under Global Administration.
Default information
These settings allow you to define fields that should be auto-populated on the invoice. You can also define when notifications will go out after the invoice is overdue.
- Click Edit in the top right hand corner of the panel. *Note: Be sure to click Save once you have finished making changes to any of the options in this section.
Default Logo
The Logo appears at the top center of the invoice form and is a great way to let the recipient know right away that the invoice is from your organization. *Note: The image should have an aspect ratio of 1.7:1 (approximately 340x200 pixels).
- There are two options for adding your logo:
- Click Choose From Library to select a pre-existing image from your Media Library within Event Manager.
- Alternatively, click Upload to select a file from your computer's hard drive.
![]()
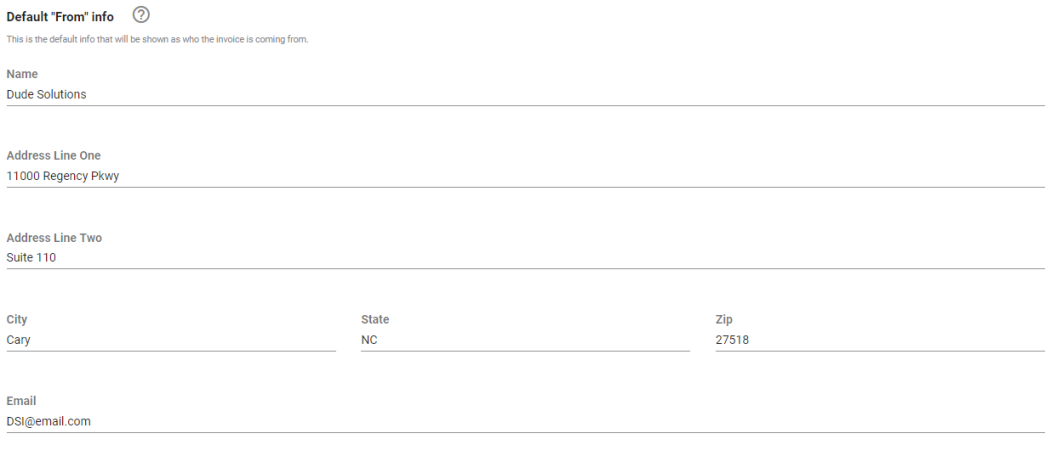
Default "From" Info
Once entered here, this information will be auto-populated on each new invoice that is created. If you have one billing address for all invoices, define it here.
- Enter a Name, such as the name of your organization or billing department.
- Enter the billing address information.
- Enter an appropriate Email for the recipient to contact with billing questions.
Default Late Fee Info
- Enter any late fee policy information you would like to be included on each invoice.

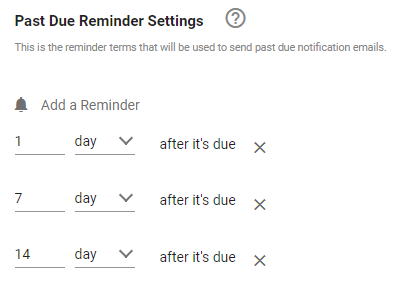
Past Due Reminder Settings
Set up notifications here that will send emails automatically to the recipient to inform them that the invoice is overdue.
- Click Add a Reminder.
- Select either day or hour from the drop down menu.
- Enter the number of days or hours after the invoice is due to send the notification.
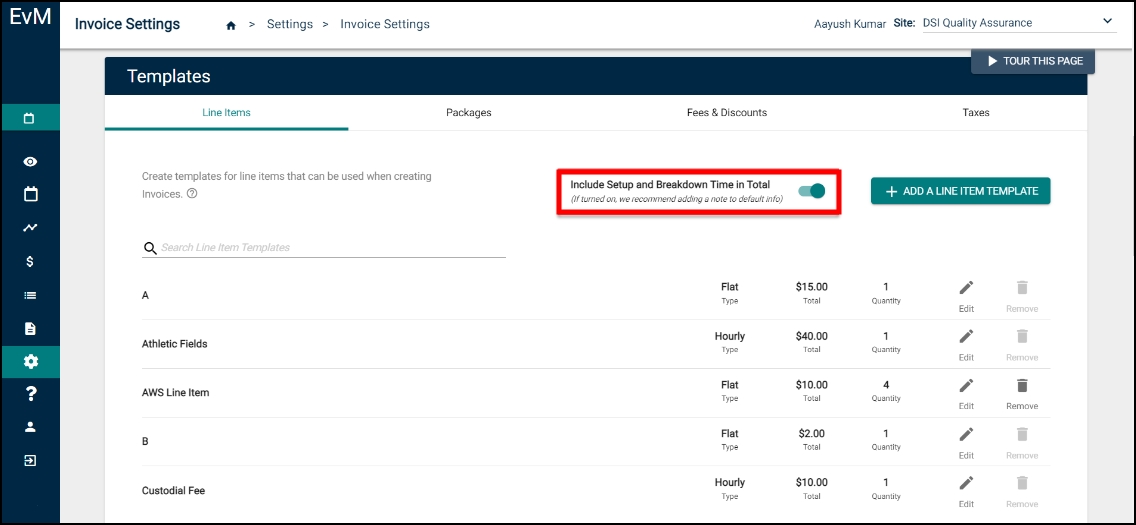
Auto-Populate the Setup and Breakdown Times of Events
You can auto-populate the charges for setup and breakdown times of your events in an invoice by enabling the Include Setup and Breakdown Time in Total toggle in Invoice Settings.
-
Go to Settings and click on the Invoice Settings tile under Global Administration.
-
Enable the Include Setup and Breakdown Time in Total toggle. This will apply to any package that has an hourly line item.
-
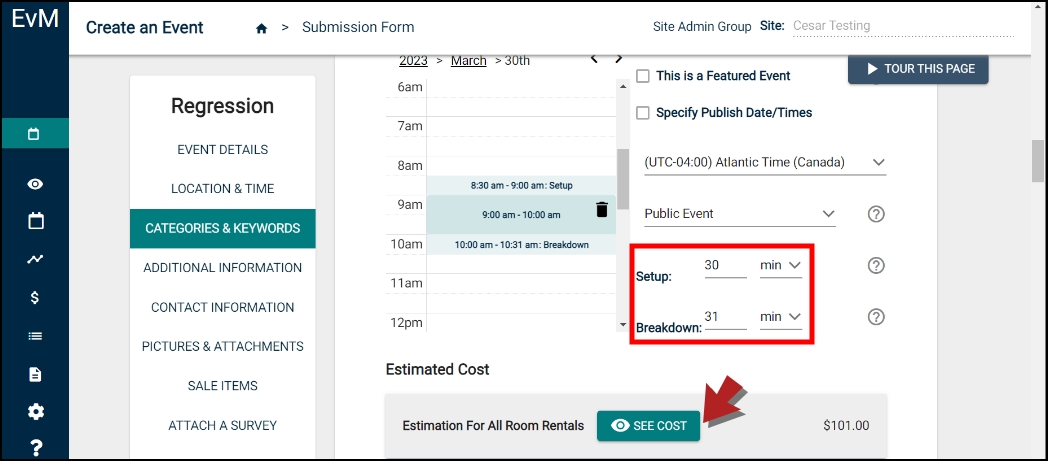
If the estimated cost is turned on in the event form, the requester will see the cost increase as they add setup and breakdown times.
-
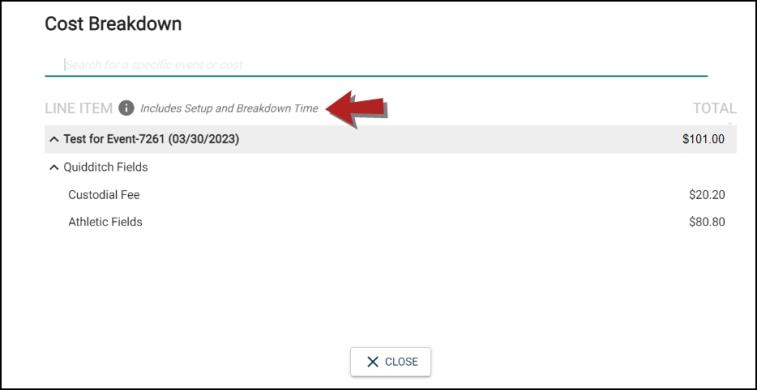
Click See Cost to open the breakdown. A message next to the info icon confirms that this cost Includes Setup and Breakdown Time.
-
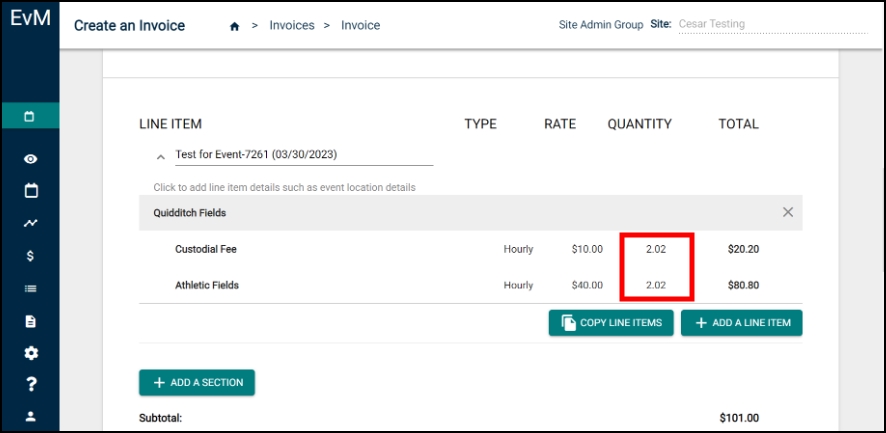
When the invoice is created, the hours under Quantity in Line Item will show a total of event time that includes setup and breakdown times.
View invoices via hyperlinks on Event Details
You can quickly view invoices by clicking the hyperlinks on Event Details.
-
Navigate to the Events list or the Pending Events list to view the details of an event that has been invoiced. If the event has one or more associated invoices and the user has permission to view invoices, the invoice number(s) will appear as hyperlinks:
-
Invoices with a zero balance display a checkmark.
-
Invoices that are partially paid display a clock.
-
Invoices that have not been paid do not show an icon.
-
-
Click the hyperlink on the invoice number to open a new tab with the invoice displayed.

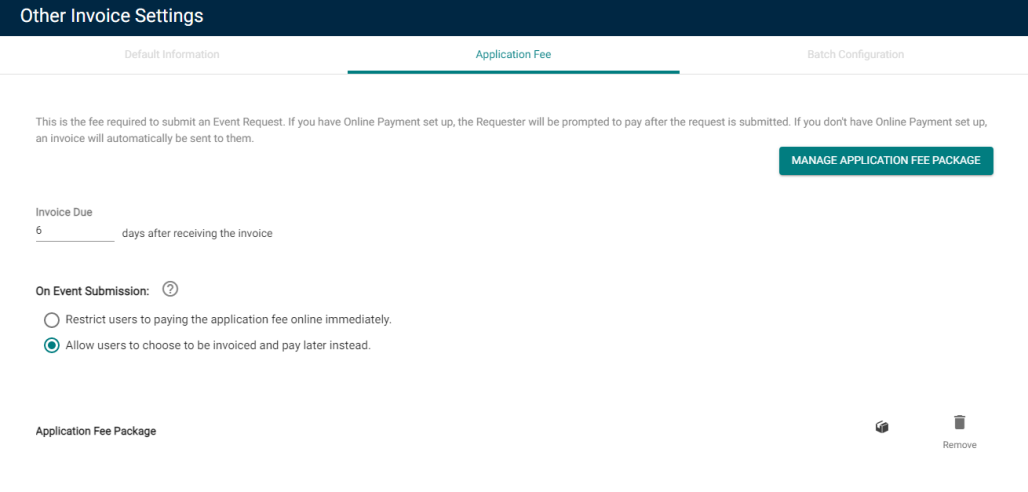
Application Fee
An application fee is the fee required to submit an event request. Once set up, the application fee will auto-create an invoice that is tied to each event. *Note: This invoice is created separately from any invoices that are created using Batch Configuration and will only trigger for Community Portal users or visitors submitting an event through open entry.
- Click on the Application Fee tab from the Other Invoice Settings panel.
- Under Invoice Due, enter the number of days after receiving the invoice that the invoice is considered due.
- Under On Event Submission, choose whether to force users to pay the application fee online immediately, or allow users to be invoiced and pay later instead. *Note: This option is only configurable if online payments are enabled.
- Click on the Manage Application Fee Package button. *Note: This option will only be available if you have entered information under the Default From Info section of your Invoice Settings.
- Enter an Application Fee Package Name.
- Click Add a Line Item Template to add existing line items you'd like to include in this package.
Or
-
Click Create New Line Item Template to apply a new template to this package.
- If applicable, select a Classification from the drop down menu to associate it to this package. *Note: You can associate a package with multiple classifications if necessary.
- Click Save to finalize the changes.
- You can Remove the package at any time or edit it by clicking the Manage Application Fee Package button.
Batch Configuration
Invoice Batching allows you to define a schedule for Event Manager to automatically create and distribute invoices for events that occur within a defined time range. *Note: These invoices are created separately from any invoices that are created using an Application Fee.
- Click on the Batch Configuration tab from the Other Invoice Settings panel.
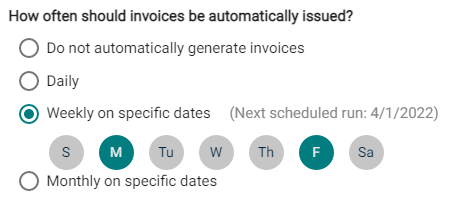
How often should invoices be automatically issued?
This determines when invoices for events in each batch will be issued. *Note: The date that the next scheduled batch will run is displayed next to the chosen option.
- Select one of the following options:
- Do not automatically generate invoices: This is the only selection that will prevent invoices from being automatically issued.
- Daily: This will cause invoices to be generated for events every day, if there are new events to be invoiced.
- Weekly on specific dates: This will cause invoices to be generated for events every week on the selected days of the week.
- Monthly on specific dates: This will cause invoices to be generated for events every month on the selected dates.
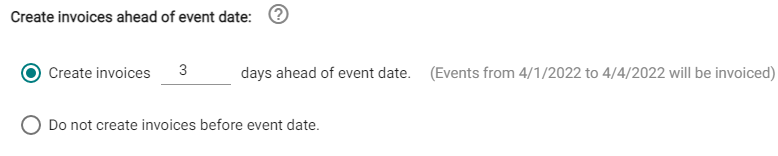
Create invoices ahead of event date
This determines if and when invoices should be created before the date of the event.
- Select Create invoices __ days ahead of event date and enter the desired number of days. *Note: The date range that will be invoiced in the next batch is displayed to the right of this option.
- Alternatively, select Do not create invoices before event date to cause invoices to only generate on or after the event date.
Create Invoices for Review Ahead of Batch Issue Date
This determines if and when invoices should be created for review before the batch issue date.
- Select Create invoices __ days ahead of batch issue date and enter the desired number of days.
- Alternatively, select Do not create invoice ahead of batch issue date to cause invoices to be created and issued on the batch issue date.

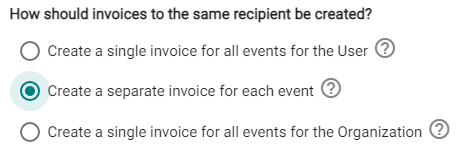
Creating Invoices for the Same Recipient
This determines how invoices should be created for events included in each batch.
- Select one of the following options:
- Create a single invoice for all events for the User: This will combine all events for particular requesters included in each batch onto a single invoice.
- Create a separate invoice for each event: This will create an invoice for each event included in each batch.
- Create a single invoice for all events for the Organization: This will combine all events for a particular Organization included in each batch onto a single invoice.
Other Batch Settings
- If you would like to Send a notification when invoices are created to a specific email address, check the box and provide the email address that should receive the batch notifications.

