Back to Event Manager Main Menu
Community Portal Setup
In Event Manager, the community portal is your public facing page for visitors to access information about your facilities and their availability. Before your visitors can access the portal and take advantage of this resource, you will need to set up your Community Portal by providing relevant information such as featured locations, community portal details, and community contact. *Note: If you do not currently have access to this feature, please contact your Sales Representative or Client Services for more information.
Watch the Video Tutorial

To access the Community Setup:
- Click on Settings from the side navigation menu.
- Click on the Community Setup option under the Global Administration tile.
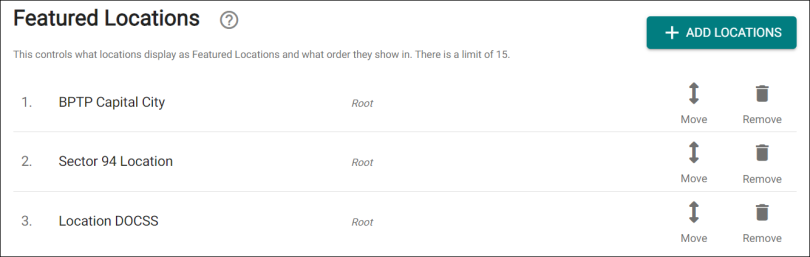
Featured Locations
You can have up to 15 featured locations displayed on your community portal. A minimum of 3 will display at one time, with more displayed depending on the size of your browser window. The first three locations in this list should be those that you want to highlight or encourage visitors to use the most.
NOTE In order to add a Location as a featured location, you must first add a Location description, set up Usages and Types, and enable the location to be booked by organization members.
Adding Featured Locations
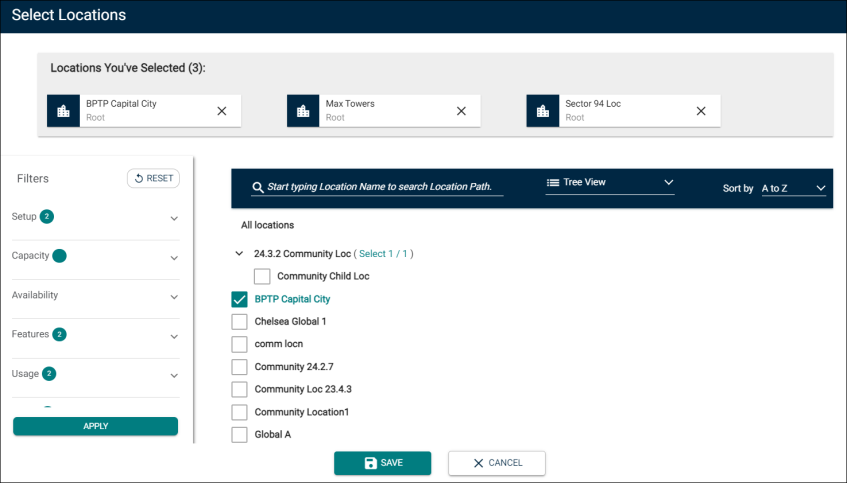
To select and add a featured location on the community portal:
- Click on Add Locations.
- On the Search Locations window, select a featured location using one of the following options:
- Enter a keyword in the text box to search the location name and select the check box.
- Under All Locations, select one more location that you want to use as a featured location.
- On the left pane, select the desired filter options and click Apply. Select the featured locations from the options displayed on the window.
- Select the location you would like to add. Repeat this process for any additional locations.
- Click Save to finish adding the location(s).
Managing Featured Locations
Once a featured location has been added to the list, you can either Move the location higher or lower in priority or Remove it from the list.
- Move: Click and drag this icon to adjust where a featured location is displayed on the Community Portal.
- Remove: Click this icon to remove a featured location from the list.
Community Portal Details
The ability to affect the branding of the Community Portal exists under Community Portal Details. You can adjust the banner image, logo, website information and more.
To edit community portal details:
- Click Edit at the top of the Community Portal Details panel.
- Enter the Community Name. This will display towards the top of the page and lets your visitors know that they are in the right place.
- Add a Main Image.
- You can choose from your existing library of images uploaded to Event Manager by clicking Choose From Library.
- If the image you would like to use is not in your library, either upload a new file (10 MB max) by clicking Upload or you can paste the URL for an image from the Internet.
Bright Idea:The main image should be a high quality image that attracts potential renters. We recommend an image with a 16:9 aspect ratio.

- When you are ready to provide the link to your Community Portal, click Copy next to the link and distribute via your preferred method.
- Add a Logo. *Note: Your logo will display next to your Community Name and should be 100x 100 pixels.
- You can choose from your existing library of images uploaded to Event Manager by clicking Choose From Library.
- If the image you would like to use is not in your library, either upload a new file (10MB max) by clicking Upload or you can paste the URL for an image from the internet.
- Enter a Welcome Message. This message will display beneath your Community Name and Logo and should encourage your visitors to utilize the portal for facility usage.
- You can hyperlink a section of your message and link it to a website of your choice:
- Highlight the text that you would to link to a URL.
- In the box that appears, enter the URL of the website.
- Click Save.
- You can hyperlink a section of your message and link it to a website of your choice:
- Enter your Terms & Conditions. This field should be used to reflect your existing terms & conditions. Information provided here will display the first time a user attempts to book an event. They are required to agree to the Terms & Conditions in order to continue booking their event.
- Enter a URL into the Terms & Conditions Link field if you would like to provide a clickable hyperlink that will allow your community portal users to navigate to the website of your choice.
- Enter your Website URL and Website Hyperlink Name. The link will be displayed on the Community Portal and will take visitors back to your website.
- When you are ready to allow access to the community portal, turn on the Community Activation toggle.
- To display a location map on the Community Portal, turn on the Show Map toggle. The location is highlighted using a location pin.
- Click Save to finalize the information you have entered. You are able to edit this information later if necessary.
Community Contact Information
The Community Contact is the public face of your organization for the Community Portal and will serve as the main point of contact for any questions regarding facility rentals. Any contact information you provide will be accessible by clicking the help icon in the search filter panel on the portal.
To edit your Community Contact Info:
- Click Edit at the top of the Community Contact Info panel.
- If your intended community contact already exists as a user, start typing their name in the search field and click their name to auto-fill their information below.
- If your intended community contact does not exist as a user, enter any known contact information in the fields.
- Click Save. This information can be edited later if necessary.

