Surveys and Inspections
The Survey/Inspection application allows you to create a series of questions to gather feedback. Surveys can be linked to work orders so they generate automatically when the work order is printed or the work is completed. Once created, each survey tracks its own average results over time. *Note: If you do not currently have this application, please contact your Sales Representative or Client Services for more information.
Watch the Video Tutorial:

|

|
Creating Survey and Inspection Templates
The first step to setting up surveys and inspections is to create the templates you will need. This involves creating the actual questions that will need to be answered in each survey or inspection. Once the templates are created, you can start adding in individual responses to the survey questions. To access the Survey/Inspection settings in TheWorxHub:
- Click on the Settings tab, then select the Survey/Inspect tab. This page will show all the Surveys already in your account.
- Click the New Survey/Inspection Template button.
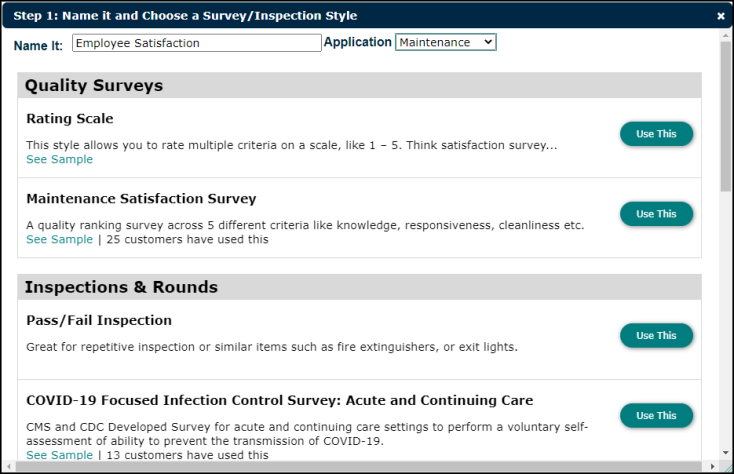
- Enter a name for the survey in the Name It field, and select a department from the Application list.
- Click the Use This button next to the survey style you want to use: Quality Surveys or Inspections & Rounds.

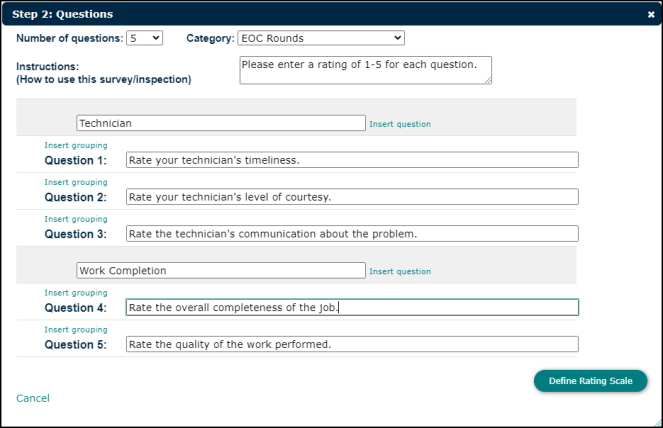
- After you click the Use This button, select the Number of questions for the survey, as well as the appropriate Category.
- If needed, type any Instructions for the survey. This is an optional field.
- Type the Question text as you would like it to appear on the survey.
- If you would like to group questions together, click the Insert grouping link above the first question in the group.
- Type the group name in the field that appears. All questions in this group should fall below the group name field.
- Click Define Rating Scale when you have completed all questions and groupings.

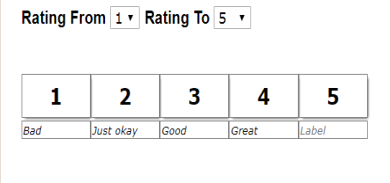
- Select the Rating From and Rating To number range, and then type the Label for each number in the text box.

- Click the Settings button.
-
In the Confirm Settings window, add instructions to the survey, such as instructions to tell respondents what to do with completed surveys. *Note: If instructions are going to be the same for all your surveys, enter them on the Default Instructions section of the Surveys tab. This will apply the same set of instructions to all surveys you create.
- To prevent unanswered surveys from building up in the system over time, select a number of days, weeks, or months to automatically cancel the unreturned surveys after the time period you select.
- To make the survey active, check the Publish This Survey/Inspection Now box.
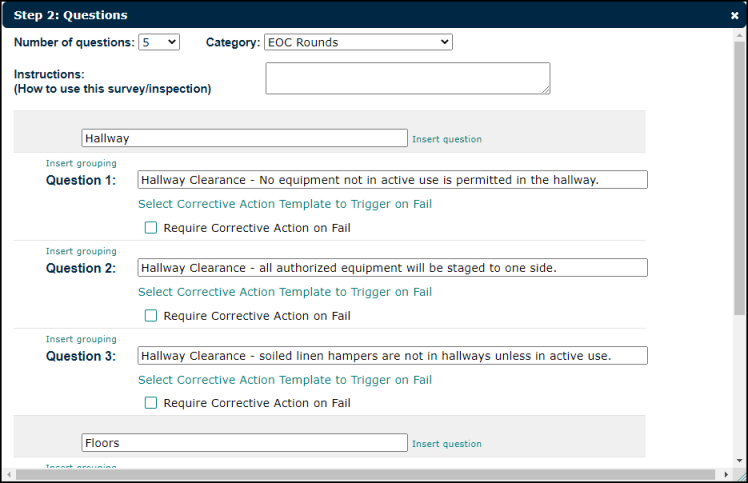
- After you click the Use This button, select the Number of questions for the survey, as well as the appropriate Category.
- If needed, type any Instructions for the survey. This is an optional field.
- Check the Corrective Action Required on All Failures box if you need the respondent to enter a corrective action for any questions marked "Fail."
- Type the Question text as you would like it to appear on the survey.
- If you are using Templates, you can click the Select Corrective Action Template to Trigger on Fail link to choose a template that will be used if the response is marked "Fail."
- Check the Require Corrective Action on Fail box if a corrective action should be triggered by failure of a question.
- If you would like to group questions together, click the Insert grouping link above the first question in the group.
- Type the group name. All questions in this group should fall below the group name field.

- Click the Settings button.
-
In the Confirm Settings window, add instructions to the survey, such as instructions to tell respondents what to do with completed surveys. *Note: If instructions are going to be the same for all your surveys, enter them on the Default Instructions section of the Surveys tab. This will apply the same set of instructions to all surveys you create.
- To prevent unanswered surveys from building up in the system over time, select a number of days, weeks, or months to automatically cancel the unreturned surveys after the time period you select.
- To make the survey active check the Publish This Survey/Inspection Now box.
- Click the Set Auto-Generating Rules link if you would like the survey to generate automatically.
- Check the Use Ad-Hoc Survey/Inspection Rule box to apply the auto generation rules on this page.
- Enter the number of copies and select which day of the week the survey(s) should generate.
- Click 0 Locations to select the locations that may be randomly assigned the survey.
- If you do not want the same location chosen more than once every certain number of days, enter the number of days that must pass before they are able to receive another survey.
- Check the Generated Survey/Inspections Require Selection of Worker Before Entering Results box if you want a worker's name attached to the survey.
- Click the I'm Done! button to save the auto-generating rules. For example, the image below shows a survey that will be randomly sent to three of the five selected locations every Monday. Any location that receives the survey cannot receive the survey again until fifteen days have passed.

Creating Work Order Survey Rules
This feature allows for a survey to be automatically sent out to a group of TheWorxHub users, based on their role. For example, you can send out a Maintenance Satisfaction survey to a requestor whose requested work order has been completed by a worker. They can then evaluate the quality of work that was done and respond to the survey appropriately, which provides your organization with valuable feedback.
- Click on Settings in the navigation menu, then select the Survey/Inspect tab.
- Click on Work Order Surveys under the Survey/Inspect tab.
- Click Add Rule.
- Select how often you would like the survey to be sent in the For every drop-down menu.
- Select the appropriate Department in the drop-down menu.
- Click the select survey link to choose a published survey/inspection template from your account.
- If you would like this survey to be sent to all user roles, click All.
- If you would like to pick only certain user roles to send this survey to, click in the Select Some Options box, then select one or more users.
- Click Save to finalize your work order survey rule.
- To continue adding work order survey rules to your account, click Add Rule and follow the steps above.
