Adding Survey and Inspection Responses
Watch the Video Tutorial:
Survey and Inspection Responses
- Click the Add button in the top right corner and select Survey/Inspection.
- Click the Use This button next to the Survey/Inspection template you would like to add responses for.
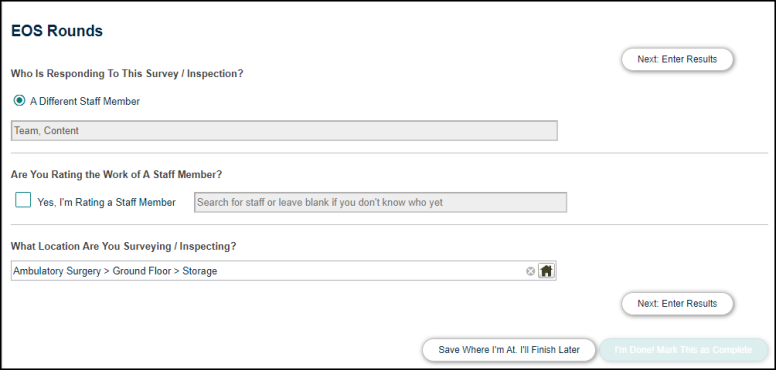
- Answer the questions to help identify who and where your survey/inspection applies to.
- Who is Responding to this Survey / Inspection? - Select either The Staff Member Who Added the Request option or A Different Staff Member option. If you are selecting the Different Staff Member option, begin typing the name of the survey respondent, then select the name from the list that appears.
- Are You Rating the Work of A Staff Member? - This section is typically used if this is a work quality inspection, or a satisfaction survey about a specific work order. Check Yes, I'm Rating a Staff Member and enter a staff member's name now, or leave the field blank to tell TheWorxHub to remind you to attribute it to a staff member later when you're entering the survey results.
- What Location Are You Surveying / Inspecting? - Every survey/inspection requires a location. The survey will automatically pick up the location of the work order.
- Choose the Delivery Type.
- If you choose Print & Deliver, select the Print Options.
- If you choose the Email Delivery Type, an email will be sent to the user in the Who is Responding To This Survey/Inspection field.
- Click the Next: Enter Results button.

Entering Responses
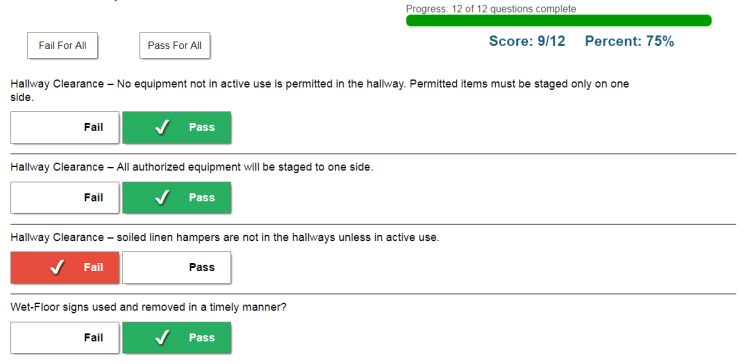
- Enter the responses by either clicking on the Pass or Fail buttons or selecting the appropriate rating if the survey/inspection uses a rating scale.
- The progress bar in the top right lets you know how far through the survey/inspection you are.
- Click the Save Where I'm At. I'll Finish Later button to save the survey / inspection at any time and return later to complete it.
- To save time, you can click the Pass For All or Fail For All buttons to either mark all responses as Pass or Fail.

- Hovering over a question reveals additional actions you can take.
- Exclude - Click this link to omit this question from the survey/inspection. You can click the Include link to reinstate this question as part of the survey/inspection.
- Comment - Click this link to add comments to this response. Click Save to add the comment to the survey/inspection.
- Corrective Action - Depending on how the survey/inspection template was created you may see a Corrective Action link. This lets you initiate a request for work into any application and relate it back to that question. You may also be prompted to create a work order based on a template, or create an alert for this service area. *Note: The request will not be generated until you mark the entire survey as complete.
- To submit the survey/inspection responses click the I'm Done! Mark This as Complete button.
Ad Hoc Survey and Inspection Responses
- Click on the Add button at the top of your screen, then click on Survey/Inspection.
- All survey and inspection templates will show on this page sorted by most frequently used.
- Click the Use This button next to the Survey/Inspection template you would like to add responses for.
- Answer the questions to help identify who and where your survey/inspection is related to.
- Who is Responding to this Survey / Inspection? - Begin typing the name of the survey respondent, then select the name from the list that appears.
- Are You Rating the Work of A Staff Member? - This section is typically used if this is a work quality inspection, or a resident satisfaction survey about a specific work order. Check Yes, I'm Rating a Staff Member and enter a staff member's name now, or leave the field blank to tell TheWorxHub to remind you to attribute it to a staff member later when you're entering the survey results.
- What Location Are You Surveying / Inspecting? - Every survey/inspection requires a location. Enter a location by typing the location name and selecting it in the list that appears or by using the location picker.
- Click the Next: Enter Results button.

Entering Responses
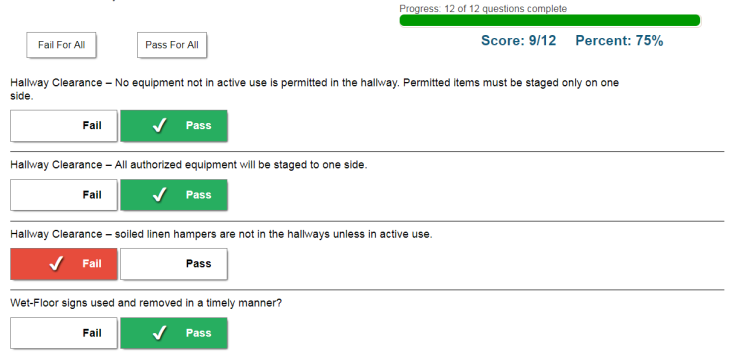
- Enter the responses by either clicking on the Pass or Fail buttons or selecting the appropriate rating if the survey/inspection uses a rating scale.
- The progress bar in the top right lets you know how far through the survey/inspection you are.
- Click the Save Where I'm At. I'll Finish Later button to save the survey / inspection at any time and return later to complete it.
- To save time, you can click the Pass For All or Fail For All buttons to either mark all responses as Pass or Fail.

- Hovering over a question reveals additional actions you can take.
- Exclude - Click this link to omit this question from the survey/inspection. You can click the Include link to reinstate this question as part of the survey/inspection.
- Comment - Click this link to add comments to this response. Click Save to add the comment to the survey/inspection.
- Corrective Action - Depending on how the survey/inspection template was created you may see a corrective action link. This lets you initiate a request for work into any application and relate it back to that question. You may also be prompted to create a work order based on a template, or create an alert for this service area. *Note: The request will not be generated until you mark the entire survey as complete.
- To submit the survey/inspection responses click the I'm Done! Mark This as Complete button.

