Uploading Drawings
If you have drawings or blueprints of your facilities, they can be uploaded into TheWorxHub inside of the Space Management module, as long as they are a PNG, JPG, or PDF file.
-
Click on the Space Management tab.
- Click on the New Drawing menu option from the side navigation menu.
How to Upload PNG or JPG Drawings
- Enter a Name for this drawing. This name will display under the drawing on the Space Management Dashboard.
- Select a Location to map to this drawing.
Typically a drawing should represent a larger section of your facility such as a floor or wing of a building. If you choose a specific room within one of your facilities, it may limit your ability to map sections of the drawing to your locations.
- Either click into the File input field or click Browse to select a file from your computer to upload for this drawing. *Note: The file must be either a PNG or JPG in order for TheWorxHub to process the file correctly.
- Click Submit to process the drawing and upload it into TheWorxHub. *Note: This may take an extended amount of time depending on how much processing is needed. Do not close the window until the drawing has been successfully uploaded.
- Uploaded drawings can be edited and managed at any time from the Space Management Dashboard.

How to Upload PDF Drawings
Typically a drawing should represent a larger section of your facility such as a floor or wing of a building. If you choose a specific room within one of your facilities, it may limit your ability to map sections of the drawing to your locations.
- Either click into the File input field or click Browse to select a file from your computer to upload for this drawing. *Note: The file must be a PDF in order for TheWorxHub to process the file correctly.
- Click Submit to process the drawing and upload it into TheWorxHub. *Note: This may take an extended amount of time depending on how much processing is needed. Do not close the window until the drawing has been successfully uploaded.
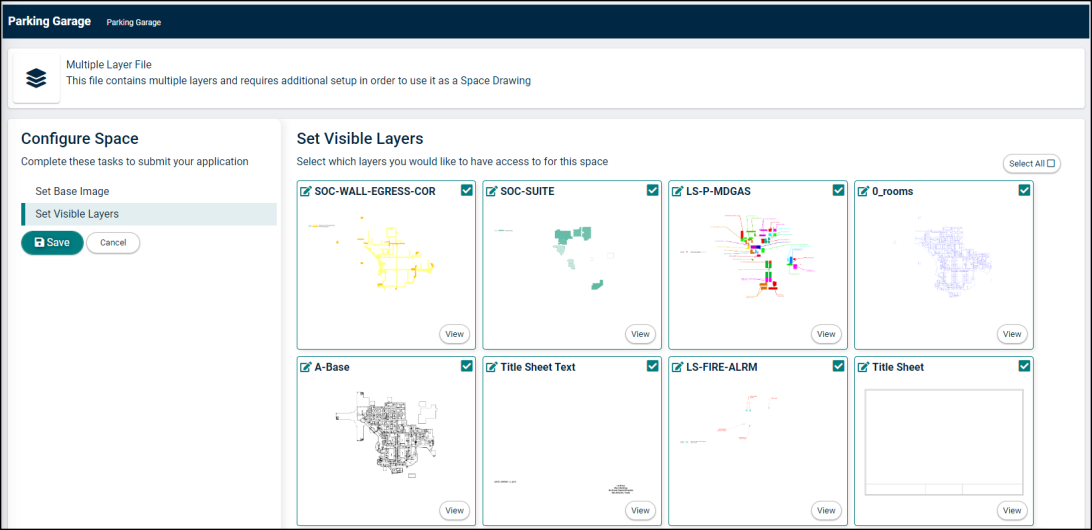
- If your file has multiple layers, you will need to define the Base Image and the Visible Layers.
- Under Set Base Image, check the box next to each image that should be used as the base for this drawing. *Note: You can select multiple Base Images. This will merge each selected image into one base layer on the drawing.
- Click Set Visible Layers and then check the box next to each image that should be available as a layer for this drawing.
- Click on the edit icon (
 ) next to a layer name to edit the name of a layer, if necessary. Then hit "Enter" on your keyboard to save the changes.
- Click on the edit icon (
- Click Save to finalize the details of this new drawing.

