How to Log In
*Note: If your organization is using SSO (single sign on) for user authentication, your login experience may be different. If you are having difficulty logging in using SSO or you are unsure whether your organization utilizes SSO for their Dude Solutions products, please contact your technology help desk for assistance.
- Open your Internet Browser (Internet Explorer, Firefox, etc.) and go to login.facilitydude.com. You can bookmark this page or create a shortcut on your desktop to make it easy to come back to this page later.
-
On the Login screen, enter your Username and Password.
-
If needed, click on the eye icon (
 ) to view the text you have entered in the Password field.
-
- Make sure that Incident is selected in the Product box.
-
Click Sign in.
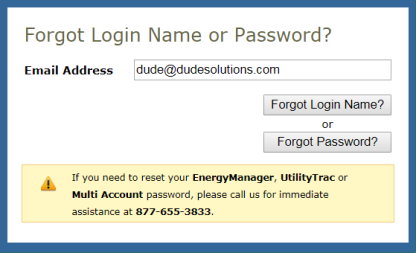
- If you have forgotten your login information, click the Forgot Login Name or Password? link under the Sign In button.
- Enter your Email Address.
- Click Forgot Login Name? to have your login name emailed to you.
- Click Forgot Password? to have an email sent to you with instructions to reset your password.

- If you need additional assistance logging in, see our Login Help page.
Site Administrator I Home Page
Here are some highlighted sections of the Site Administrator I home page:
My Account Link
- Click on the My Account link to go to your personal information page, where you can change your password or update your information.
- The Application Links drop down box is also in this section. If you are a user in multiple Dude Solutions applications, you can select the application from the list to jump between the different programs.
- Click the Logout link in the far right corner of the page to exit the system.

Home Page Banner
- The tabs across the top of the screen help you navigate to important areas of the application.
- Home - takes you to the Incident home page.
- My Requests - where you can view the incident requests you have submitted.
- New Request - where you can enter a new incident request for your assigned Location(s).
- Approval - takes you to incidents waiting your approval where you can approve and process these requests.
- My Settings - takes you to your personal information page where you can change your password or update your information.
- The Search For box under the Home tab can be used to find a specific incident for your assigned Location(s). Enter the Incident ID into the box and click Go to bring up that form.
- The Advanced Search link takes you to a more advanced search form where you can select multiple criteria to find a group of incidents for your assigned Location(s).
- The Actions menu contains links to Add information to your account, List the current fields, and run Reports for your assigned location(s).

Requests
- This center section shows you a breakdown of the statuses of all the incidents for your assigned location(s).
- Use the Period drop down to change the pie chart and list to only show incidents entered within a certain time period.
- The Request Totals section shows the incidents in their current status. The pie chart next to this list is a graphical representation of the numbers in this list.
- My Requests shows the incidents you have submitted in their current status.

Requested Work
- This section displays incidents that have been routed to you for approval. For more information about approving requests, see How to Review and Approve Incident Requests.
Work Center
- This section provides a quick link to the Calendar, which will display incidents on the date they were created.
- It also has quick access to any incidents that have been assigned to you that day for approval. Click on the date to be taken to a quick view of your incidents for that day.

Information & Analysis
- This section has links to fields in Incident that you may commonly use.
- For more information about setting up and using Saved Actions, see Saved Actions.
