Back to Safety Center Main Menu
Adding Contacts
Adding Contacts to your events and plans will give your end users the information they need to contact the right people in the right situations. You can add contacts directly to your events or you can create or upload a master list of contacts to the plan that can then be used to add contacts to the individual events.
Watch the Video Tutorial:
Adding Contacts to an Event
- Open the Event to which you would like to add contacts.
- Click on the Event tab and then click on Event Contacts.
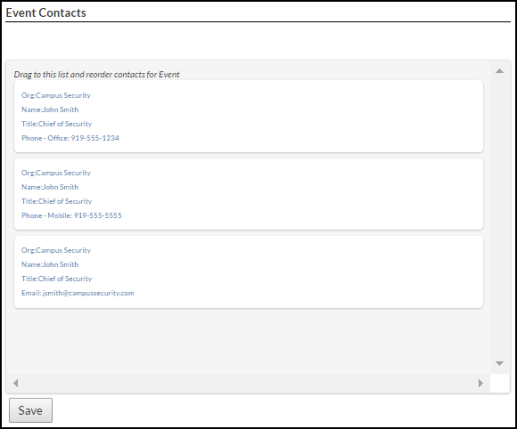
- The box on the right side of the page will list the contacts for this specific event. It will be empty for a new event.
- To enter a contact manually, scroll down to the Add New Contact section.
- Enter the Organization, Title, and Name of the contact.
- Enter at least one method of communication. If you enter more than one, they will all be added to the event as separate contacts.
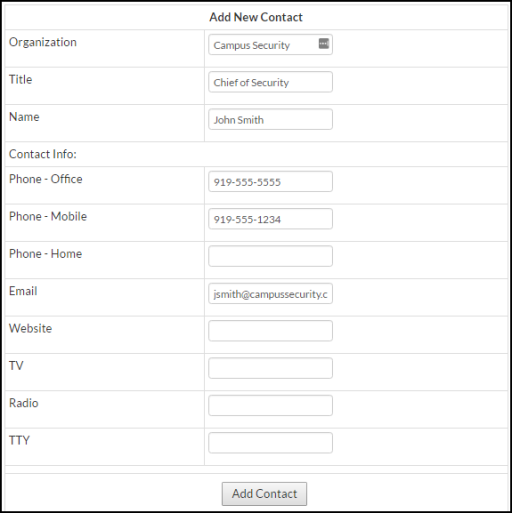
- Click Add Contact.
- This contact information will now appear in the Event Contacts section.
- Click Save. This will also save this contact information in the Available Contacts box on the left side of the screen.
- If there are already contacts listed in the Available Contacts box on the left side of the screen, you can click and drag those contacts into the Event Contacts box.
- Click Save.
All Contacts List
You can enter all of the contacts needed for a plan into the All Contacts list. This list populates the Available Contacts box when adding contacts to an event. You can enter the contacts to the All Contact list manually or through an import.
Adding Contacts Manually
- Click on the Contacts tab and then click on All Contacts.
- Enter the Organization, Title, and Name of the contact into the Contact Information box.
- Select the Communication Method from the drop down list and enter the phone number, email address, etc. in the box to the right.
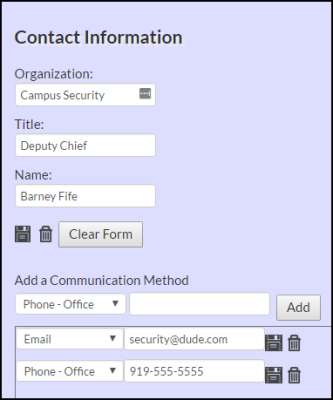
- Click Add. This will add the information in the box below.
- If you would like to enter additional communication methods for this contact, select a new one from the drop down, enter the information, and click Add again.
- To add a new contact, click Clear Form and repeat the steps.
Importing Contacts
- Click on the Contacts tab and then click on All Contacts.
- Click the Import Contacts button at the bottom of the screen.
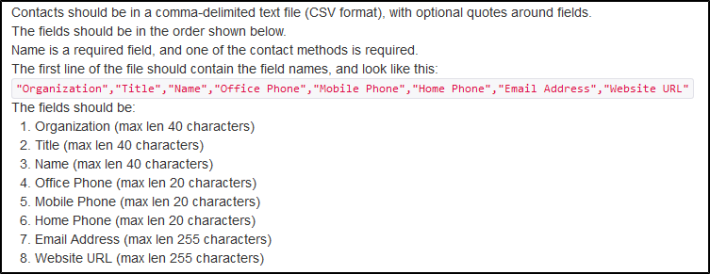
- Contacts should be in a comma-delimited file (CSV format) to be imported.
- The fields must be in the exact order and be typed in the exact way as shown below. The quotation marks are optional.
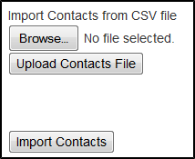
- Click the Browse button to search for your CSV file.
- Select it and click Open in the dialog box.
- Click Upload Contacts File on the Import Contacts page.
- A preview of your contact list will appear on the screen.
- Click Import Contacts.
- These contacts will now be available to add to any of your events in the plan.
Plan Contacts
Once you have imported or added your contacts to the All Contact List, you can access Plan Contacts from the Contacts tab to easily add them to the appropriate Events.
- Click on the Contacts tab and then click on Plan Contacts.
- This brings you to a list of all the contacts with check boxes for each Event in the plan listed to the right. Each event is abbreviated by the first two letters in the name, but you can hover over the check box to see the full Event name.
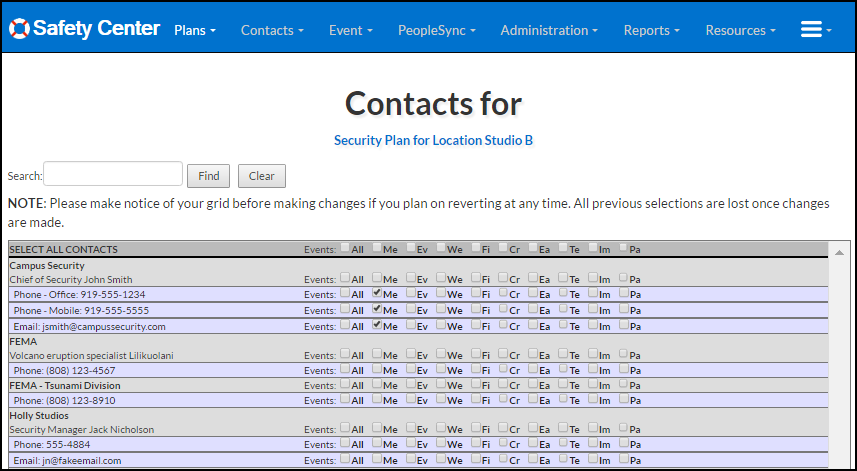
- Put a check mark next to the Communication Method (phone, email, etc.) that you would like included on the Event. If you would like to include all communication methods, check the box in the row with the contact's name. This will also enter a check for each communication method listed.
- If you would like to include all of the contacts on a particular event, check the Event box at the very top of the list. This will check every communication method for every contact listed.
- Once you have checked the appropriate boxes, you can navigate away from this page and your changes will be saved.

