COVID-19 Tips - Track and Document
We want you to feel empowered even in today's uncertainty, which is why we're sharing Work Order best practices with you. Please reach out to your Client Success Manager for any questions or concerns you may have about utilizing Work Order for your COVID-19 needs.
We have also created a list of resources to help you stay on top of your operations during COVID-19. Check out the blogs, videos, and podcasts we have compiled on our Brightly website and remember that the Dude is beside you!
Track COVID-19 Related Maintenance
Your staff is devoting many hours to cleaning, sanitizing, and disinfecting your facilities to help prevent the spread of COVID-19. Use Work Order to help track all COVID-19 related work and the time it takes to complete by creating a Purpose Code.
Creating a COVID-19 Purpose Code
- Click on the Account Setup tab.
- Click on Purpose under the Manage Codes section.
- Click on Add New Purpose on the right side of the page.
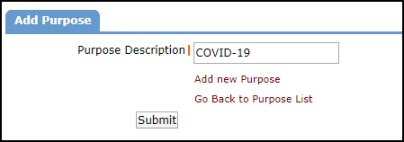
- Enter COVID-19 in the Purpose Description field.
- Click Submit.
Applying the COVID-19 Purpose Code to Work Orders
- When creating a new work order or editing an existing work order, navigate to the Budget Info section.
- In the Purpose field, select COVID-19.
- Fill out any additional information on the work order.
- Click Save at the bottom of the page.

Reporting on COVID-19 Work Orders
- Click on Report in the Actions menu at the top of your homepage.
- Select Work Order in the list of items to report on.
- In Step 1, select All for the Reporting Period in the drop-down menu.
- In Step 2, select Request Date.
- Use steps 3 through 9 to narrow down the report by specific Locations, Priorities, Assigned Employees, etc.
- In Step 10, select COVID-19 for your Purpose.
- Use Steps 11 through 20 to narrow down the report by specific Crafts, Areas, Descriptions, etc.
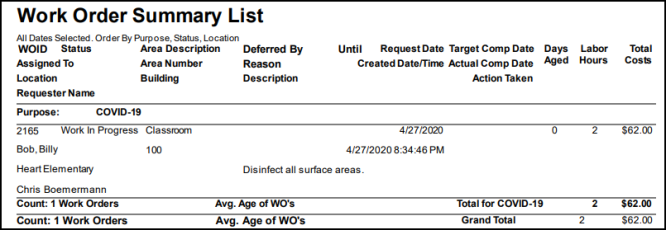
- Choose a Report Type for viewing. The example below is displaying the Work Order Summary 2 report. Each report type has a different look and contains varying levels of detail. *Note: In the drop-down menu next to the report type, choose how you would like the report results to be sorted or grouped.
- Select the Report Format (PDF or Excel). If you choose the Excel output format, you will be able to create your own tables and graphs from the data using the Pivot Chart feature of Excel.
- Click Print This to run this report and open a preview.
- Work Order reports can also be saved and scheduled as Saved Actions. To use this feature, type a Report Title in step 23 and click Save and Print This.
Allocate Transactions to a COVID-19 Budget Code
Do you have a budget set aside for all the COVID-19 related work that needs to be performed? If so, use Budget Codes in Work Order to help you manage those specific expenses and keep track of the remaining funds. You can create a COVID-19 Budget Code that will allow you to track and group your maintenance costs on work orders.
Creating a COVID-19 Budget Code
- Click on the Account Setup tab.
- Click on Budget under the Manage Codes section.
- Click on Add New Budget Code on the right side of the page.
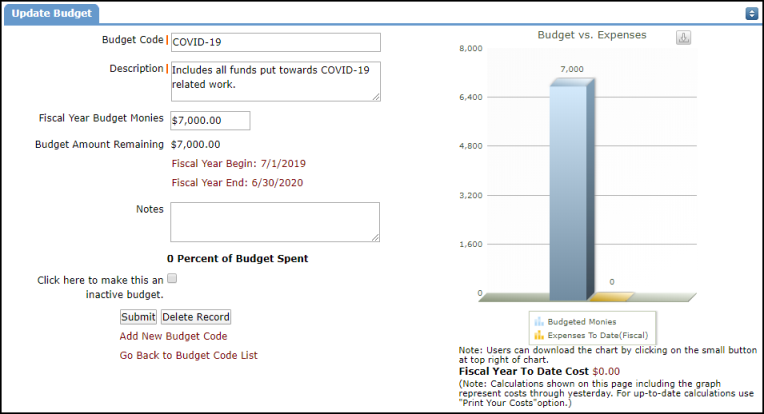
- Enter COVID-19 in the Budget Code field.
- Include a Description, such as Includes all costs associated with COVID-19 related work.
- Enter the appropriate amount in the Fiscal Year Budget Monies field.
- Confirm the Fiscal Year is correct, then click Submit.
- Once your Budget Code is created, you can apply it to work orders, labor transactions, purchase transactions, or inventory transactions.
Reporting On Your COVID-19 Budget
- Click on Report in the Actions menu at the top of your homepage.
- Select Budget - Work Order Costs in the list of items to report on.
- In Step 1, select All for the Reporting Period in the drop-down menu.
- In Step 2, select Request Date.
- In Step 3, select COVID-19 for your Budget Account.
- Use steps 4 through 8 to narrow down the report by specific Locations, Transaction Types, etc.
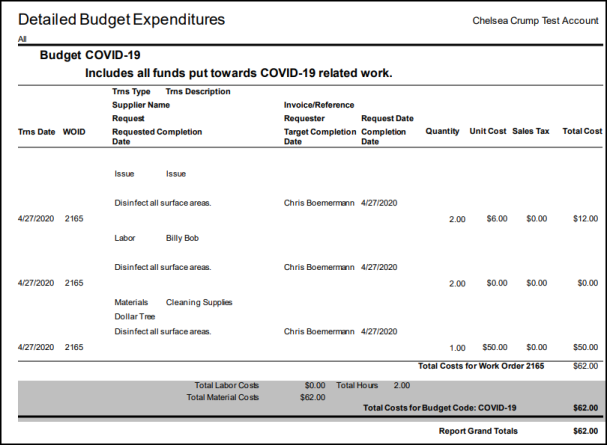
- Choose a Report Type for viewing. The example below is displaying the Detail Report. Each report type has a different look and contains varying levels of detail. *Note: In the drop-down menu next to the report type, choose how you would like the report results to be sorted or grouped.
- Select the Report Format (PDF or Excel). If you choose the Excel output format, you will be able to create your own tables and graphs from the data using the Pivot Chart feature of Excel.
- Click Print This! to run this report and open a preview.
Utilize PM Templates for New COVID-19 Procedures
Use the Planned Maintenance PM template feature to document the tasks your staff should perform on a regular occurrence based on CDC guidelines to help prevent the spread of COVID-19. Having these tasks listed in a template makes it easier when creating multiple COVID-19 related PM Schedules. *Note: To be able to create a new template and view the template library, you must use Internet Explorer as your web browser.
Creating a PM Template for COVID-19 Related Tasks
- Click on the New Schedule tab.
- Fill out the schedule steps with the COVID -19 information you would like included in the template, such as disinfecting surface areas daily according to the CDC guidelines. *Note: Location, Building, and Equipment information from the schedule will not be included in the template. Information from all other steps will be included in the template.
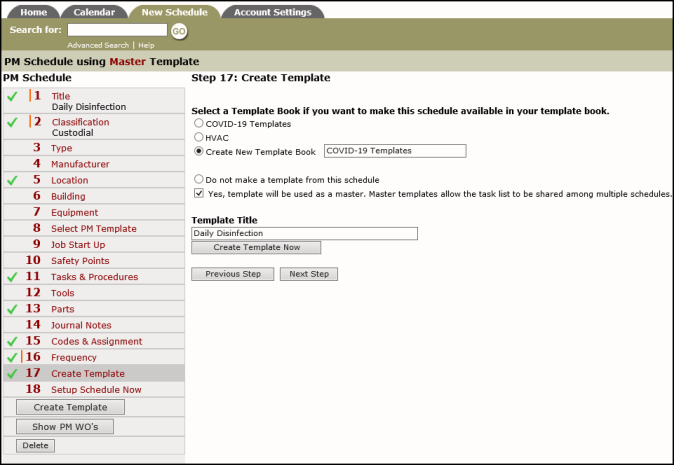
- In Step 17, select the Create New Template Book option and enter a name for the book in the field provided, such as COVID-19 Templates.
- Check the box next to Yes, template will be used as a master. Checking this box will make it available to use as a Master Template on other schedules.
- Enter a Template Title. This should be descriptive of what the template is for, but should not include location information. For example, Daily Disinfection.
- Click Create Template Now.
Master Templates allow you to share the task list among multiple schedules in a way that prevents those tasks from being edited within the schedules. The benefit to using Master Templates is if you need to edit the task list, you can make the changes in the PM Template and it will change all of the schedules where that template has been used as a Master.
You can still create additional tasks from within the schedule, but changing the Master template tasks must be done from within the PM template. Master templates can also be used as regular templates where the task list is not locked down. However, if a change is made to the tasks in the template, this change will not carry over to the schedules where this template has not been used as a Master.
Applying the PM Template to a PM Schedule
- Click on the New Schedule tab.
- Fill out the schedule steps with the information you would like included in the PM schedule.
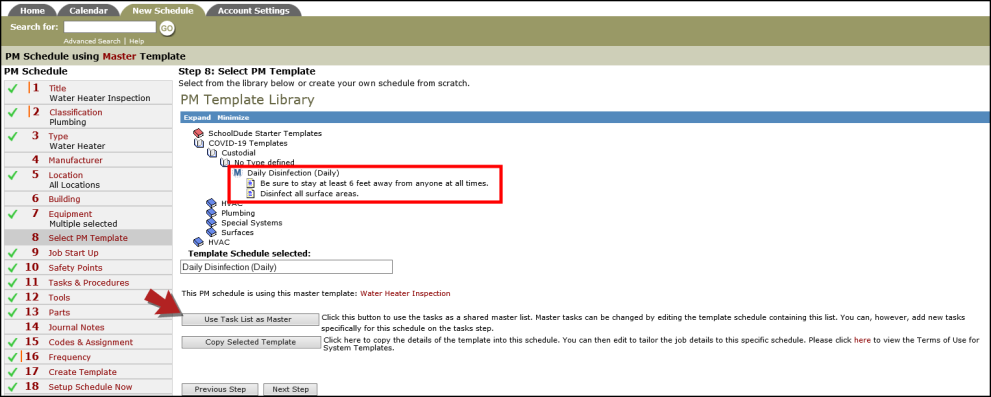
- In Step 8, click on the COVID-19 Templates book and continue to drill down in the tree until you reach your COVID-19 Master Template.
- Click on the template name so that it populates into the Template Schedule selected field.
- Click the Use Task List as Master button to use the tasks as a shared master list.
- In Step 11, continue to add additional tasks and procedures relevant to the PM schedule below the COVID-19 tasks.
- In Step 18, ensure the selections you made on the schedule are correct, then click Setup Schedule Now.
