COVID-19 Tips - Conserve and Optimize Maintenance
We want you to feel empowered even in today's uncertainty, which is why we're sharing Work Order best practices with you. Please reach out to your Client Success Manager for any questions or concerns you may have about utilizing Work Order for your COVID-19 needs.
We have also created a list of resources to help you stay on top of your operations during COVID-19. Check out the blogs, videos, and podcasts we have compiled on our Brightly website and remember that the Dude is beside you!
Conserving Resources By Postponing Non-Critical PM Schedules
There are only so many hours in a day and now that your staff is devoting time to COVID-19 related issues, you may need to conserve your resources and reprioritize some of their existing work. One way to do this is by pausing some of your non-critical PM schedules, so that they do not generate new work orders during this pandemic.
-
In Planned Maintenance, search for the PM schedule you would like to postpone. You can use the 'Search for' box, the Advanced Search, or the PM Schedules list to find the desired schedule.
- Click on the schedule title to open the PM schedule.
- Click on Step 16: Frequency in the schedule steps.
-
Check the Yes, postpone until box and enter the date that you would like the schedule to begin generating work orders again. *Note: Since we do not know when this pandemic will end, you can enter an estimated date and then return to this schedule at a later time to edit the date, if needed.
- Click Next Step to save. Repeat this process with any other PM schedules that need to be postponed.

Focus on High Priority Work
We know you and your staff already have a full plate and now with the additional COVID-19 related work, you are juggling multiple needs and prioritizing that work accordingly. You can use Work Order to communicate the high priority items to your staff by using the Priority field on the work order.
Selecting a Priority on a Work Order
- Navigate to the work order that you are processing from your Assigned Work section or the Work Orders By Status section of your homepage.
- Click on the Work Order ID to open the work order.
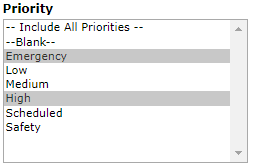
- Click the Priority drop-down menu and select Emergency or High.
- Fill in any other necessary fields, such as the Assignee.
- Click Save at the top of the page to communicate the urgency of this work to your Technicians.
Running an Advanced Search to Display High Priority Work
- Click on the Advanced Search link at the top of the page.
- Since we are searching for high priority work orders, be sure to select High and/or Emergency from the Priority field.
- Use the selection fields to continue filtering the results of the search as needed, such as Locations, Status, or Craft.
- You can select any combination of items from each of the fields. You can also select multiple items from within some of the fields by holding down the CTRL key on your keyboard. The more items that are selected, the more specific your search will be. *Note: When selecting multiple items from a criteria box, the "Include All" option should not be highlighted.
-
Click the Search Now button at the bottom of the page. The filtered results will display on the screen.
- Process the appropriate work orders from the filtered list.
Tracking Your Staff and Their Work
Social distancing is key in helping to prevent the spread of COVID-19. It is important to know which staff are critical for continued operations so you can manage their work accordingly. For assistance, you can use the Notes field to record which staff are essential vs non-essential and then run a report to view the users in each criteria. You can then run an Advanced Search by location to plan where it is best to distribute your staff.
Defining Essential vs Non-Essential Staff
- Click on the Account Setup tab.
- Click on the Users link.
- Click on the Name of the user you'd like to define as essential or non-essential.
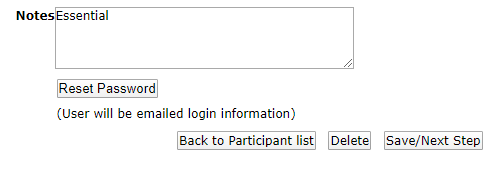
- Enter Essential or Non-essential in the Notes field.
- Click Save/Next Step.
- Hover your mouse over Shortcuts and click List User to return to the user list.

Reporting on Essential vs Non-Essential Staff
- Click on the Account Setup tab.
- Click on the Users link.
- Hover your mouse over Shortcuts and click Report.
- Filter the report as needed.
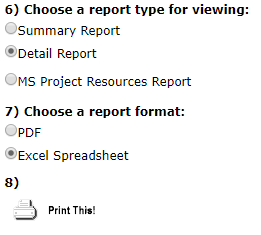
- Be sure to select Detail Report under Step 6.
- Select the Report Format (PDF or Excel) under Step 7. If you choose the Excel output format, you will be able to create your own tables and graphs from the data using the Pivot Chart feature of Excel.
- Click Print This!.

Reporting by Work Order Location
Once you have defined your essential personnel, use the Advanced Search report to generate a list of work orders and easily filter them by location to decide where to distribute your staff. This will help to avoid assigning multiple technicians to work in the same space at one time.
- Click on the Advanced Search link at the top of the page.
- Use the selection fields to continue filtering the results of the search as needed, such as Locations, Status, or Craft.
- You can select any combination of items from each of the fields. You can also select multiple items from within some of the fields by holding down the CTRL key on your keyboard. The more items that are selected, the more specific your search will be. *Note: When selecting multiple items from a criteria box, the "Include All" option should not be highlighted.
-
Click the Search Now button at the bottom of the page. The filtered results will display on the screen.
- Click Print to Excel at the bottom of the page.
- Cross reference the list of work orders and their locations with your list of essential staff. This will help you make critical decisions about how to assign your staff to the appropriate work orders and distribute the staff across your locations to keep them safe. You can use the Pivot Chart or filtering features of Excel to help accomplish this.


