Back to InventoryDirect Main Menu
Adjustment Transactions
 ).
).
Entering Multiple Adjustments (Clerk Form)
You can add up to five Adjustment transactions at a time using the Clerk form.
- Click on the Adjustment tab at the top of the screen. You can also click on the Adjustments link in the Information & Analysis section of the home page.
- From the My Adjustments list, click on the New Adjustment (Clerk Form) link in the Shortcuts section at the top of the page.
- On this page, you can enter up to five adjustment transactions at one time. The field headings in the bar at the top correspond to the entry fields in the columns below.
- The Transaction Date will automatically populate with today's date.
- Select the Inventory Type of the item from the drop down list.
- Type the Item Number into the field or click on the binoculars icon to open a pop-up window where you can search for and select the item.
- Select the Pool from the drop down list.
- Enter the Reason for the adjustment.
- Select the Budget Code if needed.
- Enter the New Quantity for that item.
- Enter Notes if needed.
- Click Save at the bottom of the page to save the transactions.

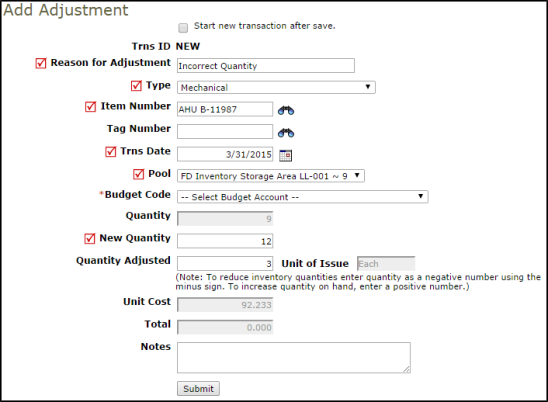
Entering an Adjustment (Long Form)
- Click on the Adjustment tab at the top of the screen. You can also click on the Adjustments link in the Transactions section of the home page.
- From the My Adjustments list, click on the + Add New Adjustment link on the right side of the list.

- Enter the Reason for Adjustment.
- Select the Inventory Type of the item from the drop down list.
- Type the Item Number into the field or click on the binoculars icon to open a pop-up window where you can search for and select the item.
- The Transaction Date will automatically populate with today's date.
- Select the Pool from the drop down list. The only pools that will be available to select from are the ones where this item is stored. You will also see the on-hand quantity for this item beside each pool name.
- Select the Budget Code if needed.
- The Quantity will automatically fill in for you with the current count.
- Enter the New Quantity for that item.
- Quantity Adjusted, Unit of Issue, Unit Cost, and Total Cost will all fill in for you based on the information on the Inventory Item.
- Enter Notes if needed.
- Click Submit to save the transaction.

