Entering New Inventory Items
 ).
).
How to Add New Inventory Items
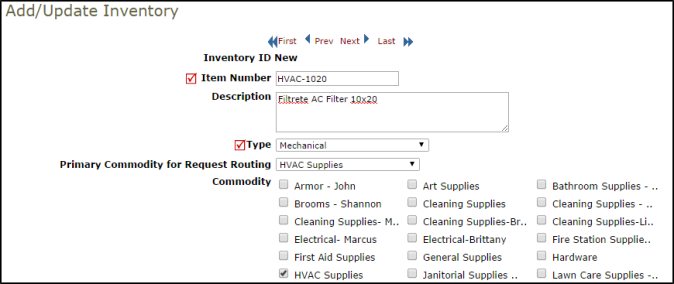
- Click on the Inventory tab at the top of the screen.
- From the My Inventory list, click on the + Add New Inventory Item link on the right side of the list.
- Enter an Item Number for this inventory item. *Note: Choose item numbers that are easily recognizable and be consistent as this field is the primary sort for the inventory item. For example some clients will put an abbreviation at the start of every item number - EL for electrical items, PL for plumbing items, etc. Choose a naming convention that works for your organization and stick to it.
- Enter a Description for this item.
- Select the Inventory Type for this item.
- If you would like to automatically route inventory requests for this item by commodity, select the appropriate Primary Commodity for Request Routing.
- Put a check mark next to any Commodity that this inventory items falls under. You can select as many commodities as needed.

Asset Info
The Asset Info section is only used when you are entering a Tool that will be checked in and out of the system, similar to a library book.
- Enter the Tag Number for the tool.
- Be sure to check the box marked Asset Item as this indicates to the system that this is a individual tool that will be checked in and out, rather than consumed.
- Enter the Serial Number for the tool if needed.
- Enter the Date Purchased.

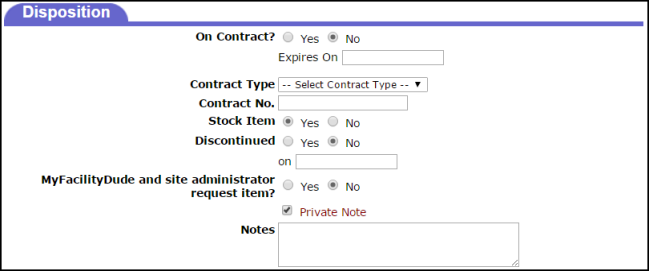
Disposition
- Select if this item is On Contract, the Expiration date, Contract Type, and Contract Number.
- Select the bubble next to Stock Item if this is an item you keep in stock.
- If this item has been Discontinued, you can mark that here and enter the discontinued date.
- If you would like requesters and site administrators to be able to request this item, select Yes next to MyFacilityDude and site administrator request item?
- Enter Notes if needed. *Note: These notes will be available for requesters to view unless you check the Private Note box.

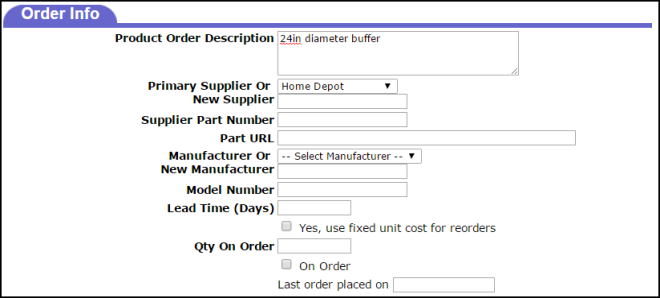
Order Info
In this section, you will enter information that is important when reordering this inventory item.
- The Product Order Description will be automatically populated with the same text that you entered in the Description box at the top of the form. You can change it if the manufacturer or supplier description differs from yours, as this description will be included in reorders.
- Select the Primary Supplier from the drop down list. If the Supplier is not in the list, you can add the Supplier using the New Supplier field. *Note: Be sure to check the existing Supplier list carefully before adding a new one to avoid adding duplicate Suppliers.
- Enter the Supplier Part Number and Part URL if needed.
- Select the Manufacturer from the drop down list. If the Manufacturer is not in the list, you can add the Manufacturer using the New Manufacturer field. *Note: Be sure to check the existing Manufacturer list carefully before adding a new one to avoid adding duplicate Manufacturers.
- Enter the Model Number if needed.
- In the Lead Time field, enter the number of days it takes to receive the item once it has been ordered.
- Check the box if you want to use the fixed unit cost for reorders.
- If the item is already on order, enter the Quantity On Order amount and check the On Order box. Put the date of the last order in the Last order place on field.

Transaction Defaults
- Select the Unit of Issue for this inventory item from the drop down list. *Note: Be sure to select how you will issue this item out to your users, instead of how you receive it. For example, you may receive a case of paper towels, but you issue them by the roll. You would select Rolls for the Unit of Issue.
- Enter a Tolerance Level % for this item. This percentage is based on the high level reorder amount that you set for this item. It determines how much inventory you can issue from each pool when the on-hand quantity of the item in that pool is zero. If you leave this field blank or enter a zero, you will not be able to issue inventory when there are no items in the pool.
- Choose whether you will use Avg Unit Cost or Fixed Unit Cost for this inventory item. The red check box with the gray background (
 ) indicates that one of these two fields is required.
- Avg Unit Cost means that the system will average the unit cost for the items to make them all the same even if they were purchased at different costs.
- Fixed Unit Cost means that the system will issue at the fixed cost that you set when creating the inventory item. When you receive new items into your inventory, you can decide whether or not to update that fixed unit cost for both the existing items and new items.
- Enter a Markup % if needed.

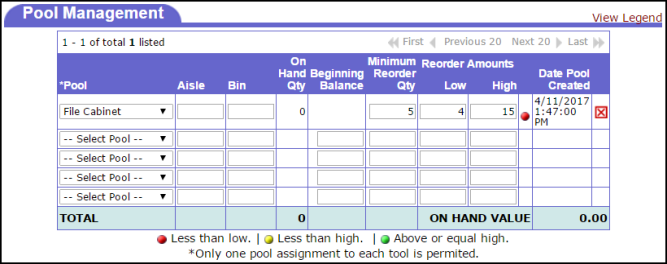
Pool Management
- Select the Pool(s) where these items will be stored and issued from.
- Enter the Aisle and Bin location for this item, if applicable.
- When entering a new inventory item, we recommend enter a zero (0) for the Beginning Balance to start.
When entering a new inventory item, Dude Solutions recommends that you enter a zero (0) for the Beginning Balance to start out. Once you have done a physical count of your inventory and are ready to start using the system, you can enter Adjustment transactions through the clerk form to correct the on-hand balance. This saves you from having to count your inventory multiple times before you are ready to implement Inventory as your quantities will change as you set up the account.
- Enter a Minimum Reorder Qty.
- Set your Low and High Reorder Amounts. This numbers indicate the minimum and maximum number of this item that you would like to keep on hand.
- Click Submit to save this inventory item.

