Request templates
The Request Templates setting allows you to customize the request form for your users on the web and the mobile app. *Note: The default global template called Global Request Template will need to remain untouched in your account in order for the mobile app to function successfully.
How to add a request template
- Click on the Admin menu icon, then click Configurations.
- Select Request Templates in the Templates section.
- Here you will see the default Global Template that is included with your account as well as any other request templates that have been created.
- Click on Global Template to edit the template used at all sites, or click the New button to create a new custom request template.
General
- Enter the Name of the template.
- If applicable, select the Default Region and Default Site.
- Choose the Status for new requests from the drop down.
- Use first N characters from Work Requested as Title if it's not presented: This setting allows you to control the number of characters of text entered in the Work Requested field that will appear as the Title of the work order if the user does not enter or is not given the option of entering a Title.
- Check the box next to any additional fields you would like displayed for the requester.
- If you would like to display a welcome message for your requesters, enter a Welcome Title and the Welcome Text. This message will appear at the top of your request form.
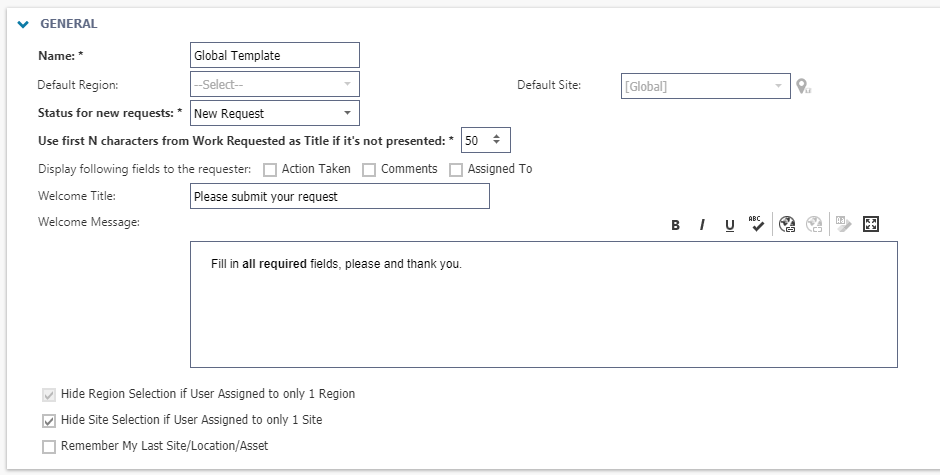
- If you would like to hide the Region and Site selection options for users that only have one assigned Region or Site, check the appropriate boxes.
- If you would like the request form to auto populate Site, Location, and Asset from the user's previous request, check the Remember My Last Site/Location/Asset box.
Region/Site
This section will only appear if you are editing the Global Template. If you selected a Default Region or Default Site in the general section, you will not see these options when setting up your request template.
- Enter a Section Title.
- If needed, type a Section Subtext. These could be instructions for users to follow.
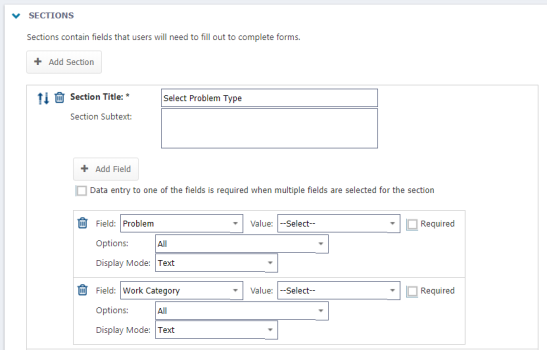
Sections
Sections allow you to customize which fields appear on the request form, as well as specify default values for those fields if needed.
- Click the Add Section button.
- Enter a Section Title.
- Type any Section Subtext if needed. These could be instructions for users to follow.
- Click the Add Field button.
- To make at least one field required in the section, check the Data entry to one of the fields is required when multiple fields are selected for the section box.
- Select one of the following fields from the drop down. Various additional options will appear depending on which field you select.
Location
- Select a Value from the drop down if you would like a default Location to be preselected for the user.
- Check the Required box to make this field required for submission.
Asset
- Select a Value from the drop down if you would like a default Asset to be preselected for the user.
- Check the Required box to make this field required for submission.
Priority
- Select a Value from the drop down if you would like a default Priority to be preselected for the user.
- Check the Required box to make this field required for submission.
Work type
- Select a Value from the drop down if you would like a default Work Type to be preselected for the user.
- Check the Required box to make this field required for submission.
Work category
- Select a Value from the drop down if you would like a default Work Category to be preselected for the user.
- Check the Required box to make this field required for submission.
- In the Options drop down, uncheck the box next to any Work Categories you would like to hide from requesters.
- Choose your preferred Display Mode.
- If you select either Icons or Icon + Text, select the Icons per row and the Rows to display initially.
Problem
- Select a Value from the drop down if you would like a default Problem to be preselected for the user.
- Check the Required box to make this field required for submission.
- In the Options drop down, uncheck the box next to any Problems you would like to hide from requesters.
- Choose your preferred Display Mode.
- If you select either Icons or Icon + Text, select the Icons per row and the Rows to display initially.
Cause
- Select a Value from the drop down if you would like a default Cause to be preselected for the user.
- Check the Required box to make this field required for submission.
Project
- Select a Value from the drop down if you would like a default Project to be preselected for the user.
- Check the Required box to make this field required for submission.
Work requested
- Type a Value in the text box if you would like a default description to be displayed to the user.
- Check the Required box to make this field required for submission.
Documents/Images
- Select the Path you would like the uploaded documents or images to be stored in your Documents Library.
Address fields
- Select Addr #1, Addr #2, City, State/Province, Postal code, or Country to apply those address fields to the section.
- Type a Value you would like to display as a default for any address field that has a text box.
- Select a Value from the drop down menu if you would like a default Country to be preselected for the user.
Area/Room #
*Note: In order for the Area/Room # field to appear as an option, a Global Admin must turn on the 'Display Area/Room #' setting under System Settings within the Admin Configurations.
- Type a Value in the text box if you would like a default Area/Room # to be displayed to the user.
- Check the Required box to make this field required for submission.
- Click the Add Section button to create additional sections on the form.
- Use the arrow (
 ) icons to rearrange the sections, and click the trashcan (
 ) to delete any sections from the form.
How to delete a request template
*Note: If an existing Request was created using a template that is being deleted, that request will remain in the account. However, once a Request template is deleted, that Request will populate with all the pre-configured fields on the Global template and will no longer only display the specific selections made on that Request template.
- Click on the Admin menu icon, then select Configurations.
- Click on Request Templates found under the Template section.
- Check the box next to the Request template you need to delete.
- Click the Delete button at the top of the page then select Delete in the menu.
- Click Yesin the confirmation window that appears.
