COVID-19 tips - Conserve and optimize maintenance
We want you to feel empowered even in today's uncertainty, which is why we're sharing Asset Essentials best practices with you. Please reach out to your Client Success Manager for any questions or concerns you may have about utilizing Asset Essentials for your COVID-19 needs.
We have also created a list of resources to help you stay on top of your operations during COVID-19. Check out the blogs, videos, and podcasts we have compiled on our Brightly website and remember that the Dude is beside you!
Conserving resources by pausing non-critical PMs
There are only so many hours in a day and now that your staff is devoting time to COVID-19 related issues, you may need to conserve your resources and reprioritize some of their existing work. One way to do this is by pausing some of your non-critical PMs, so that they do not generate new work orders during this pandemic.
Creating a PM exclusion condition
- Click on the Admin menu icon, then select Configurations.
- In the Misc section, click on Exclusion Conditions.
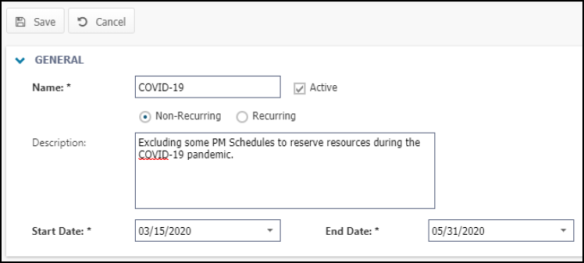
- Click the New button and enter a Name for the PM Exclusion Condition, such as COVID-19.
- Select Non-Recurring and enter a Start Date and End Date. *Note: Since we do not know when this pandemic will end, you can enter an estimated End Date and then return to this Exclusion Condition at a later time to edit the date, if needed.
- Enter a Description, if necessary.
- Click Save.
Applying the PM exclusion condition to non-critical PMs
- Click on the Work Orders menu icon, then select PM/PdM.
- Select all of the non-critical PM schedules that you wish to apply this PM Exclusion Condition to. *Note: Only "Time-Based" and "Time-Based with MR Override" PMs will allow PM Exclusion Conditions to be applied.
- Click the More button at the top of the list and select Update.
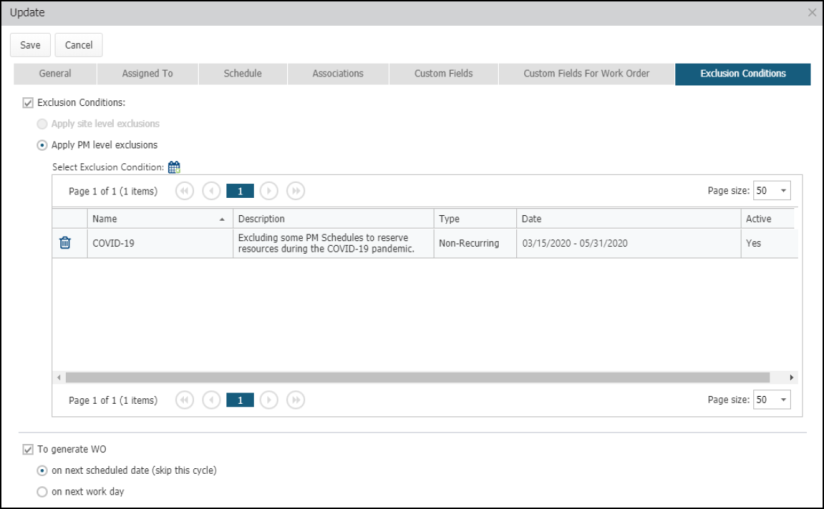
- Click on the Exclusion Conditions tab.
- Check the Exclusion Conditions box and select Apply PM level exclusions.
- Click the Select Exclusion Condition icon (
 ).
). - In the window that appears, check the box next to your COVID-19 PM Exclusion Condition and click Select.
- Check the To generate WO box and choose from the two options:
- on next scheduled date (skip this cycle): The next PM work order generation will take place on the next scheduled cycle after the PM Exclusion Condition date has passed.
- on next work day: The next PM work order generation will take place on the next day, including weekends, that does not include any exclusions.
- Click Save at the top of the page to save this PM Exclusion Condition to the selected PM schedules.
- Once the pandemic is over and your operations are back to normal, you can deactive this PM Exclusion and your PM Schedules will continue to generate work orders as usual.
Focus on critical assets and high priority work
We know you and your staff already have a full plate and now with the additional COVID-19 related work, you are juggling multiple needs and prioritizing that work accordingly. You can use Asset Essentials to communicate the high priority items to your staff by using the Priority field on the work order and the Criticality field on the Asset.
Selecting a priority on a work order
- Navigate to the work order that you are processing from the Dashboard or from the Work Orders summary page.
- In the Work Order Details section, click the Priority drop-down menu and select Critical or High.
- Fill in any other necessary fields, such as the Assignee.
- Click Save at the top of the page to communicate the urgency of this work to your Technicians.
Filtering your work order list to display high priority work
- Click on the Work Orders menu icon, then select Work Orders.
- Click the Columns button, then click the arrow next to Work Order Fields.
- Check the box next to Priority and click Apply.
- In the Priority column, depending on the priority chosen on your work orders, type either High or Critical and press "Enter" on your keyboard.
- Process the appropriate work orders from the filtered list.
Selecting the criticality for an asset
- Click on the Assets menu icon, then select Assets.
- Select the Asset from the list that you need to adjust the Criticality for.
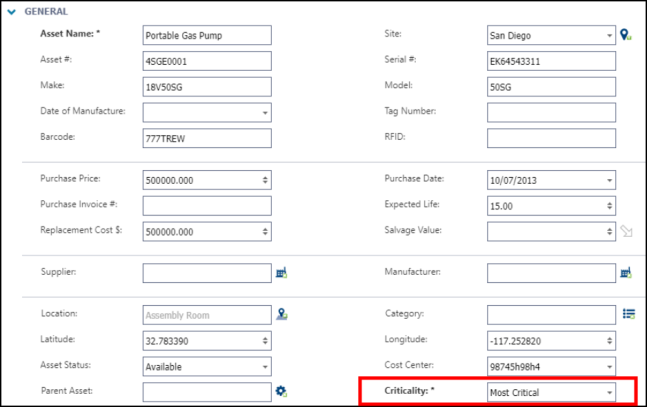
- Use the Criticality drop-down menu to select the appropriate option, such as Most Critical.
- Click Save at the top of the page.
Filtering your work order list to display work tied to critical assets
- Click on the Work Orders menu icon, then select Work Orders.
- Click the Columns button, then click the arrow next to Work Order Fields.
- Check the box next to Asset Criticality and click Apply.
- In the Asset Criticality column, type the appropriate Criticality, such as Most Critical, and press "Enter" on your keyboard.
- Process the appropriate work orders from the filtered list.
Tag and track resources
Social distancing is key in helping to prevent the spread of COVID-19, so it is important to know where your staff is located and to schedule their work accordingly. For assistance on managing your staff you can apply Custom Fields to your users to keep track of essential versus non-essential employees. You can also utilize the Monthly Calendar view to help plan the work for the day so that your Technicians are not working closely to one another.
Creating a COVID-19 custom field
- Click on the Admin menu icon and select Configurations.
- In the Misc section, click on Custom Fields.
- Click the New button.
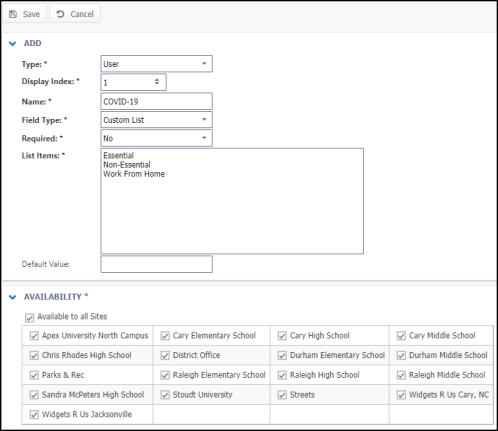
- In the Type drop-down menu, select User.
- In the Name field, enter COVID-19.
- In the Field Type field, select Custom List.
- In the List Items section, add the available fields, such as Essential and Non-Essential.
- In the Availability section, select the Sites that you would like this Custom Field available for.
- Click Save at the top of the page.
Applying the COVID-19 custom field to your staff
- Click on the Admin menu icon and select Users.
- Click on the user you would like to select a COVID-19 status for.
- In the Custom Fields section, select the appropriate option in the COVID-19 drop-down menu.
- Click Save at the top of the page.
Filtering your user list to display your staff's COVID-19 status
- Click on the Admin menu icon, then select Users.
- Click the Columns button, then click and drag the COVID-19 box onto your user list in the correct position.
- The user list will now display the COVID-19 status of each staff member.
Utilizing the monthly calendar
- Click on the Calendar menu icon, then select Monthly.
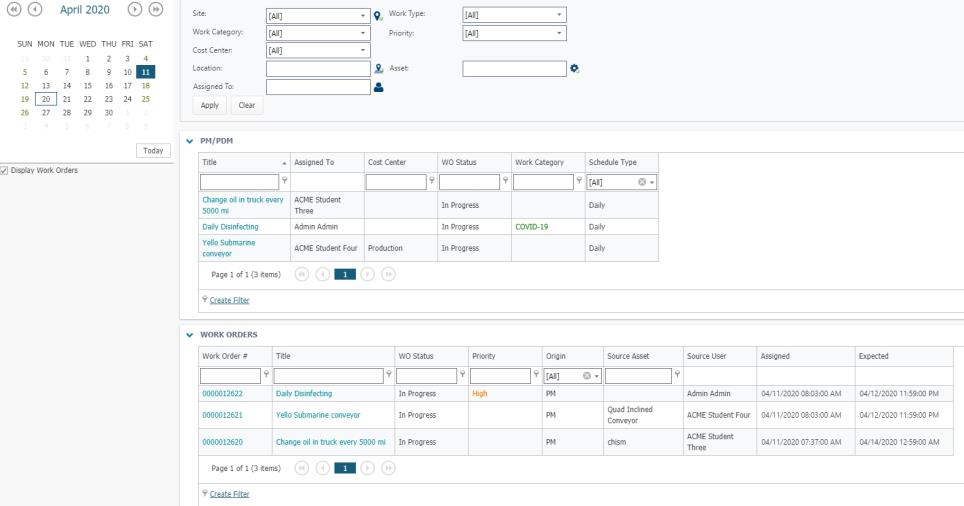
- Check the box next to Display Work Orders on the left side of the page. This will display all PM work orders that will generate on each day as well as all reactive work orders based on their assigned date.
- Click the More Info link below each day to view what work is expected to be completed each day in a grid view.
- You can evaluate who the work orders are assigned to and determine if you need to postpone work due to a Technician scheduled to complete a work order in the same area as another Technician.
